Subscribe to Pleasure in Simple Things via RSS ReaderFollow Pleasure in Simple Things on InstagramFollow @InSimpleThings on TwitterLike Pleasure In Simple Things on FacebookFollow Pleasure In Simple Things on PinterestEmail Jackie

penzys spices

October 5, 2012

friday field trip

I often talk about the amazing spices I use in my cooking and recipes.  Today, since I need to restock on some items, I thought I would make our Friday field trip to Penzys Spices in Norwalk, CT.  I have been to the Penzys location in Grand Central Station in New York City also, but it wasn’t until my lastest visit to the Norwalk store that I discovered there are 68 retail locations!  I never realized Penzys locations spread across the country.

It is extremely easy to become addicted to Penzy’s products.  Once you try something from Penzys, it is impossible to use grocery store spices again…the product is so superior and makes food so much more flavorful.  My visit was prompted by a need for more mulling spice.  Last weekend I used the last of what I had to make some mulled cider to enjoy by a bonfire.  I had been making myself pumpkin lattes lately and needed a change!  Mulled cider is so seasonal and so simple using the Penzy spice combination.

Including Penzy flavorings in holiday baking is an instant way to improve any recipe.  If you want to try a product and one of the 68 stores is not within visiting distance, check out the website:  www.penzeys.com  I really prefer to actually visit the store. I enjoy looking at the variety of products and collecting the recipe cards that are displayed throughout the store.

One of the most important tips about spices that I have learned at Penzys is to store spices AWAY from any type of heat source.  Don’t so many people store their spices on top of the stove?  To maintain strong, fresh flavor, spices need to be stored properly.  Heat, light, moisture and air all speed the loss of flavor and color.  Avoiding light is also important and is the reason spices should be put inside a cupboard or drawer.  Definitely keep any type of open spice rack out of direct sunlight.
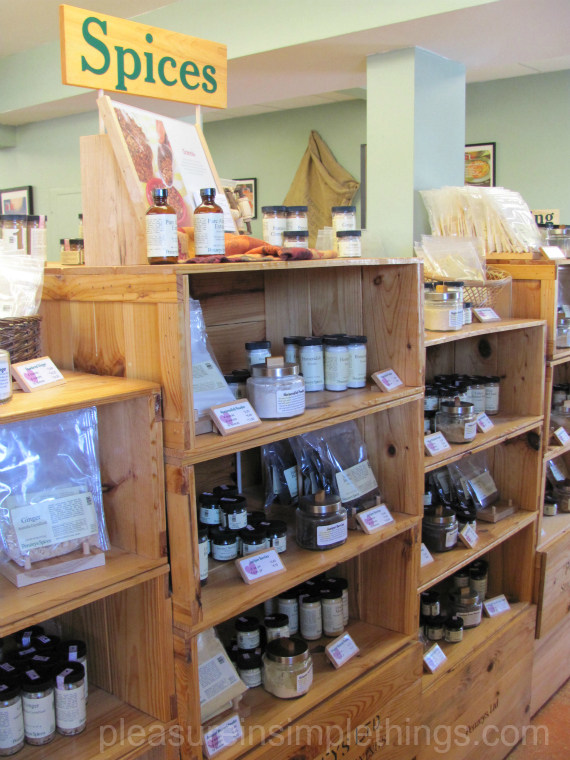
A photo of an array of spices offered for sale at Penzys Spices in Norwalk, CT.


A photo of one of the many gift assortments available at Penzys Spices in Norwalk, CT.

Everyone has their own favorite spices, but I think my favorite from Penzys would be the fajita spice.  I can no longer make chicken fajitas without marinating the chicken in the easy recipe on the Penzys fajita seasoning jar.  It is fabulous.  And, because I love to bake, it would be hard for me to do without the vanilla and cinnamon.  This time of year cocoa, pumpkin pie spice, lemon rind, etc. are all great flavorful items to add to baking.  And, there is a whole chili section in the store!

I asked at the store about the shelf life of the average spice…don’t we all have a few spices we bought for one recipe and have had on the shelf for ages?!  WHAT is that spice lol?!  A good guideline is to buy a one year’s supply of herbs or ground spices, and a one to two year supply of whole spices.  Most spices are havested only once a year, so it does not make sense to discard them after a shorter period than a year.  The flavor components will dissipate over time so it is not wise to keep them long beyond a year.  When in doubt?  Smell it.  If it smells strong and spicy, use it.  If not, toss it.

Next time you are in the market for spices, give Penzys a try…I think you will be glad you did!

Thanks for visiting, Jackie 

3 comments

book giveaway winner for september!

October 1, 2012

Congratulations to Lynn T. from New Jersey for winning the author signed copy of 1,000 Places to Visit Before You Die.  Lynn, I know you will enjoy this book!  You can read a little more about it here  https://pleasureinsimplethings.com/1000-places-to-see-before-you-die/

Now, on to October’s giveaway!

We have a very special book giveaway this month.  In keeping with a favorite October theme (candy!), I have chosen a book that was inspired by Willy Wonka & the Chocolate Factory…seems appropriate for the season :)  BUT, the book is not directly about candy and is not about the making of the popular movie.  Rather, the book uses the movie as a metaphorical backdrop to life lessons.  Whether or not you have seen the movie, this book  Life Lessons From the Chocolate Factory…10 Rich, Satisfying Nuggets to Nibble On reveals the simple, yet timeless lessons we can all embrace to help get hold of life’s real golden ticket –lasting peace of mind.

It is a wonderful book for both reflection and discussion.  And, because of this, Christopher Holl, the author of this book, has arranged for a very special giveaway for the October giveaway.  He has agreed to not only provide signed copies of his book to AN ENTIRE BOOKGROUP (!), but also to make a conference call to the winning bookgroup during a monthly bookgroup meeting to discuss the book!!!!

So, for this very special giveaway, I ask that anyone that is part of a bookgroup send me a message and I will enter you into this special drawing.  Anyone sending me a message or making a comment on the blog, facebook, or twitter during the month of October will be entered BUT you need to let me know that you are a member of a bookgroup and indicate how many members are in your bookgroup.

Christopher Holl, author of “Life Lessons from the Chocolate Factory”,  October’s special giveaway book selection.

Good luck!

 Thanks for visiting, Jackie


no comments

easy candy table favors

September 28, 2012

friday field trip

Don’t you LOVE that section in Target where everything is a dollar?  I can’t walk into the store without stopping to look at everything in that section…I always end up picking up something I have to have!  It is only a dollar, after all!  This trip, I was on a mission to find an item in the dollar section that I can use as a favor to hold candy.  When the college kids are home, it is always fun to include a favor on the table for family dinners.  Candy is a natural with the kids (of all ages) and at this time of year it seems a little more legitimate!  There were quite a few possibilities when I started rummaging through the shelves.  (You can check out a few more of the options on my facebook page  www.facebook.com/insimplethings .)

But, when I came across these zippered burlap ‘pencil cases’, I knew they were perfect!  Plenty of room for candy and very seasonal!

Here is what I did to dress up my $1. find!

First, I decided I wanted to add the word ‘boo’ in black letters.  A personalization or the word ‘treat’ were also options I considered.  I also toyed with the idea of glow-in-the-dark paint, but decided I liked the stronger contrast of the black against the burlap.  I simply stenciled the three letters onto the bag using cardboard stencils and black acrylic paint.  (Slipping a piece of cardboard in the case to protect the other side in the event paint should bleed through.)


I cut a length of ribbon and tied it to the zipper pull.  I chose a black grosgrain with white polka dots.

And, that’s it!!  Great favor for a dollar, don’t you think?  And, plenty of room to fill with candy!  (Oh…I did buy rubber spiders at Target also…they were 4 for a $1!  Love the white polka dots on this one!)

A photograph of a favor for a seasonal table made from an item purchased from the Target $1. section.


Hope you have some fun creating seasonal table favors from Target’s $1. section –  great for those with a sweet tooth ;)

Thanks for visiting, Jackie
5 comments

photo tutorial for velvet pumpkins

September 25, 2012

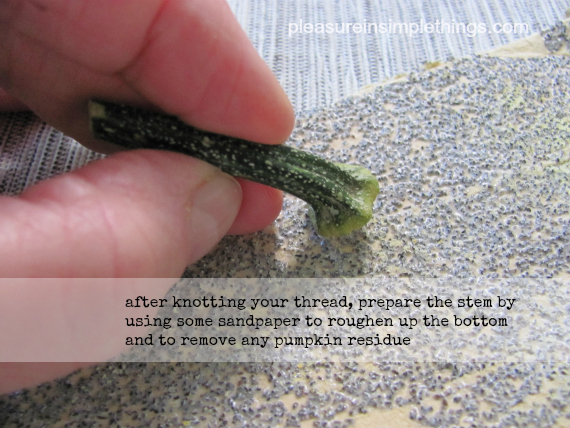
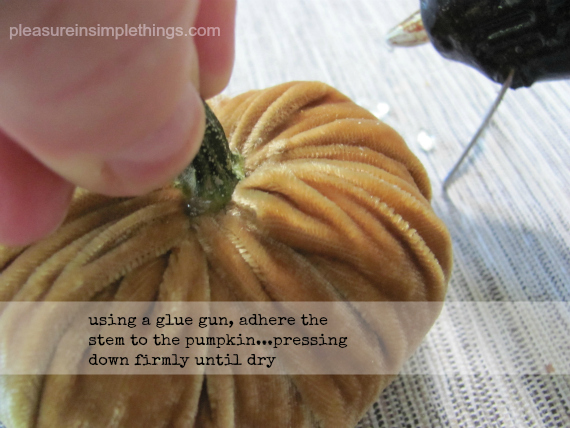
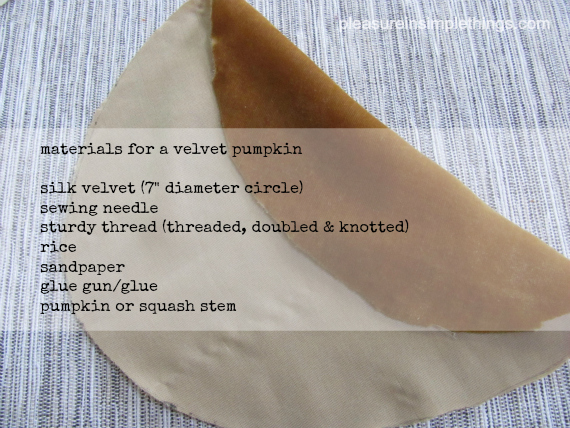
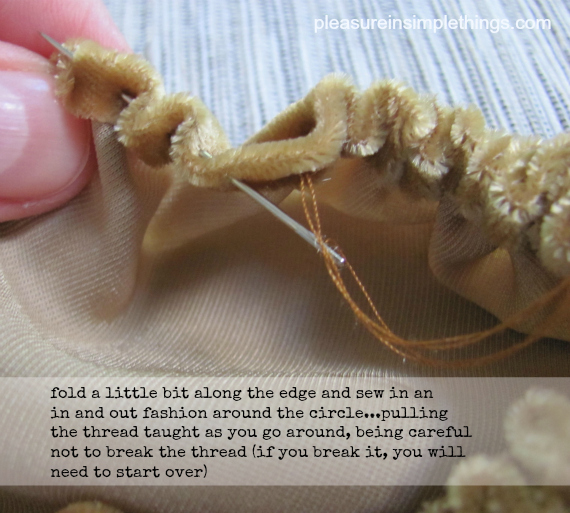
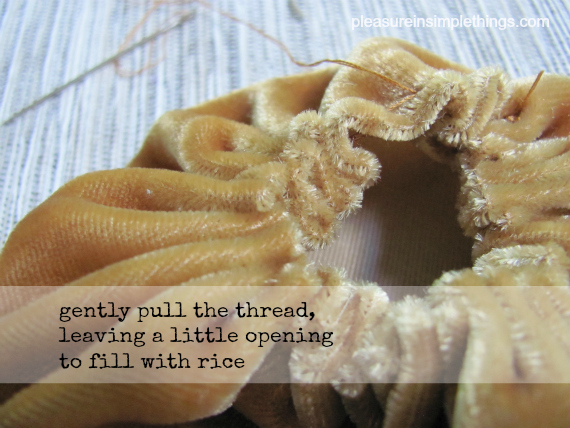
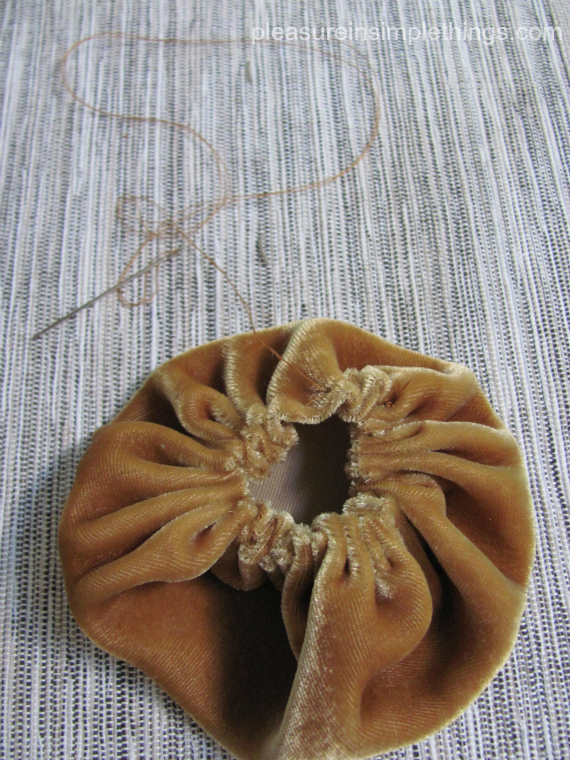
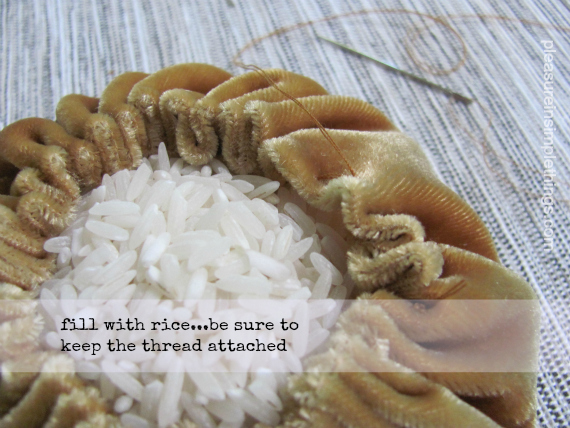
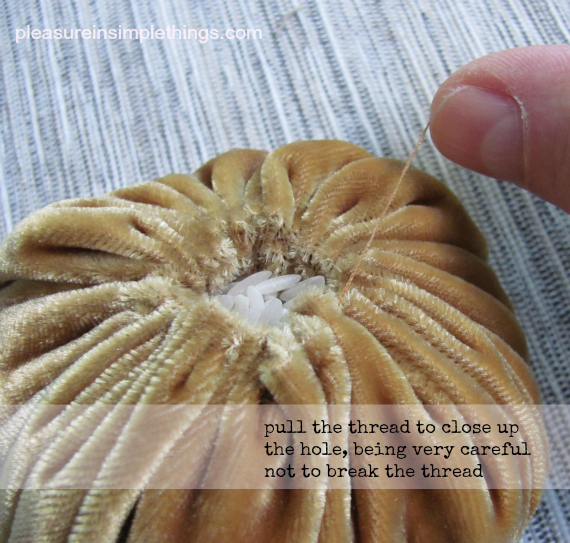
Notes: I decided to try and present directions best I could since I had so many requests for instructions.  I hope this helps.  I think part of the success of this project is to have a beautiful velvet.  I used a silk velvet.  As much as I love white, I think the velvet fabric colors that show depth are more beautiful – you can’t really see depth in the white.  They did not carry silk velvet at the local craft store or many of the fabric stores.  I was able to find it at a fabric store in Norwalk, CT called Banksville Designer Fabrics (www.banksvilledesignerfabrics.com).  I am sure there must be some sources online also, but I didn’t check.  Banksville had a half yard minimum which cost $12.50.  With a half yard you can probably make approximately twenty 7″ pumpkins.  A 5 lb. bag of rice would probably be sufficient for a dozen pumpkins.  Rice is pretty inexpensive, so if you plan on making a lot of pumpkins, buy a huge bag.  Stems can be found at pumpkin farms from unwanted pumpkins or squash.  I think the crazier stems you can find, the better – the stem can really add personality to the pumpkin.  If you don’t have any farms nearby, you can purchase a small pumpkin for a $1 at a grocery store if you have no other way to get a stem.  I think part of the beauty of these pumpkins are the real stems, but I have seen people use sticks from trees or cinnamon sticks on fabric pumpkins.  I think driftwood is also a fun option.  Of course, you can use the same procedure  I demonstrate to make pumpkins from other fabrics. I love to seek out new fabrics…like at Mood in New York City.  I also often use fishing line instead of thread (particularly on larger pieces) since it is so strong and won’t break.  If you aren’t crafty or would rather purchase some really beautiful velvet pumpkins rather than make them, look at http://www.hotskwash.com/hot-skwash-online-store/ .  This is the company that made the pumpkins that inspired me to try and create some and they sell them in an amazing array of colors.  If you have any questions on how I created mine, please send me an email and I would be happy to help you out! 

Thanks for visiting, Jackie
7 comments

homage to fall with velvet pumpkins

September 24, 2012

One of my recent visits to Terrain created an intense love for velvet pumpkins…definitely love at first sight!  O.M.G., why have I never seen these before!  The display in the store was just breathtaking…how incredibly beautiful!  As much as I hate leaving summer, I now have a wonderful reason to celebrate fall…velvet pumpkins!!  So, I spent the first night of fall staying up into the wee hours of the night making velvet pumpkins…they are addicting!!

Here I present my homage to the new season, using my new creations…enjoy!

Because so many have asked, I am going to put together a tutorial (another late night!) on creating these beauties and I will post it tomorrow…if you want to try your hand at making them, check in tomorrow for the instructions.


The pumpkins I saw in Terrain, that created such a stir in my heart, can be purchased in an unreal assortment of colors, on this website: http://www.hotskwash.com/hot-skwash-online-store/  To shop Terrain online:  www.shopterrain.com

Hope you enjoyed my velvet pumpkins!  Remember, if you want to give them a try, check in tomorrow for “how-to” instructions.  Thanks for visiting, Jackie
7 comments

first day of fall

September 22, 2012

Happy Fall!  Thanks for visiting, Jackie
1 comment

healthful eating with claire’s corner copia

September 21, 2012

friday field trip

I developed a renewed enthusiasm towards healthful eating after listening to Claire Criscuolo when I attended a presentation she gave recently at the Trumbull, CT library.  Claire is definitely a Connecticut icon.  Her restaurant, Claire’s Corner Copia, has provided a healthy eating location in New Haven for 37 years – starting long before healthy and organic eating became trendy.  Her philosophy of “flavor first with a healthy edge” dismisses any preconceived notions about healthy food not tasting good.  The “flavor first” is evident when trying the first bite at Corner Copia.  Not surprisingly, the restaurant was named one of the top 10 heart-healthy restaurants in the U.S. by MSN.  Although I have eaten at her restaurant many times, I had never before heard Claire speak about her passion for healthy eating and I sure have been missing something!

Claire grew up in a family of Italian heritage with a mom that served a selection of fresh vegetables every day, many from her own garden…It seems she bypassed the whole “Betty Crocker” era of casseroles and Shake ‘n Bake.  Instead, the Criscuolo family ate the way many of us aspire to eat – fresh and healthy with no processed foods and plenty of fruits and vegetables.  When people tell Claire she is forward thinking, she responds by saying that she is backward thinking – eating the way her parents did – like “the old days.”

Claire’s Italian mom told her not to “cheat her stomach” and Claire has definitely taken those words to heart.  Her continuing commitment to educating herself about healthy eating is demonstrated in many ways…most recently by her meetings with researchers to address how food preparation can aid with eliminating cancers.

The session at the library contained a cooking demonstration* for a healthful and tasty salad and was packed with tips for incorporating great foods into daily eating.

*If you want to try one of the recipes from Claire’s newest book, I have included the recipe for the salad she prepared for us at the end of this post.

Probably the #1 tip I took away from the session was to BE PREPARED.  Things seemed to click into perspective for me when Claire asked the attendees why it is that everyone can spend so much time researching the latest iphone, but not the food they put in their bodies?  The key to  being prepared is to always have great food choices available in your home.

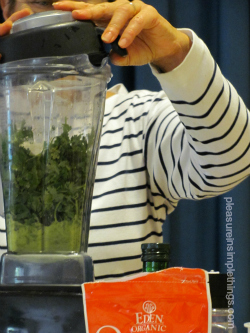
Claire has a smoothie for breakfast most days – something I have quickly adopted since I always seem to be too busy to think of a sit-down breakfast.  She always has organic fruit in her freezer and organic spinach in her fridge (part of that ‘being prepared’ thing!).  Unsweetened coconut milk or herb tea can serve as the liquid.  Cinnamon and honey are healthy additions.  I may need to put a juicer on my Christmas list!

Claire is a big proponent of making soups; suggesting this is a wonderful way to add extra fruits and/or vegetables to a meal.  Her idea of hosting a soup exchange will definitely replace the cookie swap on my holiday calendar!

Claire’s store even makes their own cleaning supplies, which you can easily replicate by following the directions on the store’s website (www.clairescornercopia.com  click on recipes and scroll down to household cleaning).

If you haven’t yet been to Claire’s Corner Copia and happen to be in the New Haven area, the restaurant is located on the edge of the Yale campus, right on Chapel Street.  And, if you are genuinely trying to incorporate more healthful eating into your life, I would definitely recommend checking out Clarie’s books – the most recent title is  Welcome to Claire’s.  At the very least, I hope this post motivates you to spend a few extra moments thinking about your food choices…the time I spent with Claire certainly did that for me!

Chimichurri Quinoa and Bean Salad

  • salt
  • 1 cup quinoa
  • 2 cloves garlic
  • 1 bunch cilantro
  • 1 bunch Italian flat-leaf parsley
  • 3 tablespoons fresh oregano, or 1 tablespoon dried
  • 1/4 – 1/2 teaspoon crushed red pepper flakes
  • 1 small jalapeno pepper, coarsely chopped
  • 1 tablespoon white vinegar
  • 2 tablespoons freshly squeezed lemon juice (from about 1/2 lemon)
  • 3 tablespoons freshly squeezed orange juice (from about 1/2 orange)
  • 1 cup grapeseed oil, dairy-free mayonnaise, or other mayonnaise
  • pepper, to taste
  • 1, 12 ounce can organic black beans, drained
  • 1 medium carrot, peeled and diced
  • 1 small sweet organic onion, diced
  • 12 sweet grape tomatoes, halved
  • 1 large broccoli crown, florets separated into small pieces

Bring 2 cups of lightly salted water to a boil in a medium covered pot over high heat.  Reduce the heat to low-medium and add the quinoa.  Cover and cook at a simmer for about 25 minutes, until the water is absorbed and the quinoa is just tender.

Turn the quinoa into a large bowl, and using two forks, toss the quinoa to fluff it and to separate the grains.  Set aside to cool, occasionally tossing the quinoa to facilitate cooling.

Meanwhile, prepare the chimichurri.  Place the garlic, cilantro, parsley, oregano, pepper flakes, jalapeno, vinegar, lemon and orange juices, oil or mayonnaise, salt, and pepper in the bowl of a food processor fitted with a metal blade.  cover and process for about 30 seconds until well blended.  Taste for seasonings.

When the quinoa is cooled to room temperature, add the beans, carrot, onion, tomatoes, and broccoli.  Using two wooden spoons, toss to combine.  Add the chimichurri and toss well to coat.  Taste for seasonings.  Serve at room temperature or refigerate for up to 2 days.  Toss again before serving.

Hope you enjoyed this visit with Claire from Claire’s Corner Copia!

Thanks for visiting!  Have a wonderful weekend, Jackie

2 comments

5 ways to add design personality

September 18, 2012

The best part about home design is adding your own style to your decor.  I would like to share 5 simple tips that can add instant design personality to your home.

INCORPORATE FAMILY MEMORIES.  A great way to anchor your home decor is through pieces that have special family meaning.  How wonderful to see an old family item passed down through the generations, or something that has special meaning in your family, every time you walk into a room.  If you don’t have something like this already, it is easy to collect some items from other family members that you can incorporate into your decor.  I have done this a lot over the years in my home.  I even have one room in my home aptly named ‘the nostalgia room’ that is decorated entirely with old family items and photos.  An old black and white family photo framed in a spectacular or trendy way, or a piece that reminds you of a particular family member, can create instant personality.  An old sign from a family business, your grandfather’s favorite fishing pole hanging on a wall, your grandmother’s favorite lamp – anything that has some family significance can make a creative design piece with personality!

A great way to anchor your home decor is through pieces that have special family meaning.

ADD TEXTURES.  Varying the textures of the materials you use in your decor adds great visual interest.  Incorporating different textures into a room full of neutrals gives instant visual interest and is a design element all on its own.  A monochromatic color scheme is instantly transformed with the use of varying textures.  Think about mixing textures you love when you purchase items for your home.  Any color scheme is enhanced with a clever mix of textures.

Varying the textures of the materials you use in your decor adds visual interest.

CREATE ORGANIZATION.  The way you choose to organize not only makes you feel great by creating order, but also can serve as a design element.  If you look at organization in this way, it is a simple step to add style to your home.

One way I do this in my home is in the way I organize my books.  The way I incorporate them into my decor is the way I cover them.  This is the simplest, but most beautiful way to turn books into a design element.  Use your favorite wrapping paper, nautical or street maps, old sheet music, or even brown paper.  Think about your interests and the color schemes of the rooms where you shelf your books.

Closets can be organized in a visually pleasing way using baskets or attractive containers.  Keep your rings in a pretty dish that matches your decor when they aren’t being worn.  In the kitchen, utilize attractive jars to house those daily calcium tablets!

The way you choose to organize not only makes you feel great by creating order, but can also serve as a design element.

USE SOME PLAYFUL PIECES.  As in life, it is not a good idea to take your decorating too seriously – add some fun accessories to give your home decor personality and to make you smile.  This is an easy thing to accomplish with little expense and can be utilized anywhere in your home.  I like to find playful kitchen items that can make even the most mundane task seem fun.  There are plenty of ways to add whimsy to your decor, particularly in accessories.

As in life, it is not a good idea to take your decorating too seriously.

REMEMBER OUTDOORS.  Don’t miss the opportunity to utilize great decor outdoors.  Simple items can make a big difference and this is especially true outdoors.

One example at my home was my clothespin holder.  The holders traditionally sold for clothespins were visually annoying.  I bought a basket for much less than a traditional clothespin holder and stained it using leftover stain from my house…now I love the way it looks!

White plastic doorbells are another eyesore, but SO easy to change up.  House numbers are also an easy item to replace and can be a big visual element – a great way to showcase your personality by the style of numbers you choose.  Planting your seasonal flowers in colors to complement your front door is an easy way to make your plants a great design element.  Adding design features to your garden is also an instant way to add personality and can make your weeding session more fun!

Be sure, also, to use pieces you really love for outdoor dining or entertaining.  I love the acrylic water glasses I found for my outdoor entertaining.  Clearance racks are filled with outdoor dining accessories at this time of year and some smart purchases now are sure to put a smile on your face come Spring!

Don’t miss the opportunity to utilize great decor outdoors.

Hope you enjoyed these five simple tips to easily add your own design personality to your home.

Need some ideas for something in your home that you’d like to turn into a design element?  Send me an email, I would love to help!

Thanks for visiting, Jackie
3 comments

10 arts in philly

September 14, 2012

friday field trip

On one of the really hot weekends this summer, I had some time to kill wandering around Center City, Philadelphia waiting for my daughter to finish classes (yes, she attends class all through the summer)…I thought I would visit the lobby of the Ritz-Carlton so I could AGAIN check out 10 Arts (…how many visits would qualify as an obsession?). I always hope, somewhere in the back of my mind, that I will run into Chef Ripert on what, I assume, is his occasional visit to Philly.

My daughter attends school in Philly and one of my ‘Philly goals’ has always been to dine at 10 Arts Bistro & Lounge. This is Eric Ripert’s restaurant. You probably know of four star Chef Ripert because of his fame with Le Bernardin in New York City…how could you not? That, and the fact that he is, um…how should I say it…gorgeous! (Honestly, there is no way around it!)

10 Arts is in a magnificient location – in the Ritz-Carlton hotel in Center City. Because the building was a bank at one time, it

has some really cool features. The interior is mostly marble…I have heard the kitchen is too, although I haven’t seen it for myself.

Anytime I am in Center City, I stop in, look around (aka gawk) and talk to some of the staff.

Photo of lunch, 10 Arts style


A photo of dessert at 10 Arts Bistro & Lounge in Philadelphia…frozen snickers.

If you follow Food Network or the cooking shows (like you know I do if you have been reading my blog), you may know that my favorite former Top Chef competitor, Jennifer Carroll was selected by Chef Ripert to lead his kitchen at 10 Arts after she served as sous chef at Le Bernardin. It has been reported that Jen, a Philadelphia native is soon to open a restaurant of her own at 33 Greenwich Avenue in New York City…I bet the Philly fans are disappointed she didn’t stay local! I would be! But now I will be closer to where she will be creating her food and I plan to visit her restaurant, especially since I haven’t yet gotten the chance to meet her.

So enjoy the photos of 10 Arts and, if you are ever in the area, be sure to stop in. I plan on spending my daughter’s graduation dinner in those beautiful surroundings! And, I hope to visit Jen’s restaurant in NYC soon and I will share that with you when I do.

Thanks so much for visiting. Have a great weekend, Jackie

no comments

diy paint can packaging

September 11, 2012

Candy in a can.

They say the way to a man’s heart is through his stomach…the reason food is always an accepted and appreciated gift for any guy. Most guys (or anyone, for that matter) have a special dessert or snack that they particularly enjoy and giving it for their special day can only bring heartwarming smiles . Whether it be pistachios, homemade brownies, popcorn…whatever. In the case of a young relative, it is candy…he apparently inherited a sweet tooth …couldn’t tell you from who ;)

His birthday is coming up and I want to collect some of his favorite confections and package them in a clever way as part of his gift. I am going to use a paint can…doesn’t seem appropriate to go to Home Depot to pick up birthday packaging? Actually, the small paint can is less than $3., so it costs less than some gift bags. Plus, I really enjoy repurposing items in an unconventional way. The bigger cans can be fun for gifts also. And, since they have handles, there are infinite possibilities for cool ‘tie-ons’. For food gifts, I prefer the smaller size especially since I don’t really want to encourage the consumption of the amount of sweets the large size can would accomodate! (The large cans are great for holiday gifts…keep this in mind come December.)

While I am at Home Depot, I also pick up some paint sample swatches…I use them for so many craft projects…they are like construction paper for the adult craft set. They make great gift tags, mats for small photos, etc. And, of course, they come in virtually any color. (I also keep a stack of sea-colored swatches on my desk that I use for note paper.) For this project, I grab some swatches in nautical looking colors since that is what I envision for this gift. I know I want to put some Swedish Fish in the can and the nautical theme will work well with that in mind.

A photo of my paint can packaging. This one is decorated with an anchor cut from chalkboard Contact paper.

A photo of a candy gift packaged in a decorated small paint can.

As it turns out, when I get home I decide to use some leftover chalkboard Contact paper to decorate the can. I cut a piece in the shape of an anchor. I also decorated a second, more ‘adult’ themed can to show you that it is possible to create a more sophisticated look using paint cans as packaging.

So, with a glue gun and some scrap materials, a couple of paint cans are transformed into some great gift packaging. The beauty of these cans is that they mail really well – great to send off to those college kids at Valentines Day, Halloween, or at finals time.

A photo of paint can packaging using more of a sophiscated style…I used scrap ribbon, squares cut from paint sample swatches, and a starfish – all attached using a glue gun.

I just

love the novelty of the recipient having to open them with a screwdriver ;) If you are sending them off to your college student and you don’t think they have a screwdriver, include one in the box – everyone should own a screwdriver.

Have fun creating some designs of your own. If you need some particular theme ideas, I would be happy to help.

Thanks for visiting, Jackie
2 comments

Back to top