Subscribe to Pleasure in Simple Things via RSS ReaderFollow Pleasure in Simple Things on InstagramFollow @InSimpleThings on TwitterLike Pleasure In Simple Things on FacebookFollow Pleasure In Simple Things on PinterestEmail Jackie

Tag: diy


abc valentine magnet gift

22
January

gum magnet valentine gift pleasure in simple things blog

For today’s Friday field trip, we are taking a trip into the archives to make gum magnets! They look just like pieces of chewed gum, but are actually magnets!

abc gum magnets pleasure in simple things blog

I originally came up with this idea as an April Fools’ Day gift, but they make a wonderful Valentine’s Day gift with a ‘stuck on you’ card attached! A cute, wrapped up set of gum magnets makes a great gift for a child or anyone with a good sense of humor! If you use these for messages, you may see some double takes when anyone walks past the refrigerator!

Click here for the original instructions to make gum magnets.

valentine gift pleasure in simple things blog

Have a wonderful weekend! Here in Connecticut, it looks like we may get our first significant snowfall…I am kind of looking forward to it!

Thanks for stopping by. Remember to take pleasure in simple things, Jackie

P.S. What is abc?  Already been chewed, of course!

Comments Off on abc valentine magnet gift | diy, gift ideas

love you to pieces

19
January

diy valentine gift canvas pleasure in simple things blog

So far, the valentine ideas I have shared involved puns and treats. But, it is possible to be ‘punny’ with other types of gifts as well. Today, I am sharing a gift of a painted canvas.

I have made this gift for a new baby, but it can easily be made as a Valentine’s Day gift. It can be done with traditional Valentine’s Day colors of pink or red or with a color to match a specific décor.

In my case, I wanted to use lavender and gray to match the room of the gift recipient. I also decided to personalize the gift by adding the baby’s name.

painted a valentine canvas pleasure in simple things blog

I started with an 8” square canvas. I used acrylic paint in lavender and gray to paint the entire surface. After that was dry, I used a pencil – with a very light hand – to draw a heart and the writing I intended to add to use as a guide.

Next, I used an oil paint marker to add “love you to pieces” and the personalization I wanted, writing over the pencil marks.

diy valentine canvas pleasure in simple things blog

I used Mod Podge with a matte finish to add the “pieces.” I painted the penciled heart shape, and the places below the heart that I wanted the glitter to attach, with the Mod Podge. Then, I sprinkled gold glitter onto the painted areas. The main part of the heart got a thick coat of glitter while the bottom section was sprinkled lightly.

painted a valentine gift canvas pleasure in simple things blog

That’s it! Doesn’t it make an adorable little Valentine’s Day gift for someone special? I hope I have inspired you to make one!

Thanks so much for stopping by!

Remember to take pleasure in simple things, Jackie

2 comments » | diy, holiday, inspiration

valentine pillow box diy

12
January

You rock valentine diy candy box

Yes, I am still making ‘punny’ valentines!  Today, I want to show you how easily you can make a pillow box to use for some Valentine’s Day treat boxes.  All you need is a cardboard tube and a paper cocktail napkin!  For my treat box, I am using napkins that have a graphic of river rocks that is very appropriate considering what I plan to put into the container – candy rocks!

napkin for gift box diy pleasure in simple things blog

If you don’t have a napkin with a pattern you like, you can use any wrapping paper or decorative paper you choose. By using a cardboard tube and a paper napkin I already had, I am creating my pillow box at no cost.

The first step is to cut a piece of napkin that will cover the tube.  Use spray adhesive to spray the wrong side of the napkin.  Roll the tube over the paper napkin to cover.  Once the cardboard is covered, flatten the tube.  At one end of the tube, push each side into the middle of the tube, one side at a time. (See photo below – bottom right.)  Fill the tube with your desired treats.  Fold the open end of the tube in the same manner you did for the closed end.  Simple, right?

pillow box diy pleasure in simple things blog

Such a fast and easy way to create a Valentine treat container!  You can decorate your container like I did with a chalkboard sticker and ribbon, or in any way you choose.  Now, you just need to come up with the corny pun to go with your treat! :)

pillow box with bow pleasure in simple things blog
Thanks so much for stopping by!

Remember to take pleasure in simple things, Jackie

Comments Off on valentine pillow box diy | diy, gift ideas, inspiration

message in a bottle ornament diy

4
December

message in the bottle diy by pleasure in simple things blog

My imagination is in overdrive this year for my ornament designs since I chose sea glass as my holiday theme and I love anything with a coastal theme! I have so many ornament ideas, but I am limiting myself to a few designs because there is so much to accomplish in preparation for the holidays and not enough time to do it all!

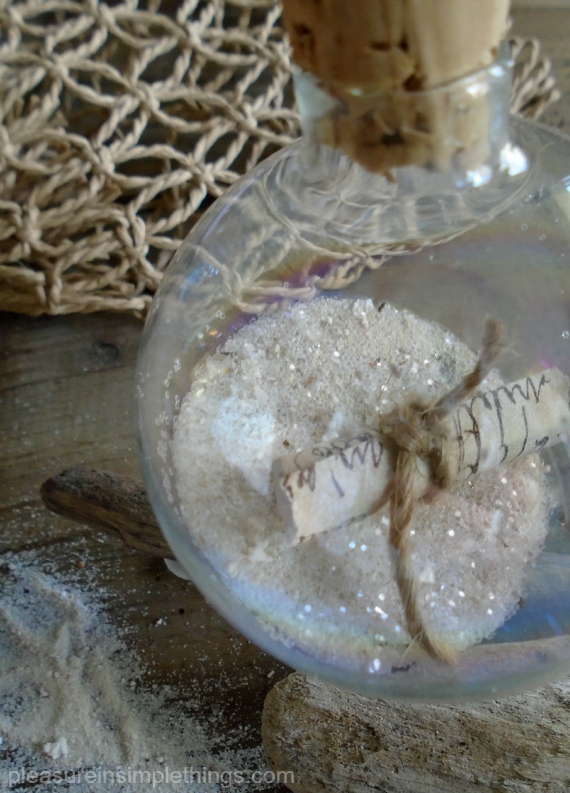
One ornament I knew I wanted to create was one that was inspired by a message in a bottle. Today, for Friday field trip, I am providing the instructions to make this easy to create ornament. I chose to use an iridescent, clear glass, hollow globe ornament instead of the obvious choice of a small bottle.

message in a bottle ornament supplies pleasure in simple things blog

Rather than write the ‘message’ myself, I opted to use a scrap of paper that already had writing on it, ripping the edges before rolling it up and tying it with a small scrap of twine.

I removed the top that came with the ornament and I poured some sand into the globe. Since it is the holidays, a little optional glitter is a nice addition to the sand! Next, I added the prepared message.

I replaced the top of the ornament with a cork. It is really simple to repurpose a cork since it is easy to trim with a knife to the size needed. After trimming the cork to the size I needed to fit snuggly in the top of the ornament, I screwed in a small screw eye and added a piece of twine for hanging. Any scrap of thin ribbon or rope will do in place of the twine.

making a message in the bottle ornament pleasure in simple things blog

That’s my ‘message in a bottle’ ornament! Easy, right?  This is a wonderful ornament to make as a gift for a newly married couple.  Use sand from their honeymoon for inside the ornament and write their wedding date or a love note on the ‘message!’

I hope I have inspired you to create your own message in a bottle ornament!

Thanks for stopping by! Have a wonderful weekend and remember to take pleasure in simple things, Jackie

Comments Off on message in a bottle ornament diy | diy, holiday, inspiration

whale ornament diy

20
November

making a diy whale ornament pleasure in simple things blog

For Friday field trip today, I am sharing instructions on how I created my first ornament design for holiday 2015 to coordinate with my sea glass theme…a whale! And, I made him in a sea glass shade!

I started by drawing a whale outline on a thin piece of scrap cardboard. I used the cardboard as a template to cut out the shape of the whale from the clay. If you are not big on drawing, you can certainly find a pattern online to print out and trace.

diy whale ornament template pleasure in simple things blog

Once I had my template completed, I prepared the clay. Softening the clay in my hands, I formed it into a ball and rolled it out with a rolling pin, as I would for cookie dough, to a ¼” thickness. Then, using my template as a guide, I cut out the whale shape using a dull knife. I added a hole in the top of the ornament using a straw – this is where I would add my wire for hanging. Following the directions on the package of the clay, I baked the shape in the oven.

 template and clay pleasure in simple things blog

Whale Ornament Supplies Needed:
• Modeling clay, 1 -2 oz. per ornament – will vary depending on size of ornament (my whale is 4” x 1 ½”)  I used FIMO in the desired color for finished ornament
• Rolling pin
• 20 gauge black wire
• Cardboard template (optional) or cookie cutter
• Acrylic paint in black and white
• Thin paint brush

I was surprised how easy the clay was to use and how sturdy it was when it came out of the oven.  Once the ornament was completed, I used the black wire to form a ‘spout’ of water. Twenty gauge wire is easy to shape without any special tools! I made one end into a ‘spout’ and I wrapped the opposite end of the wire through the hole I had created with the straw.  My whale looked great already!

diy whale ornament pleasure in simple things blog

As an optional step, I decided to sand the edges some – just to make them look a little less angular. (For a vintage look, rub a little bit of Annie Sloan dark wax to the edges of the ornament.)

Now. all I needed to do was to add the whale’s eye. I did this with a little bit of acrylic paint and a thin paint brush – first a little dot in white, and then a smaller dot in black.

I completed my first ornament design for 2015!  I will be making a few more in sea glass shades before the tree goes up!  My whale may also get a little clear glass glitter for sparkle. :)

final whale ornament pleasure in simple things blog

Have I inspired you to make your own whale? Or, maybe a variation on the design? You can use the same process to create something to coordinate with your own holiday theme.

Thanks for stopping by! Have a wonderful weekend and remember to take pleasure in simple things, Jackie

Comments Off on whale ornament diy | diy, holiday, sand & sea

diy sea themed advent calendar

10
November

sea glass diy advent calendar pleasure in simple things

I haven’t gathered up all the supplies I will need for my sea glass themed Christmas décor just yet, but I have been working on a few things and today I am sharing this year’s advent calendar.

The design I came up with to coordinate with my sea glass themed holiday, although a simple one, produced really beautiful results!

shell for a diy advent calendar pleasure in simple things blog

I started with Halloween candy from the clearance rack of a discount store. You know, that 75% off stuff?!

pleasure in simple things diy beach themed advent calendar

I wrapped up pieces of candy (the little boxes work really well) – one for each day – in white paper. With some natural twine, I tied a little beach find to each package…a piece of sea glass, a rock, a piece of driftwood…

white sea glass advent calendar pleasure in simple things blog

Then, I added a number to each.  (I made the numbers by printing them onto clear labels using my home printer and adhering them to each package.)

Next, I arranged each wrapped ‘day’ onto a wooden tray. So simple, yet so beautiful! Tucking a string of battery operated mini lights into the arrangement will add a beautiful glow to the natural materials I collected on the sand.

pleasure in simple things sea glass advent calendar diy

The perfect advent calendar for my sea glass Christmas theme! What do you think?

diy advent calendar sea glass pleasure in simple things blog

If this coastal look doesn’t go with your holiday theme, there are certainly many ways to change up the wrapped candy to accommodate whatever your theme may be. Here is an example of a variation using birch bark stars on the boxes instead of beach items. See how easy the calendar can be changed up to go with an outdoors theme? Use paper and decorative items that best fit with your décor. Then, arrange the packages in a basket, a silver bowl, a clear jar, or lined up on your mantel – whatever works for your holiday theme!

birch bark stars advent calendar pleasure in simple things blog

I hope I have inspired you to create your own version of an advent calendar. Seas & greetings! ;)

Thanks for stopping by! Remember to take pleasure in simple things, Jackie

Sharing with Sand & Sisal, Thoughts from Alice, and Finding Silver Pennies.

Comments Off on diy sea themed advent calendar | diy, holiday, inspiration, sand & sea

in the pink

16
October

a pink pumpkin place setting arrangement pleasure in simple things blog

For Friday field trip today, I am sharing a sweet little pink pumpkin arrangement.  You know I love putting flowers or plants in pumpkins!  Aren’t these cute for each place setting at a breast cancer charity event?

I used little baby boo pumpkins – you know, the little white ones?  I started by painting each pink.  I just used regular flat, latex house paint.  After they were dry, I cut the tops off and cleaned the inside.  I used a little soaked floral foam inside each pumpkin and stuck my pink zinnas in it.

pink pumpkin arrangements pleasure in simple things blog

Simple and adorable!

Try other colors based on the theme of your event or the decor in your home.  Or, maybe make some in fall colors for your Thanksgiving table!

pink baby boos pleasure in simple things blog

I hope I have inspired you to create a little pumpkin arrangement of your own!

Have a wonderful weekend!  Remember to take pleasure in simple things, Jackie

Comments Off on in the pink | diy, garden, inspiration

diy mini mummy pumpkins

22
September

mini mummy pumpkins pleasure in simple things

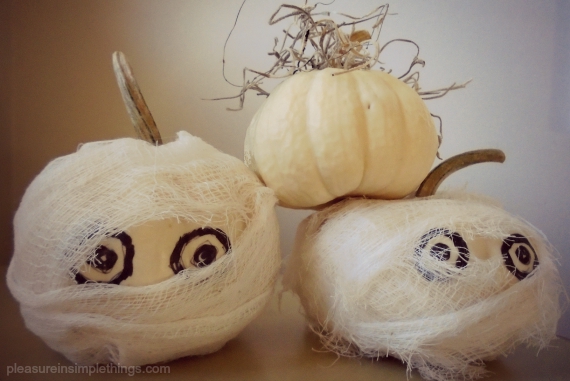
I was inspired by a Pottery Barn pillow to create some pumpkin mummies for a child’s Halloween display.

They are super simple to create and so darn cute! All you need are a few baby boos (mini white pumpkins), cheesecloth, a glue gun, and a black permanent marker.

Start by using the permanent marker to draw two eyes on the pumpkin – reference the photos here to guide your placement.

diy mini mummy pumpkin pleasure in simple things

supplies for a mummy pumpkins pleasure in simple things

Next, cut a long strip from the cheesecloth, approximately 1” – 2” wide. This can be adjusted based on the size of the pumpkin.

Wrap the cheesecloth around the pumpkin, keeping it in place by attaching it with beads of glue from the glue gun as you wrap. Be careful not to burn yourself – don’t push down the cheesecloth with a bare finger – because the cheesecloth is so porous, the hot glue will go right through to your fingers!

Also, be sure not to cover the drawn eyes completely! They need to peer through the cheesecloth!

diy mini mummy pumpkins by pleasure in simple things

There you have a pumpkin mummy! It is sure to add some whimsy to a Halloween table! Make one or a whole bunch! Wouldn’t they make adorable favors for a Halloween party? Or, a great gift for a favorite teacher?

Have fun with it!

Thanks for stopping by! Remember to take pleasure in simple things, Jackie

Comments Off on diy mini mummy pumpkins | diy, holiday, inspiration

plaster of paris leaves

15
September

basket of plaster of paris leaves pleasure in simple things blog

Last week I talked about ‘neutralizing’ fall and I demonstrated how to get started with some pine cones and bleach. This week, I am continuing on my quest to ‘neutralize’ natural elements for my fall décor.

plaster of paris leaves with gold pleasure in simple things blog

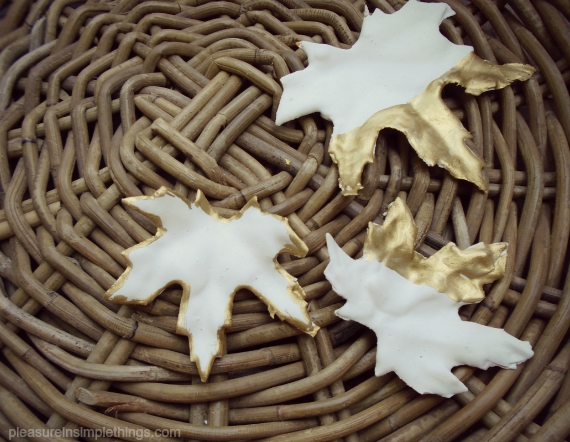
Today, I am ‘neutralizing’ leaves! Actually, in this instance, the leaves are not natural elements – I am using super inexpensive fabric leaves. The way I ‘neutralize’ them is super easy and super messy! I use plaster of Paris to add a porcelain-like look to the leaves.

Plaster of Paris is one of those things every crafter should have in their workshop. There are so many uses for it and it is very inexpensive. Plaster of Paris is a dry powder that is mixed with water to create a mixture that hardens. It can also be mixed with paint to create homemade chalk paint.before and after plaster of paris leaves pleasure in simple things blog

To make the leaves, I simply mix up some of the plaster (2 parts plaster of Paris to 1 part water) and use it to cover the leaves. I use a disposable plastic cup as a measure and stir the mixture with a paint stirrer or plastic spoon in a disposable container. Believe me, you don’t want to keep any utensils you use for this project – it gets very messy! The plaster gets thick pretty quickly, so I don’t waste a lot of time as I dip each leaf to coat, one at a time, into the mixture. I also keep an inexpensive paint brush handy to add extra plaster as needed.

plaster of paris gilded leaves pleasure in simple things blog

Once the leaves are covered, they are left on wax paper or parchment paper overnight to harden completely. A leaf can be draped over a plastic cup to dry with a curve, if desired.

forming a plaster of paris leaf pleasure in simple things blog

The plaster leaves, once dry, can be enhanced with paint or glitter. I like to use metallic gold paint to paint the edges or create a ‘dipped in paint’ look.

These plaster leaves look great on a table, in a bowl, or as part of a fall display. Adding a name to a single leaf with a paint pen turns it into a great looking and unique place card! I use gold thread to make a garland of leaves for a window. (A hole can be added for hanging the leaf, but this must be done as a first step – before the plaster is added! )

add gold thread to hang a plaster of paris leaf pleasure in simple things blog

I hope I have inspired you to ‘neutralize’ some leaves!  Have fun with it!

Thanks for stopping by!  Remember to take pleasure in simple things, Jackie

Sharing at Shabby Nest.

Comments Off on plaster of paris leaves | diy, inspiration

neutralizing fall

11
September

a bleached pine cone with glitter pleasure in simple things blog

It seems everyone is bleaching pine cones these days – and rightly so! For those of us with a passion for neutrals, pine cones can now be happily included in our fall decorating mix!

For Friday field trip today, I am demonstrating the start of how I ‘neutralize’ fall! Since I was in the woods last weekend, it was the perfect time to collect and bleach some pine cones.

pine cones before bleach pleasure in simple things blog

I prefer a 50/50 bleach and water mix in a plastic bucket; keeping the pine cones in the solution 24 hours and drying them outdoors in the sun. If you haven’t bleached pine cones before, be warned that they close up when wet. It gets a little scary when you see them this way, but they open up as they dry.

bleaching pine cones in the woods pleasure in simple things blog

Since the pine cones will float in the bleach solution, I put some paper plates on top of the pine cones and added a few rocks to be sure they were covered completely in the liquid.

That’s all there is to it! Those dark brown pine cones are transformed in a beautiful neutral hue!

a bleached pine cone pleasure in simple things blog
I like to dip the tips of the bleached pine cones into some white or off-white paint or to add a little glitter (like I did with this batch) for some added sparkle!

I hope I have inspired you to do some ‘neutralizing’ of your own! Stop back next week and I will demonstrate how I ’neutralize’ acorns and leaves!

Have a wonderful weekend! Remember to take pleasure in simple things, Jackie

Comments Off on neutralizing fall | diy, inspiration

Back to top