Subscribe to Pleasure in Simple Things via RSS ReaderFollow Pleasure in Simple Things on InstagramFollow @InSimpleThings on TwitterLike Pleasure In Simple Things on FacebookFollow Pleasure In Simple Things on PinterestEmail Jackie

earl grey – lavender hot chocolate

January 13, 2015

recipe for earl grey lavender hot chocolate pleasure in simple things blog

Do you have a favorite hot beverage for a cold winter morning? Hot cocoa? Mulled cider? How does Earl Grey-Lavender Hot Chocolate sound? Granted, it is not for the faint of heart…a decadent, chocolaty drink with a wonderfully fragrant lavender and Earl Grey flavor combination.

enjoying earl grey lavender hot cocoa pleasure in simple things blog

When I saw a recipe for Earl Grey-Lavender Hot Chocolate in last month’s giveaway book, I knew I needed to give it a try. (Click here for more on Winter Cocktails by Maria Del Mar Sacasa.) I love using the flavor of Earl Grey in desserts and I love the flavor pairing of lavender and hot chocolate.

snow day hot chocolate pleasure in simple things blog

How do I know this?  Because I adore the hot chocolate with lavender foam served at Chocopologie in Norwalk, Connecticut!  So, if you like these flavors as much as I do, you need to give this recipe a try!  I’m calling it my ‘snow day hot chocolate!’  (Remember the Earl Grey cream puffs?  Or, the Earl Grey creme brulee?  Click on name to see!)

Yes, it is a little more work than a traditional hot cocoa to make, but creating something wonderful in the kitchen is what snow days are all about, right? This is a wonderfully hot, chocolaty treat to enjoy slowly on one of those days when you are housebound and enjoying the slow pace of a snow day!

recipe for earl grey lavender hot chocolate on pleasure in simple things blog

Earl Grey-Lavender Hot Chocolate – Serves 4
½ cup dried edible lavender flowers
½ cup loose Earl Grey tea
4 cups whole milk
4 Tab unsalted butter
½ cup natural cocoa powder
3 Tab packed dark brown sugar
6 oz. finely chopped bittersweet chocolate
Pinch salt
1 Tab vanilla extract

Earl Grey-Lavender hot chocolate pleasure in simple things

Bring lavender, tea and milk to a simmer in a medium, heavy-bottomed saucepan over medium heat, stirring occasionally. Remove from heat and let steep 15 minutes. Strain mixture through a fine-mesh sieve into a bowl and discard solids. Wipe out saucepan.

enjoying hot cocoa pleasure in simple things blogIn the same pan, melt butter over medium heat. Add cocoa powder and brown sugar and whisk together until a paste forms. Slowly add milk, whisking constantly. Bring to a simmer over medium-high heat and reduce heat to medium-low. Stir in chocolate and salt and cook, stirring, until chocolate is completely melted.

Notes: If you haven’t used lavender in cooking before, be sure to use culinary-grade lavender. I found containing the Earl Grey and lavender in a spice bag created a smoother drink texture and eliminated the need for a sieve. Don’t plan on accompanying this drink with a pastry or biscuit – it is a dessert all on its own!

Hope you enjoy this cold weather treat! Thanks so much for stopping by!

Remember to find pleasure in simple things, Jackie

Sharing with French Country Cottage, Kim Klassen Friday FindsSand & Sisal, Elizabeth & Co., and Coastal Charm.

11 comments

glass blowing adventure

January 9, 2015

paperweight from glass blowing adventure pleasure in simple things blog

I love all creative arts. One place I had been eager to visit ever since I knew of its existence is Peter Greenwood’s Glass Blowing Studio in Riverton, Connecticut. Peter offers workshops for beginners with no experience and I really wanted to give it a try!

Front of Peter Greenwood's glass blowing studio pleasure in simple things blog

My idea was to visit before Christmas and create a glass blown ornament for my tree…how special would that be?! But, after discussing the workshop options with Peter before I made my visit, I decided to create a glass paperweight rather than a glass ornament. Yes, the ornament was an actual glass blowing experience, but if I took the workshop for the paperweight; I could actually make my piece from start to finish. I decided to go for the hands-on experience of forming molten glass and sculpting it into a paperweight – with Peter’s guidance, of course.

I am so glad I did. The process was fascinating.

A friend and I made the trip to the quaint little town of Riverton where Peter’s studio and showroom are located inside a historic stone church built in 1829.

glass blowing studio with pleasure in simple things blog

piece at Peter Greenwood's studio pleasure in simple things blog

I am sharing some photos from the visit on today’s Friday field trip, but I think the best way to really get a sense of the process is to watch the short video created from phone videos the day of my visit. In hindsight, I probably should have brought a video camera with me, but my friend Wendy was nice enough to take some video of my experience and I am thrilled to have it documented.

Click here for A Video on Creating a Paperweight in Peter Greenwood’s Connecticut Studio.

tools of the glass blowing trade pleasure in simple things blog

glass blowing tools pleasure in simple things blog

In some ways, I found creating glass pieces very similar to throwing pots because of the symmetry component, although working in conjunction with a 2,000 degree oven was a little more daunting! I was very much aware of the dangerous temperatures involved and was extremely cautious.

2,000 degree furnace glass blowing pleasure in simple things

The 2,000 degree oven used to create my glass paperweight at Peter Greenwood’s studio.


beginnings of a paperweight pleasure in simple things blog

The beginnings of my paperweight at Peter Greenwood’s studio in Connecticut.

glass chips from glass blowing pleasure in simple things blog

Glass chips like this are used to create the design in the paperweight…I used blue chips for mine.

When completed, the blue swirl I created in my paperweight glowed orange from the high temperature. Once cooled, the blue color would be apparent. The cooling process is done very slowly or the piece would have exploded due to the quick temperature change!

finished paperweight before cooled pleasure in simple things blog

I hope you enjoyed today’s field trip. Peter is a wonderful teacher and I highly recommend looking him up should you ever want to take a trip to Riverton and experience some of your own glass adventures!

Peter Greenwood pieces pleasure in simple things blog

Have a wonderful weekend!

Peter Greenwood pleasure in simple things glass blowing adventure

The glass master himself, Peter Greenwood.

Thanks for stopping by! Remember to enjoy pleasure in simple things, Jackie

Sharing with Elizabeth & Co., Nancherrow, and House of Hipsters.

3 comments

chocolate granola recipe

January 6, 2015

packaging chocolate granola pleasure in simple things blog

This past holiday, my woodland theme warranted some loosely defined forest food – like ‘nuts and berries’ as appetizers…glazed nuts in both sweet and savory glazes included. But, in addition, every year I make some holiday takeaways – homemade treats wrapped in individual servings to give as gifts or to use as delicious, edible favors.

The rosemary shortbread trees I make every year were perfect for my theme this year, but I also added some dried fruit roll-ups and some granola. What outdoor theme would be complete without granola?

chocolate granola takeaways pleasure in simple things blog

The chocolate granola I chose to make this year came from one of my favorite cookbooks – a la Mast – and it certainly gives granola a whole new meaning! (Click here for more on the cookbook.)

chocolate granola favors pleasure in simple things blog

This granola is the perfect treat to package in small servings….I used cellophane bags, baker’s twine, and personalized labels (yes, I did make home made two words intentionally lol…I thought it gave it more emphasis to the fact that it was, indeed, made at home.)  I love this granola as a topping on plain yogurt, but it is also great to add some crunch to a pancake – maybe chocolate chip!

I made chocolate granola for the holidays, but it may be the perfect thing to make for a Valentine’s Day brunch (I will use it to make yogurt parfaits – layering yogurt, fruit, and chocolate granola in a pretty stemmed glass.) or to slip into a Valentine’s Day school lunch bag…also makes a nice bite to take on the ski slopes or on a winter hike.

This Chocolate Granola Recipe makes 5 cups.  Enjoy!

chocolate granola recipe pleasure in simple things blog
Chocolate Granola Recipe (makes 5 cups)
1 cup almonds, roughly chopped
1 cup pecans, roughly chopped
1 cup rolled oats
½ cup honey
2 Tablespoons brown sugar
3 Tablespoons unsalted butter
2 Tablespoons cocoa powder
½ cup cacao nibs
½ cup dried cranberries
5 ounces dark chocolate, chopped

Preheat oven to 300 degrees Fahrenheit. Combine almonds, pecans, and rolled oats with honey and brown sugar. Spread evenly on a baking sheet and bake for 15 minutes. Let cool. Melt butter with cocoa in a saucepan. Mix together cacao nibs, cranberries, and the roasted mixture. Stir in the melted butter mixture. Mix in the chopped dark chocolate.

olate granola in yougurt pleasure in simple things blog

Notes:  The cocoa nibs may be hard to find unless you live near the Mast store in Brooklyn, but you can probably find some at your local Whole Foods or gourmet food store. The labels I used for my holiday packaging came from Tiny Prints (click here for the website) and can easily be modified for Valentine’s Day or any other occasion by utilizing one of the many designs available…or make your own!

chocolate granola for breakfast pleasure in simple things blog

Thanks so much for stopping by!

Remember to find pleasure in simple things, Jackie

Sharing at The Shabby Nest, French Country Cottage.

no comments

restoration hardware gallery in ct

January 2, 2015

mixing textures at Restoration Hardware pleasure in simple things blog

Don’t you love walking through Restoration Hardware? Their use of a neutral color palette, thoughtful mix of textures, and minimal use of accessories is definitely right in line with my taste. And, the light fixtures? O.M.G.

lighting at Restoration Hardware in CT pleasure in simple things blog

All the stores are worth a visit, but if you happen to live near Boston, Greenwich, Atlanta, or West Hollywood; you have access to a very special store – the Restoration Hardware Gallery Store. If you don’t happen to live near these places, you can catch a little glimpse of what you are missing on today’s Friday field trip to the Connecticut store.

restoration hardware gallery in connecticut

Formerly on Greenwich Avenue, the store moved a short distance up the street to occupy the old historic Greenwich Post Office and become one of the four RH gallery stores. But, this did not happen until after the space was completely gutted and renovated. Click here to see more about the project.

The grand scale and dramatic lighting of this magnificent store make for a museum-like experience…

a collage of restoration hardware

magnificent lighting at RH pleasure in simple things blog

The store displays a luxury lifestyle with dramatic interior and exterior installations of home furnishings in a gallery setting.

stair case at Restoration Hardware in CT pleasure in simple things blog

bathroom at Restoration Hardware pleasure in simple things blog

Some pieces are a little too masculine for my taste and some a little too heavy on the industrial vibe, but for the most part, I would love to own any one of Restoration Hardware’s furniture pieces (if I had a large enough space to accommodate it, of course!).

chair at Restoration Hardware pleasure in simple things blog

textures at Restoration Hardware pleasure in simple things blog

I love examining paint finishes and have had fun trying my hand at recreating (in look anyway) them in some of my refinishing projects using Annie Sloan Chalk Paint.

table setting at Restoration Hardware pleasure in simple things blog

table accessory at Restoration Hardware pleasure in simple things blog

The Greenwich RH Gallery provides some amazing inspiration and I urge you to visit one of the four gallery locations if you should be provided the opportunity.

lighting at Restoration Hardware pleasure in simple things blog

I hope you enjoyed today’s field trip.

Thanks so much for stopping by.  Remember to take pleasure in simple things, Jackie

Sharing at The Shabby Nest, Kim Klassen’s Friday Finds, French Country Cottage, and House of Hipsters.

3 comments

january book giveaway!

December 30, 2014

page from Kinfolk pleasure in simple things blog

Hard to believe – not only is it the end of the month, but also the end of the year!  Where has the time gone?!

I am pleased to announce that Manda from Oklahoma is the winner of the December giveaway book Winter Cocktails by Maria Del Mar Sacasa!  Congrats Manda!  I know you will enjoy the book!  The two calendars are going to Ashley from Texas and Mary from Chicago.

For the first giveaway book selection for 2015, I have chosen The Kinfolk Table:  Recipes for Small Gatherings by Nathan Williams.  This book is definitely a winner!  The recipes in this book are a collection of recipes from home cooks from around the world where the author has taken us into the home of each of the contributors.  “Here you will find recipes not just for one-pot stews and refreshing salads, but for evenings spent with friends when the hours pass effortlessly, conversation flows naturally, cooking us participatory, and the meal ends with a satisfying sense of accomplishment.”

free giveaway book for January by pleasure in simple things blog

The book is a great way to set the tone for the start of a new year that includes many wonderful friends and many wonderful meals – demonstrating the joy in casual entertaining.  As much a coffee table book as a recipe book, this selection is sure to please!  (So much so, I am willing to send all 344 pages of this large, heavy book to the winner via mail!)

Leave a comment here or on Instagram, Facebook, or Twitter to be entered to win this great book selection that will help you discover the simple pleasures of a shared meal.  Good luck!

For those on Instagram, this month’s challenge is Winter Whites!  Whether it be your skinny white cords paired with a white angora sweater or the piles of snow outside your back door, white in winter is special…a visual treat! For the month of January, let’s share photos of winter whites, using hashtag #pleasuregram. I can’t wait to see your photos!!

Jan 2015 Instagram Challenge pleasure in simple things blog

Thanks so much for stopping by!  I am excited to start a new year sharing pleasure in simple things with you!  Happy 2015!  xo Jackie

8 comments

personalizing homemade party crackers

December 26, 2014

personalized party crackers for 2015 pleasure in simple things blog

Party crackers are nothing new. But, last year when a family member used them as wedding favors, I started giving them a little more thought. Why not make my own personalized version of a party cracker? So, I had been thinking about them for a while…I even saved all my empty toilet paper rolls (for over a year!) to use in creating some of my own.

For my research, I spoke to my friend from London. Julie filled me in on proper party cracker etiquette. The three required items that must be contained in the cracker – per tradition – are: a toy, a paper crown, and a joke. I planned on following tradition, but for my version, I decided to substitute a treat for the toy.

candy for new year's party crackers pleasure in simple things blog

I had the design aspect in my head and I was pretty sure I could come up with a good looking cracker as well as the right combination of contents…but, what about the noise the cracker makes when it is opened?! That was the part I wasn’t sure about! After looking around online, I found the ‘crack’ was actually a thin strip of paper that contained a little bit of gun powder called a cracker snap.  I purchased the cracker snaps from Olde English Crackers and found a video they posted on the assembly steps to create the crackers. Click here for the instructions. (Note: I did not use the rollers shown on the video and had no trouble making the party crackers without them. I did find it was very useful to make a center line with a pencil on both the toilet paper roll and the wrong side of the decorative paper to use as guides. )

papers for party crackers pleasure in simple things blog

Since my first set of party crackers were being created for New Year’s Eve, I decided the outside of the crackers would be black (with an added hint of green for an accent color) to coordinate with a set of black dishes I planned to use for New Year’s Eve dinner. If you decide to make some crackers, think about what color(s)/pattern(s) would look best on your dinner table!

I bought sheets of decorative paper at Jo-Ann Fabric and Craft Store (on sale) for just pennies a sheet. I chose coordinating black patterns with stripes, stars, and script writing. I personalized some circle gift tag stickers with ‘2015!’ from Tiny Prints (click here for website) in my black and green color theme and I used a green sparkle ribbon to tie the ends of the crackers.

contents of personalized party crackers pleasure in simple things blog

For the inside contents of the crackers, I decided on a neutral color scheme. I printed jokes on my home computer that I found online – adding a little embellishment with a gold marker. I crafted the paper crowns from a pretty taupe and white patterned tissue paper. And, for the treat, I made up little bags of champagne flavored candy that I found at Williams-Sonoma…so elegant and so appropriate! A little handful of homemade confetti added a little extra touch of gold to the contents!

making jokes for party crackers pleasure in simple things blog

Party crackers are so much fun to create – personalizing them is the best part! The only limitation is keeping your contents within the confines of the inside space of an empty toilet paper roll!

making personalized party crackers pleasure in simple things blog

I hope I have inspired you to try your hand at creating some party crackers on today’s Friday field trip! I already have some in mind for my 4th of July party this summer! If you need help with some ideas or have questions, send me an email and I’d be happy to help!

Thanks so much for stopping by! Remember to take pleasure in simple things, Jackie

Sharing with The Shabby Nest and Elizabeth & Co.

no comments

snowballs for dessert

December 23, 2014

great holiday dessert ice cream snowballs pleasure in simple things blog

Do you need a quick and easy, stress free, last minute holiday dessert?  Small individual desserts at a meal are especially perfect at the holidays. Since there is so much snacking and treat eating between meals, a small refreshing sweet is ideal.  Do you want to know what I think fits the bill perfectly? Snowballs!

icecream snowball for dessert pleasure in simple things blog

Some of the best desserts are the simplest. And. at the holidays, snowballs are perfect!  Just 2 easy ingredients – vanilla ice cream and coconut – create a delicious snowball for dessert. This dessert looks so seasonal on a holiday table, and it is sure to be a hit with kids of all ages!  There is no better way to bring back memories of creating snowmen or participating in long ago snowball battles!

vanilla bean ice cream to make snowballs for dessert pleasure in simple things blog

I love ice cream snowballs. They are such a festive winter dessert.  Just make a round of a good quality vanilla bean ice cream and roll it in coconut – voila!  A snowball!

For an easy upgrade, a pool of chocolate or raspberry sauce can easily be added to the bottom of the bowl.  Or, for those over 21, add a favorite liquor – peppermint or peach are great choices. Myself – I prefer just a garnish of sugared cranberries or raspberries and some mint.

seasonal cranberry and mint garnish on snowball for dessert pleasure in simple things blog

I use red mini latte bowls from Anthropologie to serve – the perfect size for a single snowball!  (The dishtowel is also from Anthro.)

If you have little children, you may want to consider stacking the snowballs to make a snowman or serving a ‘snow fort’ on a platter, to be portioned out at the table!  Enjoy!

Wishing you and those you love a very blessed holiday.  Thank you so very much for sharing pleasure in simple things with me!

See you after the holiday, Jackie xoxo

Sharing with House of Hipsters, The Shabby NestElizabeth & Co., and Sand & Sisal.

6 comments

forest in a jar centerpiece

December 19, 2014

forest in a jar pleasure in simple things blog

Originally, holiday 2014 in my house was intended to have a sea glass theme using aqua as an accent color. But, as you know if you read my blog, I was so wrapped up in last year’s outdoor theme that I had to continue it for one more year…I just had too many ideas left to use! The sea glass theme is being pushed out to 2015…can’t wait!

easy to make  forest in a jar pleasure in simple things blog

You may also know, one of my fascinations this year has been with jars, bottles, (even salt shakers) …any type of glass container. I just can’t seem to get enough! Putting some favorite items in a jar can really elevate them to the status they deserve and it puts a smile on your face in the process!

DIY forest in a jar pleasure in simple things blog

Case in point – my favorite trees from Terrain this year. The trees are just so beautiful, I wanted to highlight them in some way. I decided to make a very simple forest in a jar! Rather than use the typical snow for the bottom of the jar, I used white beans. I love the simplicity of the design!

outdoor theme holiday decor pleasure in simple things blog

The jar? I bought it at Target. In fact, I bought quite a few. They come in 3 sizes and are very reasonably priced – ranging in price from $3.99 to $14.99.

easy forest in a jar pleasure in simple things blog

neutral tree cookies pleasure in simple things blogThen, I got so stuck on the forest in a jar idea, I made one out of cookies also! On this one I used sugar ‘snow.’ I made gingerbread cookies and let them sit around for a while so they got really rigid before I used them – better for standing!  The cookies can easily be decorated to match your decor!

Happy planting! What will you use to make your forest in a jar?

Thank you so much for stopping by.  I hope you enjoyed Friday field trip’s quick and easy way to create a holiday centerpiece!  Have a fabulous weekend and remember to take pleasure in simple things, Jackie

Sharing at House of HipstersThe Shabby Nest, Crafts a la Mode, and Craftberry Bush.


2 comments

diy feather ornaments

December 16, 2014

white feather glitter ornament pleasure in simple things blog

It is hard to believe Christmas is only a little over a week away! But, there is still some time to make some ornaments as gifts. I am sharing two easy DIY ideas on making feather ornaments. A woodland holiday theme needs to include feathers, nests, and birds – don’t you think?

One way is to put a feather or feathers into a clear hollow glass ornament. I did this in three different variations this year:

1.  I used a clear drying glue to add silver glass glitter to the outside bottom of the glass globe and added a spotted feather inside the globe.

dotted feather ornament pleasure in simple things blog

2.  I used a cotton swab to add dots of clear drying glue and glued white glass glitter to the dots. When dry, I added a white feather and a pinch of silver glitter inside the globe.

white dot and feather ornament pleausre in simple things blog

3.  I dipped two feathers into some silver glass glitter before placing them into the globe. To keep them positioned correctly, I used a glue gun to glue the tops of the feathers near the top of the ornament. This doesn’t show, because the place where the feathers are glued is covered when the metal piece for hanging the ornament is repositioned on the ornament top.

close ups of glitter feather ornaments pleasure in simple things blog

The second way isn’t using an actual feather, but rather… using heavyweight cardboard to create a feather design. Simply draw or trace a feather onto cardboard (I made mine black for purposes of demonstration – it is best to use the same color as your glitter so a different color will not show through). Cut out the feather shape using a craft knife and cut a hole for adding a string or ribbon. Use clear drying glue to cover the cardboard with glass glitter – one side at a time.

process of making a feather glitter ornament pleasure in simple things blog

Add a ribbon or string for hanging. I used black and white baker’s twine because I am giving my feather ornament as a gift, and the black and white color scheme best reflects the taste of the recipient.

packaged feather ornament pleasure in simple things blog

I decided to package it with a favorite Emily Dickinson quote. I used my computer printer to print the quote onto a clear label and used the label to seal the ornament in a clear cellophane bag. I think it makes a thoughtful gift.

emily dickinson quote pleasure in simple things blog

I hope these ideas have inspired you to create some ornaments using feathers.  Have fun with it!

Thanks for stopping by!  Remember to take pleasure in simple things, Jackie

Sharing at Elizabeth & Co., Sand & Sisal, and Coastal Charm.

no comments

salt shaker snow globes

December 12, 2014

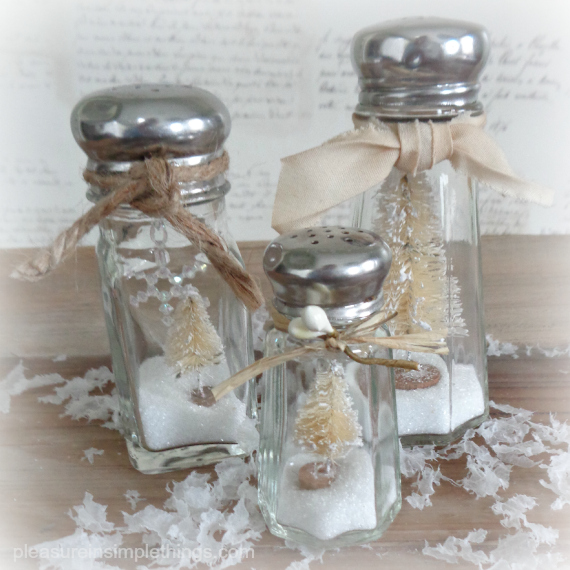
Salt Shaker Snow Globes pleasure in simple things blog

With the current bottle and jar love I have going on for my holiday décor, this post should not surprise you!

Remember a few years ago when Anthropologie carried salt shakers with little trees in them?  Many crafters were inspired by this cute idea and I saw a number of versions created soon after the little beauties hit the Anthro stores.

Salt Shaker Snow Globes pleasure in simple things blog

I didn’t hop on that bandwagon and create a batch of salt shaker inspired items back then. That changed recently when I inherited quite an extensive salt shaker collection…(don’t ask – that interesting story is for another post!)

So, now in possession of so many salt shakers, I was prompted to create some salt shaker ‘snow globes’ and I am sharing some of my creations on Friday field trip today.  (Okay, so technically they are not snow globes since I haven’t added water.)

Salt Shaker Snow Globes pleasure in simple things blog

And, because of my preference for neutrals, I made my salt shaker snow globes with natural bottle brush trees.  I just added a little ‘snow’ and a tree to make a wonderful little favor or piece of holiday décor. (My recent inheritance gives me enough salt shakers to fill a mantle a couple of times over!)

Salt shakers are easily found at thrift stores or can be purchased very inexpensively at restaurant supply stores. Cute, aren’t they?

Salt Shaker Snow Globe with snowflake  pleasure in simple things blog

The best thing about them is that each creator can add a personal touch by choosing a favorite tree and ribbon or embellishment. For example, in one of my creations, I hung a little snowflake from a piece of thread. The variations are obviously endless!  Create something that matches your decor.  The stainless tops to the shakers can easily be spray painted with an oiled bronze or rusty look finish if that is your preference…or, spray in a glossy red or green!  You can also tie on a rusty jingle bell or other favorite item around the top of the shaker.  Or, glue a little ornament to the tree like I did with the Santa ornament my friend Phyllis gave me below. ;)  Group a bunch together and add some lights for a wonderful glow! :)

Salt Shaker Snow Globes and light pleasure in simple things blog

I hope I inspired you to create some salt shaker snow globes that coordinate with your individual taste and décor.  You don’t even have to ‘hold the salt’ – you can use it for the ‘snow!’

santa salt shaker snow globe pleasure in simple things blog

Thanks so much for stopping by. Remember to take pleasure in simple things, Jackie

Sharing at Thoughts from Alice, Finding Silver PenniesHouse of HipstersCoastal Charm, Crafts a la Mode, Shabby Nest, French Country Cottage, and Craftberry Bush.

10 comments

Back to top