Subscribe to Pleasure in Simple Things via RSS ReaderFollow Pleasure in Simple Things on InstagramFollow @InSimpleThings on TwitterLike Pleasure In Simple Things on FacebookFollow Pleasure In Simple Things on PinterestEmail Jackie

two tons of white legos®

August 21, 2015

building in process pleasure in simple things blog

What would happen if someone dumped two tons of LEGOS® into a city park and told the public to ‘have at it?’  You can find out this summer on the High Line in New York City with The collectivity project!

lego time pleasure in simple things blog

art installation at the high line pleasure in simple things blog

The collectivity project, an installation of white LEGO® bricks, features an imaginary cityscape conceived and designed by the public.  The ever-evolving shape of the installation is at the mercy of those visiting the High Line who are welcome to play with the installation – building and rebuilding the structures over time.

building legos at the high line pleasure in simple things

The project stimulates tons of creative energy and provides a darn good time in the process!  The idea was driven by Danish-Icelandic artist Olafur Eliasson, demonstrating his desire to make the concerns of art relevant to society at large; not limited to the confines of a museum or gallery.
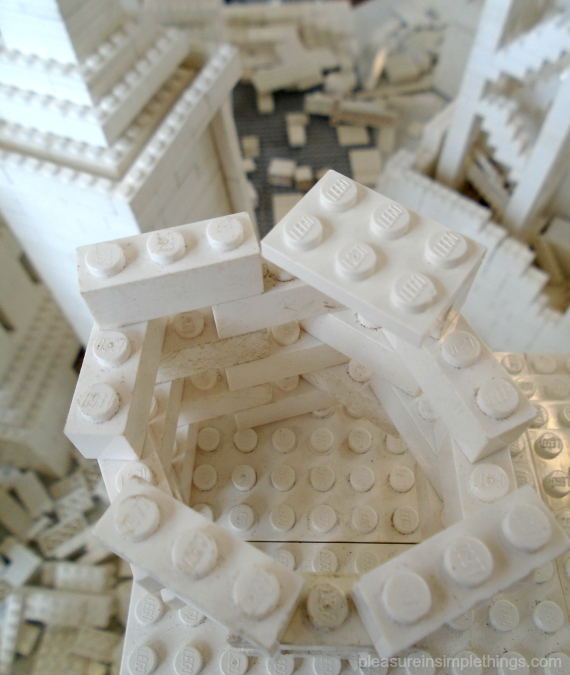
high line legos pleasure in simple things

Visitors are a mix – from super serious architect types to those who are just passersby and add a single brick or two.  Me? I found myself somewhere in the middle.  I wanted to make my mark on the project – to be a contributor – but, I didn’t feel the need to impress anyone with my superior LEGO® building skills!

lego sky scrapers pleasure in simple things blog

If you should visit, you may not see what is pictured here since the piece is constantly being reconfigured by those who visit and contribute to its ever-progressing contour.

building legos in nyc pleasure in simple things blog

lego tower at the high line pleasure in simple things blog

Visit the High Line now through September 30th and you will get the chance to make your mark on two tons of white LEGOS® at no charge!  How cool is that?!  Thanks for stopping by for Friday field trip!  I will post some additional photos from this great installation on Facebook this weekend.

white legos pleasure in simple things blog
Have a wonderful weekend and remember to take pleasure in simple things, Jackie

legos left at the high line pleasure in simple things
P.S.  Click here to read more about The High Line.

no comments

diy garden wrapping paper

August 18, 2015

making garden wrapping paper pleasure in simple things blog

I very often create my own wrapping paper; particularly when I have a vision of something specific in my mind. This was the case with the tomato wrapping paper I made recently for a thank you gift I was giving a friend.

finished home made wrapping pleasure in simple things blog

The gift was a book on heirloom tomatoes and I had a vision of a graphic of a tomato on brown paper. I knew I needed to make it! I decided on a classic potato print and set to work. I cut a couple notches into one half of a potato – that would be the main part of the tomato. I used the other half of the potato to make some greens for the top. Simple!

making potato print wrapping diy pleasure in simple things blog

I printed it in two parts. First, the red in a random pattern on brown paper large enough to accommodate the book I was wrapping. After that was dry, I printed the second part – the green. Great! Exactly what I had hoped for! And, I would add tie it up with some natural raffia for my final touch!

diy wrapping pleasure in simple things blog

I hope I have inspired you to create some fun wrapping paper this summer! ;)

simple home made wrapping paper pleasure in simple things blog

Thanks for stopping by! Remember to take pleasure in simple things, Jackie

Sharing with Sand & Sisal.

2 comments

jewelry holder redo with annie sloan

August 14, 2015

after of a jewlery stand redo pleasure in simple things blog

Today’s redo may seem a little unusual… Maybe not if you remember that I once turned a plastic drink container into a beautiful flower vase using Annie Sloan paint!  Today, I am again using Annie Sloan paint for a transformation.  For today’s Friday field trip, come see how I used paint, an old poetry book, a few shells, and some scraps of ribbon to turn a black metal jewelry stand into something much more ‘poetic.’

before and after jewlery stand

First, I used Annie Sloan paint in Old White to cover the entire jewelry stand.  I really did not like the grid pattern on the metal piece so, I decided to tone it down by attaching some pages I ripped out of an old poetry book.  After I liked the way the pages were arranged, I added a ‘belt.’

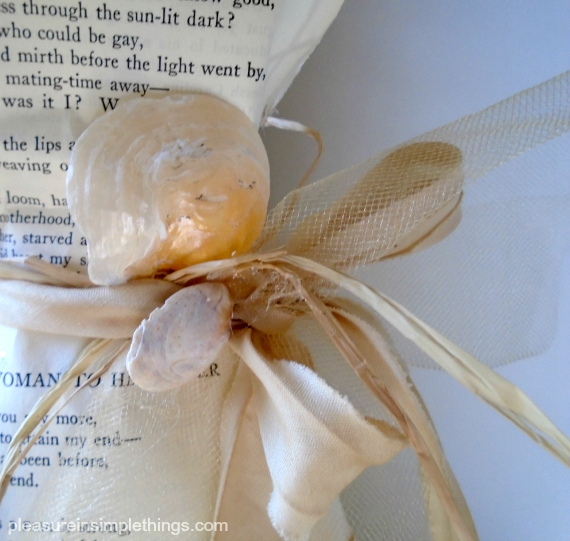
closeup of jewlery stand redo pleasure in simple things blog
For this, I used a glue gun to add some raffia, some seam tape (I aged using some strong coffee), a few shells, and some tulle.

jewlery stand redo on pleasure in simple things blog

I finished by adding a little bit of sparkle to the pages and a few gold accents to the Old White paint.  A much different look than the old black metal grid, don’t you think?

jewelry holder with necklace pleasure in simple things blog

The piece now looks really great to display jewelry or to display on its own!

Thanks for stopping by!  I hope I have inspired you to update your own flea market find!

redo of a jewlery stand
Have a wonderful weekend and remember to take pleasure in simple things, Jackie

Sharing with Elizabeth & Co., Coastal Charm, and Thoughts from Alice.

2 comments

diy nautical flag garden stones

August 11, 2015

signal flag rock diy pleasure in simple things blog

I think we have all painted garden stones in our day. If not, you should have! They are so fun to make and look so cute in the garden or as a paperweight. Today, I am showing you how to create some stones for your garden that have more of a ‘beach’ vibe than the typically decorated stones – a batch of nautical plant markers boasting the shapes of signal flags!

painting nautical rocks

They are so simple, yet so fun to make! The only thing you will need to make up some of these marine inspired cuties are some paint markers and some smooth stones! I used Sharpie brand medium point oil based paint markers. I love these markers because they totally eliminate the mess of paint and brushes but create the same result. And, the best part is that they come in a set that contains the exact colors needed for nautical flags! They should call it ‘signal flag set’ or ‘nautical color set.’ Thanks for that Sharpie!

supplies for nautical rock painting

maritime signal flags

These flags are used internationally as signals for ships at sea. Each flag represents a letter.

Stones painted with nautical flags also make great table markers at a beach wedding or a really nice addition to a gift of potted sea grass or beach roses. Make up the recipients initials in signal flags and add them to the potted plant!

nautical rocks pleasure in simple things

I am sure you have said to yourself by now “This is a super activity for kids.” It sure is! Not only can children learn some basic seamanship with this craft, but it is pretty easy to incorporate a math lesson as well!

nautical flag rock painting pleasure in simple things

Another fun idea for the kids, is to have them make up some nautical ‘x’s’ and ‘o’s’ with some small rocks; using them for a game of tic-tac-toe in the sand! Fun!

nautical tic tac toe diy pleasure in simple things

I hope I have inspired you to make some nautical flag stones for your own garden or as a way to add some ‘beachyness’ to your décor…make up the name of your boat or the name of your favorite beach! Have fun with it!

spelling words with nautical rocks pleasure in simple things

Thanks so much for stopping by!

Remember to take pleasure in simple things, Jackie

Sharing with Sand & Sisal and Coastal Charm.

no comments

antique chair in the garden

August 7, 2015

antique chair redo pleasure in simple things blog

My furniture redos can usually be placed in the coastal decor category, don’t you think? I love anything beachy and my furniture creations usually reflect my taste. Well, today I am taking a little departure from the beach inspired look and going with more of an antique vibe.

The reason for this departure is that I found an old, antique child’s chair and I wanted to keep it true to form.antique childs chair before pleasure in simple things blogBecause the seat was in perfect shape, I started by cleaning it up and leaving it in tact. Next,  I did a few repairs.  Then, I began to paint the piece pink, thinking I would create something for a child’s room. After thinking about it for a while, I decided the chair was much better suited to be a garden ornament. Wouldn’t it look great holding some potted plants? So, I changed my direction and decided to paint it a dark neutral to play as a backdrop for some pretty garden flowers.

childs antique chair redo Annie Sloan pleasure in simple things

I chose Annie Sloan Graphite for the chair and painted it in two coats. I did some light distressing and then added a coat of Annie Sloan Dark Wax.

Annie Sloan graphite pleasure in simple things blog

I happened to be visiting my friend Phyllis (you know Phyllis, the one with the ‘park’ yard?) and she ‘styled’ it using some of her plants so I could get some ‘after’ photos. (I plan on giving the chair to a friend who also has a gorgeous yard – maybe she will let me take a photo when it settles into its new home!)

final antique chair redo pleasure in simple things

Thanks for joining me on Friday field trip to check out my antique chair find. Have a marvelous weekend!

Remember to take pleasure in simple things, Jackie

Sharing with French Country Cottage.

no comments

adding a spigot to a watermelon

August 4, 2015

watermelon beverage container pleasure in simple things blog

It wasn’t until recently that I heard people were using watermelons as beverage holders. Since yesterday was National Watermelon Day, it seemed the perfect excuse to try my hand at creating one!

I have made many a watermelon basket in my day! Even as a teenager, I loved carving out a watermelon to fill with a fruit salad for a party or get together. The older I got, the more ornate my baskets would become!

national watermelon day using a spigot pleasure in simple things blog

Using a watermelon to create a vessel for a beverage seemed pretty similar to making a watermelon basket. It is an easy concept: Hollow out a watermelon; cut a hole and add a spigot; fill it with a beverage!

To try your hand at making one, first examine your watermelon and decide which way you want it to stand. When you have the top and bottom picked out, make a very thin slice in the ‘bottom’ so it will stand up nice and straight without rolling over. Be careful not to cut too much off, or you could spring a leak in the bottom!

making awatermelon beverage holder pleasure in simple things blog

The spigot is easy to install. Cut a small hole the diameter of the spigot. Then add the spigot – a washer will hug each side of the watermelon; the nut will cap off the inside.

Then, cut off a slice from the top. Use a large, strong metal spoon to scoop out all the good watermelon and reserve it in a big bowl. (I also saved the juice from the watermelon by pouring it into a pitcher.)

Cut a hole for the spigot and position it near the bottom of the watermelon. (Remember that the section of liquid below the level of the spigot will not flow out.)

watermelon spigot on stand pleasure in simple things blog

Now you are ready to fill your beverage container with whatever beverage hits your fancy! I decided to make something of a jazzed up watermelon water. I had enough melon to make the water and still had leftovers for snacking!

watermelon spigot with pleasure in simple things blog

Watermelon Water
6 cups of watermelon, pulverized in a blender (you can count the liquid from the watermelon as part of the 6 cups.)
Juice of one lime (or to taste)
. . . . . . . . . . . . . . . . . . . . . . . . . . . . .
Mix ingredients. Strain. Chill. Garnish with basil or mint leaves from garden. ;)

You may decide to fill your watermelon with a punch or some type of alcoholic drink (for those over 21) for your next party. My only advice is to be sure to strain any fruit drinks prior to putting them into the watermelon container. This ensures no pulp will clog up the spigot.

a watermelon spigot instructions pleasure in simple things blog

I know there are spigots marketed now as “watermelon spigots,” but you really don’t need anything special for a watermelon. My spigot cost $4.99. The only adjustment that may be needed is if the spigot is not long enough for the width of your fruit. I needed to shave mine down a little to be sure the washer fit on the back. I probably could have found a longer spigot, but it was easier just to make the width of the watermelon a little thinner in the spot where the spigot attached.

carving a watermelon beverage container pleasure in simple things blog

Now that I know it works, I can try some variations! Just like my watermelon baskets, I can see my beverage holders will also get ‘fancier’ over time! How about a row of fish carved around the top rim? Such possibilities! And, there are so many cute ways to set up a beverage station! Give it a try!

Thanks so much for stopping by!  Remember to take pleasure in simple things, Jackie

Sharing with Shabby Nest, Craftberry Bush,  House of Hipsters,  Sand & Sisal and Coastal Charm.

2 comments

august book giveaway!

July 31, 2015

August giveaway for pleasure in simple things blog

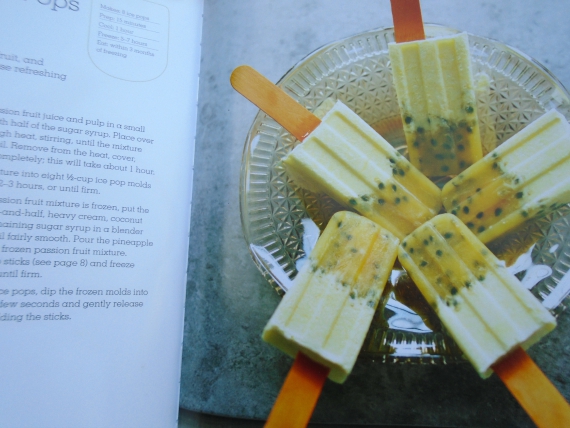
I remember, as a kid, the first time I had the bright idea to make my own ice pop. I poured some juice into a paper cup and put it in the freezer overnight. The next day, I rushed to the freezer, peeled off some of the paper cup, and attempted to eat my creation.

To my total disappointment, my ‘ice pop’ was rock solid, like an ice cube. Yes, I could lick it, but it didn’t have that great texture of a store bought ice pop. Little did I know then; what was missing to accomplish the texture I craved, was the right balance of sugar.

August giveaway pleasure in simple things blog

This and other important ice pop facts are explained in the book Irresistible Ice Pops by Sunil Vijayakar – the reason the book is a must have for all ice pop lovers! And, the reason it is the giveaway book for August!  Irresistible Ice Pops. includes all the basics to ice pop creation as well as a collection of some wonderful ice pop recipes. Leave me a comment and I will pick one lucky winner at random at the end of the month, from those that comment, to receive this great book. Good luck!

Congratulations to Emily for winning last month’s selection The Heirloom Tomato Cookbook.  Thank you also, Emily, for the heartfelt email.  A big thank you to everyone that entered to win!

August 2015 Instagram Challenge Icy Summer Treats

Instagram lovers, please read on! What’s your pleasure on a scorching hot summer day to help cool off? Is it a frozen drink? An ice pop? A slushie? Use hashtag #pleasuregram during the month of August to share photos of your favorite icy summer ice treat!

Thanks so much for stopping by! Have a fabulous weekend, Jackie

no comments

easy homemade fudge ice pops

July 28, 2015

homemade fudgesicles pleasure in simple things blog

When I was a kid, I grew up across the street from a farm. I spent a lot of my childhood hanging out at the farm – picking vegetables, playing with the animals, and working at the farm stand. There was a freezer in the porch of the old farm house that housed some ice cream treats and many times after helping on the farm, the reward would be something from that freezer. I always chose the same thing – a fudge pop.

yummy fudgesicles pleasure in simple things blog

Now as an adult, anytime I see a fudge pop, it puts an instant smile on my face as I remember my childhood days on the farm! Of course, it makes sense that I would be all about creating my own fudge pop!

Today, I am sharing a recipe I use that is similar to the old time fudge pops that I enjoyed as a kid. My adult version is updated with the addition of some coffee – don’t you love chocolate and coffee together?

recipe for homemade fudgesicles on pleasure in simple things blog
There are so many great ice pop molds out there. If you don’t already own some, check out Home Goods or Ikea for some great, inexpensive ones. If you would rather not purchase anything, the old time ‘paper cup with a wooden stick’ still works great! Pour any extra mixture into ice cube trays to use in your iced coffee. ;)

fudgesicles pleasure in simple things blog

Thanks so much for stopping by!

Remember to take pleasure in simple things, Jackie

no comments

poetic chest before and after

July 24, 2015

after Duck Egg drawer pleasure in simple things blog

This piece was part of a larger piece that was left out on the curb at a beachfront home. I instantly fell in love with it, because I knew the details would look awesome as a painted piece. It was a really large piece and I wasn’t sure I wanted to spend the time on it that it needed. It ended up I couldn’t resist it. After having a heck of a time getting it home, I ended up taking the top piece to the dump and started working on the bottom piece.

before photo pleasure in simple things blog

First, I used a sealer on it because I feared some of the stain may bleed through the paint. I decided Old White and Duck Egg would look really great on this piece, even though I was very tempted to use my favorite French Linen.

Duck egg door pleasure in simplet things

This piece would find its home in a commercial retail space that had something of a poetry theme, so I had the idea to paint the inside of the drawers and add some pages of a poetry book; roughing them up some to make them look vintage. And, because of the poetry theme, I departed from my standard coastal town name and named the piece T.S.

inside cabinet drawer pleasure in simple things blog

This redo had to be one of my toughest ever because so much of the work was done on the hottest, muggiest days we have had this summer. And, believe me; I am not exaggerating…the weather was so bad that the drawers had swollen and wouldn’t fit back into the piece when it was completed! It wasn’t until T.S. was in its new home, in air conditioning for 24 hours, that I was able to put the piece back together – and, even then, I didn’t want anyone to touch it for a while because I feared the wax wasn’t set. (The reason there are no great after photos! That and the fact that the retail space hadn’t opened yet!)

cabinet detail pleasure in simple things blog

I ended up really happy with the result and I think the details are just lovely. Here is how T.S. came to be:

• 2 coats of Annie Sloan Old White on the main part of the piece
• 2 coats of Annie Sloan Duck Egg on the doors and drawers
• 1 coat of Annie Sloan Old White and water wash (50/50) on the doors and drawers – applied with a cloth
• 1 coat of Annie Sloan clear wax over everything
• Some distressing
• 1 coat Annie Sloan dark wax

cabinet redo pleasure in simple things blog duck egg and old white

Thanks so much for stopping by!

Have a wonderful weekend and remember to take pleasure in simple things, Jackie

2 comments

diy rubber bottomed tote bag

July 21, 2015

tote bag diy with flowers pleasure in simple things

Don’t you love those rubber bottomed tote bags? I do! I have been meaning to make myself one for quite some time. I decided to give it a shot when I saw the Ikea straw totes on sale for $2.99! How could I go wrong?

My original plan for a rubber bottomed tote was to create one on a canvas bag and include a monogram. Once I got the bottom on my new straw tote, I changed my mind about the monogram. I preferred the look without it. I will wait until I find a good deal on a canvas tote, then I will make one with a rubber bottom and include a monogram.

a finished tote bag with flowers pleasure in simple things blog

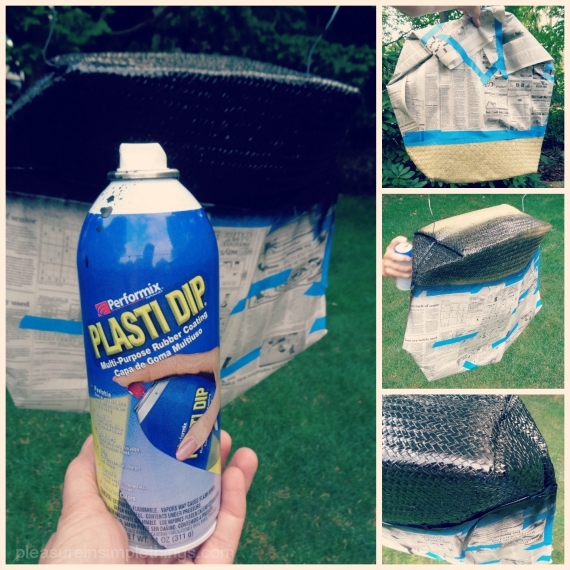
This is a super easy project. The only supplies you need are; the tote you plan to use, some tape and paper for masking, and a can of Plasti Dip. You have seen me use Plasti Dip quite a bit if you follow this blog. I really love the product. (I will include some links to other DIY projects using Plasti Dip at the end of this post.) This product was once confined to the garage – but not once I got a hold of it! I adore repurposing products that are carried at a building supply store – Plasti Dip is one of these products!

diy rubber bottomed tote pleasure in simple things blog

Rather than the liquid form you have seen me use in the past, I am using the spray version of Plasti Dip for this project. Any spray paint has an overspray, so it is necessary to thoroughly mask any areas that will not be painted. To prepare, I used painter’s tape and newspaper to mask off these areas and I hung the bag upside down on the clothesline. This made it easy to paint. I chose a black paint and sprayed it in two light coats. The natural material of the tote is very porous, so it definitely requires 2 coats.  (The texture of the tote will prevent a perfectly sharp line like you would get on fabric.)
tote bag with flowers diy pleasure in simple things blog

That’s it! Just be sure to position the tote as you would use it – you don’t want it folded when you spray it since the rubber material dries hard.

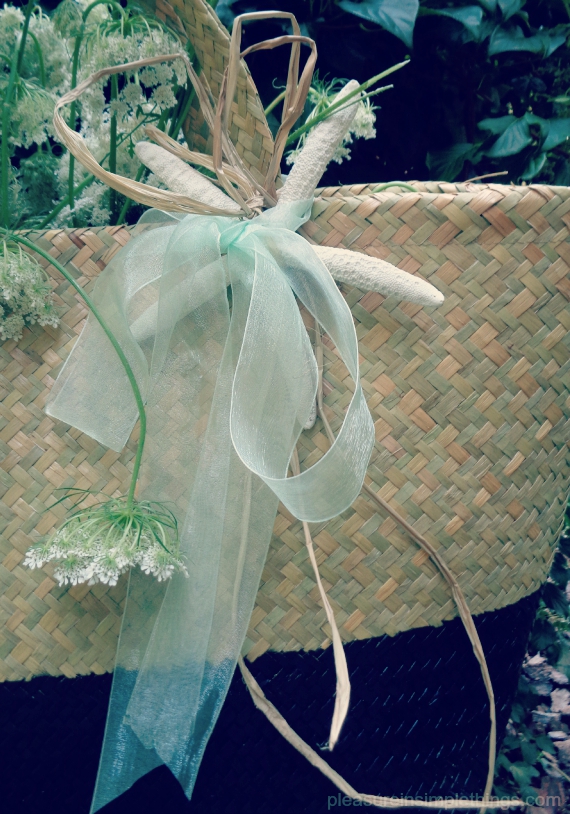
Isn’t it great? I love it! I hope I have inspired you to try this fun and easy project!

diy tote bag with starfish pleasure in simple things blog

Links to 5 other DIY projects using Plasti Dip:  Color dipped wooden spoons, On pumpkins, Napkin Rings, Nautical necklace, Seafood swag

Thanks so much for stopping by! Remember to take pleasure in simple things, Jackie

Sharing with The Shabby Nest, French Country Cottage,  Sand & Sisal, Coastal Charm.

no comments

↑ Back to top