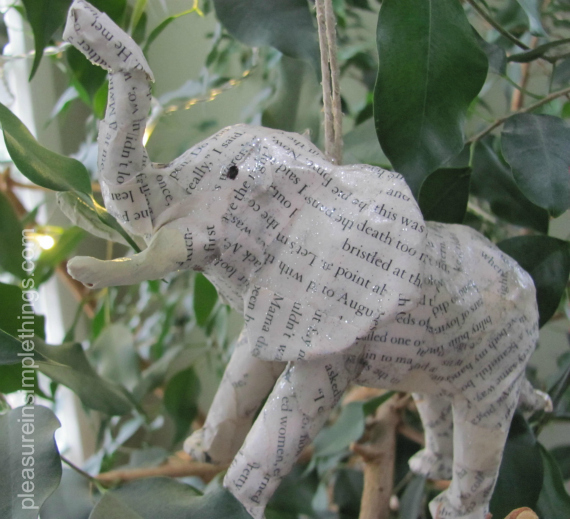
Isn’t it great to be able to find a use for something old? Even better if you fall in love with the results! That is what happened for me when I decided to turn old plastic animals into tree ornaments. I am sharing an easy tutorial on how I did it.
This is what you will need:
- plastic toy animal
- ModPodge (or white glue thinned down with water)
- wax paper
- pages from an old book, cut into strips
- twine or ribbon (for hanging)
- straight pins (a couple for each animal)
- glue gun & glue
- black paint or permanant marker
- sparkles (optional)
1. Decide what animal you will be working on. If you don’t have one, you can easily find one at a dollar store or craft store. I am partial to sea creatures, so I started with a dolphin. As it turned out, the dolphin was the quickest because it had simple lines. The more complicated the shape of the animal, the longer it will take because you will be covering the body with the strips.
2. Assemble your materials. I put the ModPodge in a paper cup I had trimmed down – just to make cleanup easier. You can’t see it in the photos, but I used a sheet of wax paper to keep the animal on during the process and for drying.
3. & 4. The first thing I did was to attach a hanger. I used a piece of twine. I decided to use two straight pins to attach the twine since the body of the animal is hollow. (Just be sure it does not come out the other side of your animal.) I then put a big glob of hot glue on the point of attachment – just to be extra sure it stayed attached…overkill?
5. Next, I put ModPodge on both sides of a strip of the book page and attached it to the dolphin. I continued attaching pieces in random directions until the entire piece was covered. (You will want smaller pieces for more detailed areas.) There is no need to cover it all in one sitting…I did mine over the period of a few days because I would work on it when I had a couple free moments.
6. When the animal is completely covered, let it dry thoroughly.
I originally had planned to accent my piece with a thin gray paint wash, but I liked the way it looked and decided to leave it the way it was. I did add some sparkle (great with the reflection of the Christmas lights) and added a couple features with a marker (I wanted to use dimensional paint, but the bottle of black I had was dried up). On the elephant, I painted just the tusks in an off white.
I love the way they came out!
I don’t have my tree up yet, so I couldn’t demonstrate how they will look when they are actually on the tree…for the opening photo, I hung the elephant on one of my houseplants – you get the idea! On this project, I repurposed the plastic animals and the old book…can you tell which book I used? Any readers out there? In the spirit of the season, if you can guess the book, I will send you a holiday gift. The first one to email me the correct title gets the surprise!
I hope you enjoyed this easy diy tutorial to transform your plastic toy animals into Christmas ornaments… Now, to figure out how to repurpose all those Legos and Matchbox cars!
Thanks for stopping by, Jackie


I just love that elephant!
Here is a company I found on etsy today that repurposes legos, sells the ornaments nad donates the money to a local charity. Love it!
http://www.etsy.com/shop/ornaments4charity
That is cool Lesley…a great idea! Thanks for sharing!
Stopping by from Kate’s party to tell you that these ornaments are adorable! I can’t wait to try it for myself!
Thanks! Your mantel looks great Lizette! I love your philosophy about enjoying the simple things :) Do you live in Cape Cod?
Thank you! I do not live in Cape Cod. I am from the Midwest! It would be lovely to live there, though! ;)
Wow these are fantastic. I want 20 of these right now :) Love your idea :) And how they came out!
oh.
my.
gosh.
I don’t have kids.
However, I’m now considering having some, registering for hundreds of tiny plastic elephants along with the customary baby items, waiting til they cast them aside as too-cool ten year olds, and then using those forgotten toys to make these ornaments.
You are too funny!!! I am so glad you commented, because it caused me to check out your blog and I love it! Those drop cloth curtains are so cool :)
Just discovered this in Pinterest! What a wonderful idea!! Just love that elephant!
[…] plastic toys into paper animal ornaments with Pleasure in Simple […]
[…] Oh my, I’m so in love with these easy-to-make (really!) animal ornaments from Pleasure in Simple Things. […]
[…] it is just a recycled toy and and old book? Put a little time and love in and you just made the best gift ever for your bookworm friend. I really love all the up-cycling going on in the blogosphere […]