Subscribe to Pleasure in Simple Things via RSS ReaderFollow Pleasure in Simple Things on InstagramFollow @InSimpleThings on TwitterLike Pleasure In Simple Things on FacebookFollow Pleasure In Simple Things on PinterestEmail Jackie

Tag: holiday


free gingerbread house gift wrap

24
November

free giftwrap diy

Start saving your grocery bags!  Trader Joe’s has started using its holiday bags and they are super cute to use as holiday gift wrap!  So, forget about adding the bags to your recycling bin and start adding them to your holiday wrapping station!

christmas bags

holiday gift wrap diy

This year’s holiday bags sport a cute gingerbread house pattern with a light blue accent.

gingerbread house bags

free wrapping

White or light blue ribbon make for a great addition to complete a package.

free wrapping diy

free gift tags


After wrapping gifts with the bags, use the scraps to make gift tags.

I hope I have inspired you to create some free gift wrap from holiday bags!

Thanks for stopping by!

Remember to take pleasure in simple things, Jackie

P.S.  Would you like some other ideas on how to repurpose brown bags?  Click here!

Comments Off on free gingerbread house gift wrap | diy, holiday

easy diy gingerbread gift wrap

2
December

gingerbread giftwrap diy

Hi!  I know it has been a minute…but, I’m happy today to have some time to show you a really simple, very low-cost way to wrap your holiday packages!  These DIY gingerbread gift tags are made from discarded cardboard and a marker!  So easy!

diy gingerbread giftwrap

If you don’t already have a white, oil-based marker or a white permanent chalkboard marker, purchase one from the craft store to complete this project.  If you want to make coordinating wrapping paper, purchasing kraft paper is not necessary – brown bags work just as well!  (Note:  Trader Joe’s holiday shopping bags work great since they already have a gingerbread house design on brown paper bags!)

neutral christmas

A pencil can be used to draw some basic shapes onto corrugated cardboard.  (There is certainly plenty of this around with all the holiday deliveries rolling in!)  Then, draw the shapes onto the cardboard using a white, oil-based marker and decorate them as you would gingerbread – except use a marker instead of royal icing!

easy diy holiday tags

When the drawings are completed, cut out the shapes and add a hole in the top for hanging.  Simple!

gingerbread house gift tag

To coordinate gift bags, just use the same white marker to add a blizzard of ‘snowflake’ dots.

Isn’t this a great project to do with children?  All their original drawings can easily be transformed into gingerbread gift tags!

holiday giftbag diy

Thanks for stopping by!  Have a great weekend!

Remember to take pleasure in simple things, Jackie

1 comment » | diy, holiday

easy diy marker ornament

17
December

orn holiday diy gold

Making holiday ornaments using paint markers and glass balls is always fun to do.  It doesn’t take any talent to come up with a nice looking ornament for tree hanging or as a gift.  The only supplies needed are clear glass ornaments and paint markers.  A pretty ribbon, of course, goes without saying!

before ornament

Craft stores sell boxes of clear ornaments.  Picking up a box or two when they are on sale is a great idea – having these ornaments on-hand means a homemade gift is always at the ready!

For the design here, in addition to the ornament and marker, I also used some stick-on crystals from the craft store.

diy supplies
This design is probably the easiest one I have ever done!  Give it a try!  (I spray painted the silver top of the ornament with a burnished gold paint and added some glitter – the silver was a little too shiny silver for me!)

make an ornament

For some more ideas for DIY glass ball ornaments, click here and here.

easy ornament diy

I hope you have fun decorating some glass ornaments to give as a hostess gift or to hang on your tree!

Thanks for stopping by!

Remember to take pleasure in simple things, Jackie

Comments Off on easy diy marker ornament | diy, holiday, inspiration

frozen holiday yogurt bark

19
November

frozen yogurt bark

If you follow this blog, you know how much I love frozen treats – ice pops…frozen drinks….I’m a sucker for any icy goodness!

Well, I came up with a frozen, guilt-free holiday treat.  No, it is not an ice pop!  It is a frozen holiday bark!

candy dish of frozen holiday bark

I mixed 2 cups plain nonfat Greek yogurt with ¼ cup honey and 1 teaspoon of vanilla extract.  I spread this mixture on a parchment-lined baking sheet to about a ¼” thick – it made an 11” x 7” slab on the parchment.

Next, I added some fun extras – dried cherries, pistachios, and cocoa chips.

ingredients for yogurt bark

So now my guilt-free creation is looking like a festive holiday bark!

I popped it into the freezer to set and then broke it into pieces to eat!  The remaining pieces are stored in a covered container in the freezer.

Fun, right?

yogurt bark pieces

There are so many fun variations to try – you can come up with some using your favorite extras – dried fruit, raisins, sunflower seeds, nuts, sesame seeds, etc.  I like the consistency of the chewy dried fruit with the yogurt.

I haven’t been this excited about a snack since I discovered frozen grapes!  Maybe if I make a version with lemon peel I could forgo my Thanksgiving lemon meringue pie?  Now I wouldn’t go that far!

Thanks for stopping by!

Remember to take pleasure in simple things, Jackie

Comments Off on frozen holiday yogurt bark | food & festivities, holiday, recipe

diy oyster shell garland

27
August

home made shell garland

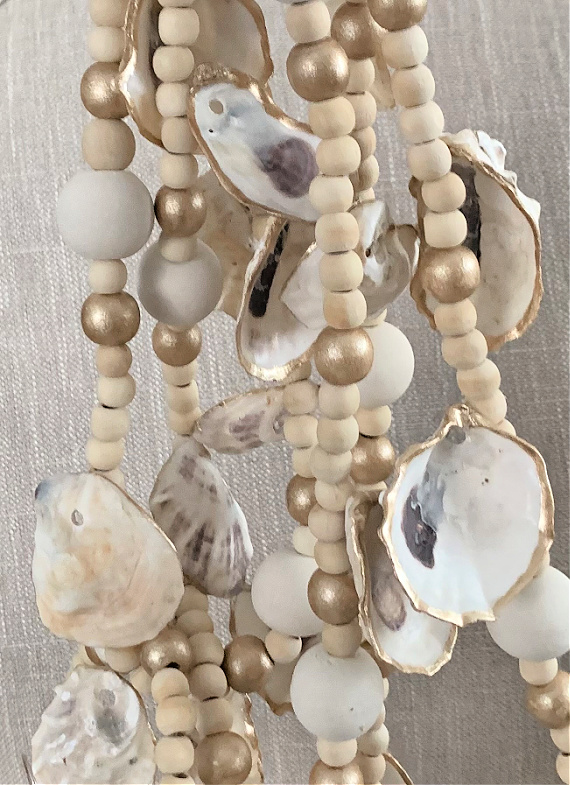
Painting or decoupaging shells is fun, but a shell in its natural state is a thing of real beauty.  I’m getting a jump on the holidays by putting together a garland of natural oyster shells. I did add a little paint – some golden highlights along the edge of the shells.  A holiday garland needs a little sparkle!

I started by collecting a bunch of oyster shells all around the same size – about 2”.  This is a very easy size oyster shell to find on my town beach so I picked a few up every time I’d walk at the beach.  I rinsed them off but they didn’t really require any additional cleaning – the ocean did that for me!

gold edged shells

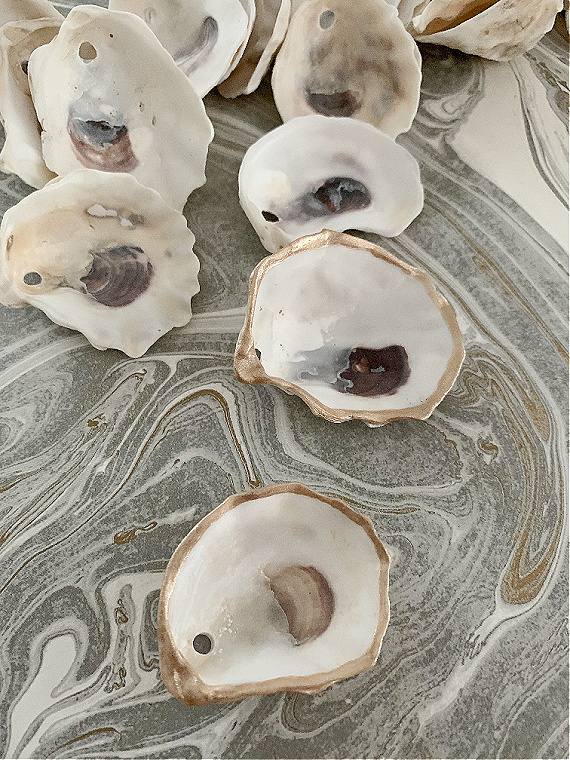
On a rainy day, I spent some time drilling a hole in each shell.  I used a masonry bit to make a hole in each shell in the center, about a ½ inch from the top.  This is super easy to do by putting each shell, one at a time, into a vice to hold it still while drilling.  It only takes a few seconds to make each hole.   This way, there are no accidents if the drill slips – it may take a little longer, but safety first!  I also wear eye protection.

drying painted beads

I estimated I would need a couple dozen shells for this project.  I could always go back and get more if I decide I needed them.  I intend to use the garland on my fireplace mantel, and I thought a couple dozen would be a good number since I wanted to string them between natural wood beads.  My plan was to alternate the shells with the beads on some fishing line.  (By the way, fishing line is a must have for decorating – it blows string, thread, twine etc. away in the strength department.  I use it so much in my decorating – particularly at the holidays and it has been invaluable setting up store displays.  I learned this very young because my dad was a boat owner and also an avid fisherman – there was always fishing line handy in our garage!  The larger the number or ‘test’, the stronger the line.  The number indicates how many pounds of a fish the line can hold before breaking!)

shells and beads

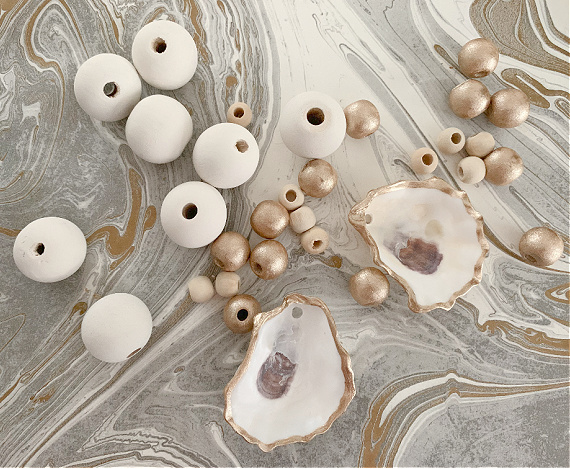
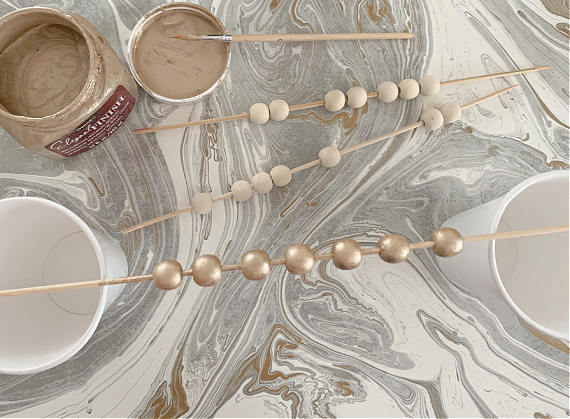
I purchased some wooden beads in 3 sizes.  I decided on a pattern for my garland in advance by laying out the shells and the beads on a table and deciding what looked best.

Next, I added a little holiday bling!  Using a champagne gold metallic paint and a thin paint brush, I painted a thin gold edge around the perimeter of each shell.  Aren’t they beautiful?  One of these shells would look gorgeous mounted in a shadow box frame!

shell garland title

Next, with the assistance of some skewers and some paper cups, I painted some of the wooden beads with the same gold paint I used on the shells.

I decided to white wash the largest size bead.  I did this in the same way I painted the gold beads, but I used a 50/50 white paint/water mix.

vertical hanging oyster garland

After all the beads were dry, I strung them in my decided upon pattern onto the fishing line.  The shells would be tied on last.  I didn’t want more than one hole in each shell – if I strung them with a single hole they would not hang the way I wanted – so, I tied each one on with fishing line after the beads were all strung.

A very easy project, but oh so satisfying!

creating a diy garland from shells

I think I may have a seaside theme to my holidays this year – I’ve been collecting some miniature bottles for another ‘beachy’ project!  Maybe paint a few more oyster shells with added gold script names to use as place cards for the table?  Glue a faux pearl to the inside?

Thanks for stopping by!  Have a fabulous weekend!

Remember to take pleasure in simple things, Jackie

Comments Off on diy oyster shell garland | diy, holiday, sand & sea

easy diy marbled easter eggs

5
March

pink marble egg with tulips

You have seen me marbleize little white baby boo pumpkins.  The same technique can be used for marbleizing Easter eggs.  It is super simple!  All you need is a container of water and some nail polish!

gray marble eggs

I always blow out my eggs before I decorate them so I can keep the ones I like indefinitely.  That is up to you.  Either use a hard-boiled egg or a hollowed-out egg for the basis of your creation.  You can start with a plain, white egg or with an egg you have previously dyed.

marble egg with pom pillow

Find a shallow disposable container that will fit an egg.  I cut down a plastic container to size so I can just throw it in the trash when I am done.

Choose the nail polish you will use.  You won’t need very much.  Don’t buy some just for this project unless you get it at a bargain store.   Nail polish is expensive!   I know Marshalls sells mini bottles in a variety pack for under $5.  But, if you can, best to just choose a nail polish you already own.

marble egg with handpainted egg cup

Add water to your chosen container – enough that you can dunk the egg under the surface.  I use my fingers to do the egg dipping since the nail polish comes off easily with nail polish remover, but you can use a traditional metal egg dying tool (or make one from floral wire).  I prefer using my fingers so I have total control over the movement of the egg.

diy marble eggs nail polish

After the water is in the container, you are going to suspend the nail polish onto the surface of the water by gently pouring a thin random stream over the water.  Next, you will dip the egg under the surface of the water.  This will be fast – you don’t want to leave it for any time period – just pass it through and twist it as you go.  You really need to try it once to get the hang of it.

marble egg in straw

That’s it!  So easy!  The nail polish will dry hard pretty quickly.  For those who asked when I did the nail polish marbleized pumpkin – no, it doesn’t smell!  Just like your nails don’t smell when they have dried polish on them!  I’ll put some video on my Instagram stories.

After the nail polish is dry, you can repeat the process with a different/2nd color nail polish.

pink marble egg in wood cup

Finished egg displayed in a wooden egg cup purchased at Target.

Display your creations any way you’d like.  Target has some great inexpensive wooden egg cups.  Or, white ones are only 97 cents at Christmas Tree Shops!  I bought a few of the white ones and painted them with a gold rim.  An easy embellishment!

diy handpainted egg cup

A finished egg displayed in an egg cup purchased at Christmas Tree Shops for 97 cents. I added a hand-painted gold rim.

I hope you will try creating a marbleized Easter egg with nail polish.

pink marble egg with jasmine

I still have some egg decorating ideas to share.  (You can also find some good ideas in the archives by using the search bar.)

Thanks so much for stopping by!

Remember to take pleasure in simple things, Jackie

Comments Off on easy diy marbled easter eggs | diy, holiday, inspiration

candy cane rice cakes

29
December

white chocolate and candy cane rice cake

I like to think I discovered the rice cake ice cream sandwich.  I started making them over 30 years ago.  What was the very first one I made?  I spread two rice cakes with peanut butter and sandwiched softened vanilla ice cream in between the two.  SO crunchy and delicious!

But for the holiday version, I cannot take total credit since a local grocery store called Stew Leonards came up with the holiday rice cake that I now use for Christmas rice cake ice cream sandwiches!

holiday rice cake recipe

Many Christmases ago, I found the white chocolate and candy cane coated rice cakes at Stew Leonards and they instantly became my favorite holiday treat!  These days, the store only makes them by special order and I can never remember to order ahead.  So, instead of giving up on holiday rice cakes – I make them myself!

candy cane rice cakes

It is easy enough to do.  I simply melt down a good white chocolate (I like Lindt or Ghirardelli) to add to one side of a rice cake.  A heaping tablespoon of melted white chocolate goes into the center and is spread evenly with a knife.  While the chocolate is still wet, I sprinkle crushed up candy canes on top!  So simple, yet SO yummy!  For 8 rice cakes, I use 11 ounces of chocolate and 8 crushed candy canes.

Once the rice cakes are made, they can be eaten as is or as part of an ice cream sandwich.  I think vanilla, eggnog, or peppermint stick ice cream works best in a candy cane rice cake ice cream sandwich!  Of course, it needs to either be a homemade ice cream or a very good quality ice cream.  It is the holidays after all – no skimping!

rice cake ice cream sandwich

Now that you know how to make them, put all your leftover candy canes to good use!

Thanks for stopping by!

Remember to take pleasure in simple things, Jackie

P.S. Click here for more on ice cream sandwiches.

Comments Off on candy cane rice cakes | food & festivities, holiday, recipe

diy abstract tree ornament

24
December

As you may know by now, as a fun holiday countdown, I am doing the final four days of DIY ornaments countdown!  Today is day four of the four days in a row of posts on how to create an ornament from a clear glass ball ornament.

For the DIY on ornament number four, I started with an abstract design on the glass.  I created this design by using a glue gun!

glue gun ornament diy

After my glue gun design was set, I sprayed the ornament with gold spray paint.

spray paint on ornament

I sprayed the top silver fastener with an antique gold spray paint and replaced it when it was dry.  Spraying the metal top definitely makes a big improvement to the finished ornament!

painted ornament cap

When the spray paint was completely dry, I accented the pattern with dark furniture wax. (I used Annie Sloan dark wax.) I just rubbed the wax randomly on areas of the pattern with a paper towel.  Complete!

That was the last of the four DIY posts for glass ball ornaments.  I hope you enjoyed this little mini-series and I hope you were inspired to create some new designs of your own!  Pick up some glass ball ornaments after the holidays on clearance to start making next year’s creations!

Thanks for stopping by!

I wish you good health and a most blessed holiday!

Remember to take pleasure in simple things, Jackie xo

Comments Off on diy abstract tree ornament | diy, holiday, inspiration

diy initial glass tree ornament

23
December

DIY monogram ornament

As you may know, as a fun holiday countdown, I am doing the final four days of DIY ornaments countdown!  Today is day three of the four days in a row of posts on how to create an ornament from a plain clear glass ball ornament.

There certainly are an infinite number of ways to decorate homemade ornaments and the best thing about making your own is tailoring them to your own taste and décor.  If you follow my blog, you know I love topography and an initial ornament was pretty much a guarantee on one of the four designs.

So, for ornament DIY number three, I crafted an initial ornament.  I chose a cream and black color scheme.

DIY monogram tree ornament

Since the glass ball was clear, I started by pouring a little bit of cream color acrylic paint inside the ball and swirled it around until the whole inside of the glass surface was covered.  I set it aside to dry.

I sprayed the metal fastener at the top of the ornament in a flat black to complement my design.

Next, I simply drew on an initial with a black permanent marker and added a black velvet ribbon to complete the elegant look of the ornament.

black and cream monogram ornament

That is it for ornament number three DIY!  Tomorrow’s post will be the final ornament DIY – number four!

Thanks for stopping by!

Remember to take pleasure in simple things, Jackie

Comments Off on diy initial glass tree ornament | diy, holiday, inspiration

diy golden feather tree ornament

22
December

golden feather ornament

For a fun holiday countdown, I am posting a final four days of DIY glass ornament design countdown!  Today is day two of the four days of posts on how to create four different ornaments from plain clear glass ball ornaments.

For day two, I have a super simple design!

diy golden feathers

The only requirement is to dip a white feather in some gold acrylic metallic paint!  If you follow this blog, you know I love dipping white feathers in gold paint!  I find a lot of different ways to use them!

Once the feather is dry, it just gets placed inside the ornament.  So simple and elegant!  I love it!

feather ornament on tree

I had spray painted the top piece of metal on the ornament with champagne gold spray paint in advance to give it a more subtle look.  I removed it carefully – it comes off and on easily with care.  I also added some glitter to the metal top before replacing it.

white candy canes and ornament

That’s it!  An easy DIY!

Check back tomorrow for ornament DIY number three!

Thanks for stopping by!

Remember to take pleasure in simple things, Jackie

Comments Off on diy golden feather tree ornament | diy, holiday, inspiration

Back to top