Subscribe to Pleasure in Simple Things via RSS ReaderFollow Pleasure in Simple Things on InstagramFollow @InSimpleThings on TwitterLike Pleasure In Simple Things on FacebookFollow Pleasure In Simple Things on PinterestEmail Jackie

Tag: gift


target bargain bin diy

6
December

diy-felt-bag-pleasure-in-simple-things-blog

I love the section at Target with all the low-priced items!  It is so much fun to find a great item for $1. or $3. in those magical bins at the front of the store!  Sometimes, a little DIY is the perfect thing to make something from the bin simply fabulous!

before-felt-clutch-pleasure-in-simple-things-blog-Recently, I ‘felt’ that way about a marvelous felt clutch I found in the $3. bin!  Though great on its own, a little enhancement would make it special!

I had a few ideas for a modification right from the start, but I knew I wanted to do an initial.  I was thinking I would use a plaid fabric that would make a nice contrast against the gray and would scream holiday.   To make it easy, I could use fabric bonding to adhere the initial.  Then, if I had any embroidery thread in an appropriate color, I would use a blanket stitch on the edges to finish it off.

felt-clutch-close-up-pleasure-in-simple-things-blog

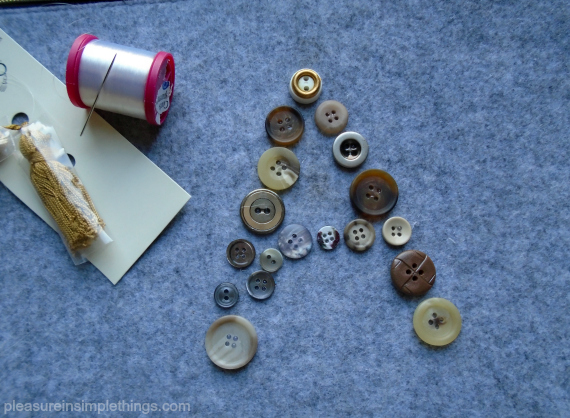
When I got home, I looked at the random buttons I had left in my button box and some of the button colors were perfect against the gray felt of the clutch.  I changed my plaid idea to an initial formed from  buttons!  Based on the colors I was using, I would make a mustard colored tassel to add a finishing touch!

I used a small bead of glue from my glue gun on each button to hold it into place before I sewed each one onto the clutch.

sewing-a-felt-clutch-pleasure-in-simple-things-blog

When I went to the craft store to buy some yarn to make a tassel, I found a premade one in the color I wanted for less than the price of the material to make one!  Perfect!

initial bag diy pleasure in simple things

The pouch makes a great gift on its own or it can be used as a pretty item to tuck some presents into!

If you’d rather not use a needle and thread, another way to add an initial to the clutch could be to use a metallic iron-on initial from the fabric or craft store.

wrapped-gift-pleasure-in-simple-things-blog

A beautiful gift for under $5!  Thank you Target for the bargain bins – they are a wealth of (inexpensive) inspiration!

Thanks for stopping by!  Remember to take pleasure in simple things, Jackie

Comments Off on target bargain bin diy | diy, gift ideas, holiday, style

zip code pillow gift

9
December

adding a zip code to a pillow gift pleasure in simple things blog

I love using zip codes in gifts! Giving a gift with the zip code from a special place – a hometown, the location of a new home, a vacation or honeymoon spot, or a college town – is such a thoughtful way to recognize a favorite or significant place of the gift recipient.

You may remember the decorative zip code tray I made a while back. (Click here for instructions to make a zip code tray.) Today, I am sharing instructions on how to add a (no sew) zip code to a homemade pillow!

I made a pillow with the zip code for Breckenridge – one of my son’s favorite snowboarding places in Colorado – to add to a group of snow themed pillows I had made for his apartment.

pillows for snow boarders pleasure in simple things blog

I had planned on using an iron-on fabric adhesive to keep the zip code numbers in place and then to add decorative stitching around the edges of the numbers. As it turned out, the instructions on the adhesive I choose said “do not sew” on the instructions so, I ended up not including the decorative stitching to my design.

I chose linen for the pillow and gray felt for the zip code numbers. I used a product I purchased at a fabric store called HeatnBond Ultrahold to adhere the numbers.

zip code pillow on a bed pleasure in simple things blog

I decided on a 12” x 16” finish size for my pillow and cut the fabric appropriately. (If you decide to use a pillow form for your pillow, be sure to create a size that will accommodate it. If you are using polyfill to fill your pillow, you obviously do not need to be exact in your measurements.)

So, before proceeding to make the pillow, the desired zip code needed to be added to one of the pillow pieces. This was not hard to do, but took a little time and patience.

zip code pillow collage of instruction photos pleasure in simple things blog

First, I printed out numbers from my computer in a size and type style that looked appropriate for the finished pillow size. I cut out the five numbers from the computer paper.  (Cut only one paper number for a duplicate number.) I cut a piece of felt in an appropriate size to accommodate the five numbers I cut out. Following the instructions on the fabric adhesive, I used an iron to adhere the fabric adhesive to the BACK of the felt. Then, I flipped the numbers and traced them onto the paper of the adhesive. BE SURE to trace the numbers BACKWARDS (flipped on reverse side) so that they will come out the appropriate way when cut! I carefully cut out each number from the tracings. I removed the adhesive backing from the felt numbers and positioned them onto the right side of the linen piece I was using for the front of the pillow. Following the instructions on the adhesive, I ironed and bonded the numbers to the fabric.

Zip code complete! I then proceeded to finish sewing and stuffing the pillow. It is perfect for the snow themed holiday gift for my son…the perfect addition to a snowboarder’s apartment!  Now I am thinking I should make more – so many snowboarding states, so little time!  I also made one for a new home owner.  (For my own home I am thinking zip codes from favorite beach towns in neutral and sea glass hues!)

Love a themed gift! It’s snow much fun! ;) I can’t wait to coordinate the wrapping!

snow themed pillows pleasure in simple things blog

Note: The snow pun pillows in this post were ordered from Tiny Prints. Every year when I order my Christmas cards, I go a little crazy ordering other products I see on their site…this year; I couldn’t resist all the wonderful pillows that were available to personalize. If you want a zip code pillow and would rather not sew it yourself, you can easily personalize one using this website (click here for website)…or, even add a photo to a pillow. If I had a photo of my friend’s new home, I could have made a pillow with a photo of the home on the front! Next, I may order a pillow with a photo of my son snowboarding to add to his gift!  Another option to create a zip code pillow is to buy a pre-made pillow cover (Ikea has some nice ones) and follow the instructions I’ve provided to add a zip code.  I hope I have inspired you to create a themed gift for someone special!

Thanks for stopping by! Remember to take pleasure in simple things, Jackie

Sharing with Thoughts from Alice, Elizabeth & Co., House of Hipsters, and Sand & Sisal.

7 comments » | diy, gift ideas, style

vintage handkerchief lavender sachets

9
May

vintage handkerchief sachet diy

Back in my grandmother’s time, handkerchiefs were an art form.  There were so many beautiful handkerchief designs – many embroidered – and every lady carried one.

I remember my grandmother always having one tucked up her sleeve.  Everything was made to last in my grandmother’s time, and this included handkerchiefs.  They were always fashioned of cloth, not the disposable variety of today.

vintage materials for sachets

Because of this, there are still many lovely old handkerchiefs around today.  I saved many from both my grandmothers because of the sentimental value, but over time I have found some great ways to transform these heirlooms into items that are practical as well as beautiful.

For Friday field trip today, I am sharing my favorite way as we travel back to a time of beautiful cloth handkerchiefs and fashion them into lavender sachets.  With Mother’s Day approaching, a sweet sachet made from a family heirloom can make a special gift for mom.

vintage handkerchief sachet

Inevitably, a gift like this may be too pretty to scent a drawer…and, instead…may end up displayed on top of a dresser or nightstand.

If you are not lucky enough to have a family heirloom to use in creating this sachet, vintage handkerchiefs are easily found for only a couple dollars each at yard sales or antique shops.

vintage lace for sachets

Very little lavender is needed to create a sachet, and because it is such a light material, a cup and a half of lavender weighs less than an ounce…be mindful of this when you are deciding how much to purchase.

vintage handkerchief sachets

To create the sachet, cut a square of cheesecloth (about a 7” square) to hold the lavender.  I use the cheesecloth so the lavender won’t directly touch the hanky, but the scent will still come through.  You will only need one quarter to one half cup of lavender.  You can adjust the size of the cheesecloth and the amount of the lavender depending on the size of the handkerchief you use.

vintage hankies

Tie the cheesecloth with a piece of twine and position the ball of lavender in the center of the handkerchief – enclosing the lavender ball in the handkerchief with a piece of ribbon or lace.  I chose some vintage lace.  That’s it!  Beautiful…and, what a heavenly smell!

vintage handkerchief sachet

Handkerchief sachets also make wonderful bridal shower or wedding favors.  They can even be personalized with an embroidered initial, name, or date.

quote with vintage lace

Have a wonderful weekend and a blessed Mother’s Day!

Remember to take pleasure in simple things, Jackie

Sharing at Crafts a la Mode, Craftberry Bush, and Timewashed.

6 comments » | diy, gift ideas, nostalgia

appreciating vanilla

22
November

ice cream at Williams-Sonoma

Have you ever thought about the flavor differences in types of vanilla extract?   With Thanksgiving so close (…think fresh vanilla whipped cream on those pies!…) I thought it would be perfect timing to share a Friday field trip to explore these differences.

To do so, I attended a vanilla ‘class’ at Williams-Sonoma – great preparation for holiday baking!  I am sharing a little of what I learned and I am also including a simple recipe for holiday gift giving – vanilla sugar.  (Wondering how I am tying vanilla sugar into my woodland holiday theme?  Isn’t tasty vanilla sugar needed for sprinkling on berries?  What better to add to a tray of fruits, nuts & berries?  Or, to give in a pretty jar accompanied with fresh berries?  Yum! )

In simple terms, vanilla extract is made by chopping vanilla beans, soaking them in a mixture of alcohol and water, and then aging the solution.

taste testing vanilla

Taste testing three vanillas in milk at Williams-Sonoma. I also had the opportunity to taste vanilla in homemade vanilla ice-cream and to taste vanilla in pumpkin bread served with vanilla whipped cream.

The differences in taste occur based on where the vanilla originates.  At Williams-Sonoma, I had the  opportunity to taste test the three most common kinds – Tahitian, Mexican and Madagascar Bourbon – the Mexican and Madagascar Bourbon beans are more strongly scented, while Tahitian are more delicate.  Mexican beans are in short supply, however, while Madagascar Bourbon beans make up about three-fourths of the total supply.

Tahitian Vanilla is grown on the island of Tahiti; this distinct member of the vanilla family is prized for its aromatic, fruity, cherry-like flavor.  A favorite of French pastry chefs, Tahitian vanilla performs best when used in low or no-heat applications, as its delicate flavor can become weakened in the presence of high heat.  Enjoy Tahitian pure vanilla extract in refrigerated and frozen treats, fruit pies and sauces, cream fillings, smoothies and shakes.  This vanilla is ideal for a vanilla ice cream that is to be served with fresh fruits or fruit desserts.

vanilla sugar as gifts

Vanilla, one of the most popular flavors in the world, originated in Mexico.  Mexican vanilla is known for its creamy, spicy flavor that has a special affinity for dishes that contain chocolate, cinnamon and other warm spices.  When properly processed, Mexican vanilla is of exceptionally high quality and flavor.  Enjoy Mexican pure vanilla extract in cookies and cakes, chocolate drinks, confections and frozen treas.  Also try it in spicy savory dishes, such as chili, tomato sauces and barbecue sauces.

tasting vanilla

Made from beans from on the island of Madagascar, Madagascar Bourbon vanilla is the king of vanillas.  It takes the name “Bourbon” not from Kentucky whiskey, but from the French Bourbon court that ruled Madagascar in the 1800’s.  Madagascar Bourbon vanilla is considered to be the highest-quality pure vanilla available, described as having a creamy, sweet, smooth, mellow flavor that blends beautifully with a variety of foods.  It is especially suited to rich foods such as ice cream and butter cream as well as cookies, cakes and confections.

I think this is a great guide for those of us that haven’t attended pastry school!  Thank you Williams-Sonoma!  I also learned that when adding vanilla extract to hot food, to first let the food cool for a few minutes.  When the extract is added to hot food, the alcohol evaporates, taking with it some of the vanilla flavor!

I hope you enjoyed today’s Friday field trip exploring the differences in vanilla extract!

Have a wonderful weekend and remember to take pleasure in simple things, Jackie

Comments Off on appreciating vanilla | field trips, food & festivities, gift ideas

blueberry sauce & trifle

28
August

Enjoy the last of the season.

At a recent visit to a farmer’s market in Westport, CT, one of the booths passed out a blueberry ginger sauce recipe.  I had a sample and thought it was great.  As I was speaking to the woman at the booth, we were both speculating on what a great trifle it would make.  Sure enough, I went home and gave it a try!

Blueberry ginger sauce

  • 4 cups blueberries
  • 1 cup agave
  • ½ tsp. peeled, finely grated fresh ginger
  • Finely grated zest of 1 lemon

Place ingredients over high heat to bring to a boil, then reduce heat to low.  Simmer until thick and shiny, about 30 minutes.  Let  cool.

For trifle

  • Combine 2 cups of ricotta cheese and ½ cup powdered sugar
  • Roughly chop ½ cup gingersnaps
  • Make or purchase a pound cake

Cut pound cake into small cubes and line the bottom of a trifle dish.  Cover the cubes with half of the ricotta mixture.  Next, add a layer of the cooled blueberry sauce.  Repeat once more, then top with the chopped gingersnaps.  I made mine in a 6” trifle dish (filled to the top – it really should have been made in a larger dish) and also made an individual serving in a mason jar as a taste for a special friend.

A photo of an individual sized serving of trifle packaged in a mason jar…perfect as a gift or a party favor.

Making an individual serving in a mason jar is also a great idea for a picnic, outdoor party, or as a favor…just make a mini version of your original dessert.

A photo of an individually packaged trifle in a mason jar…cut a small square of scrap fabric to place on top before screwing down the outer lid and add scraps of ribbon. Here I added a sand dollar as a symbol of summer :)

After making the trifle,  I had plenty of sauce leftover – a great topping for pancakes, waffles or a good vanilla or ginger ice cream :)

Enjoy!  Thanks for visiting, Jackie

Comments Off on blueberry sauce & trifle | food & festivities

Back to top