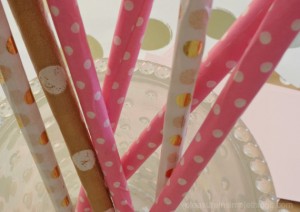
I think most of us that love creating are collectors – often collecting beautiful scraps to recycle for imagined future projects. Today, I am sharing one way I use my salvaged tissue paper by providing a tutorial for creating pretty fringed pencils. How earth friendly to use recycled tissue paper and old pencils that have been in the junk drawer, for who knows how long, to make these cute pencils!
Because Valentine’s Day is so close, I have chosen to use tissue paper that coordinates with a Valentine’s Day theme in one of my favorite patterns…polka dots! Join me as I channel my inner Kate Spade! (Am I the only one that has a polka dot Pinterest board?)
Supplies Needed
Pencils (round)
Spray adhesive
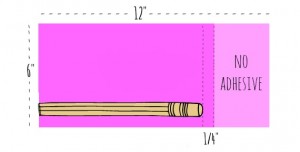
Decorative tissue paper – one 6” x 12” piece for each pencil
Start by deciding how many pencils you will create, and cut the appropriate number of tissue paper pieces. A tissue paper with a little more weight is preferred over a super thin variety.
(You can also use a paper cocktail napkin – by separating the top layer and using that in place of the tissue paper. The fringe will not be as long if you choose to use a napkin, since they are not the full 12” specified. Also, I find the cocktail napkin does not hold up as well as the tissue paper when sharpening the pencil. The beige with white polka dot pencil shown here was made with paper from a cocktail napkin.)
 Spray the wrong side of the tissue with the adhesive, being sure to plan for overspray (protect the area), leaving a section without spray (use a piece of paper to mask the area from spray). The reason for the non-adhesive section is because you don’t want adhesive on the area that will be the fringe. With care, lay the piece of tissue paper on a clean, flat surface – adhesive side up. Carefully line up the pencil in the corner of the tissue paper remembering that the adhesive is in place and put it directly on the right spot the first time. The eraser side will be on the inside, and the writing side on the outside edge, of the tissue paper. Roll the pencil tightly down the length of the tissue paper.
Cut the end of the tissue paper to make the fringe, stopping within a 1/2” of the eraser end of the pencil. You will want to make cuts approximately 1/4” spaces apart – this does not need to be exact – by placing the bottom of your scissors inside the tube you created at the pencil end. As the final step, twist the fringed end of the pencil…because there is a little adhesive on this end, it will keep the twist in place. Trim the fringe to desired length, if needed.
That’s it! Cute, right? I made a tag from a round cut from a pink paint swatch and added a gold leaf heart. If you are giving your pencil(s) as a Valentine to a youngster (or someone young at heart), you may want to add a gift tag with a corny Valentine saying like:
• You’ve got the right stuff!
• You are just write for me!
• Write on!
• You’re all write with me!
I hope you enjoyed today’s fringed pencil craft. Maybe I have inspired you to make up a batch to match your office décor, or… to match your kitchen where you keep the grocery list?
Thanks for stopping by! Remember to take pleasure in simple things, Jackie
Sharing with Nancherrow, Craftberrry Bush, Thoughts from Alice, Sand & Sisal, Homework, and Elizabeth & Co.


