Subscribe to Pleasure in Simple Things via RSS ReaderFollow Pleasure in Simple Things on InstagramFollow @InSimpleThings on TwitterLike Pleasure In Simple Things on FacebookFollow Pleasure In Simple Things on PinterestEmail Jackie

Tag: food gift


mother’s day lavender almonds

10
April

lavender almonds in a teacup

On my last trip to Boston, I was at the market near the waterfront.  One of the vendors was selling many different flavors of a variety of nuts.  I tried quite a few flavors and picked out some to bring home.

After I got back home and sampled my purchases, I found my favorite of the nuts were the ones flavored Limoncello lavender.  I thought the aroma and subtle taste of the lavender on the nuts was fabulous!

measuring lavender for flavored almonds

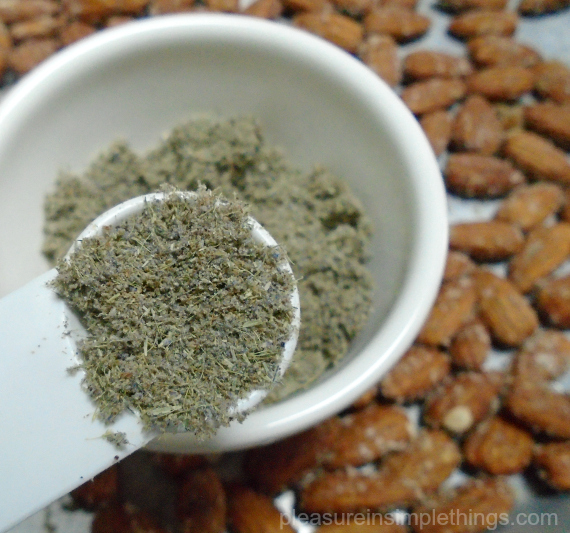
The nuts I brought home didn’t last very long and I found myself wishing I had more!  It wasn’t long before I decided to make my own lavender flavored almonds…substituting vanilla for the Limoncello.  After several attempts at creating vanilla lavender almonds, I found the recipe here to be the winning combination of ingredients.

making lavendar almonds

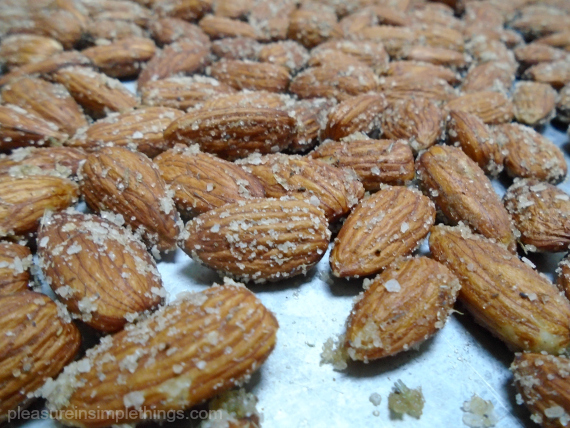
I wish someone had invented a scratch and sniff computer screen so you could smell the heavenly aroma of the lavender!  Give the recipe a try – maybe you will be inspired to adjust the flavors/amounts to your own taste and come up with your own flavor combination!

pleasureinsimplethings recipe for lavender almonds

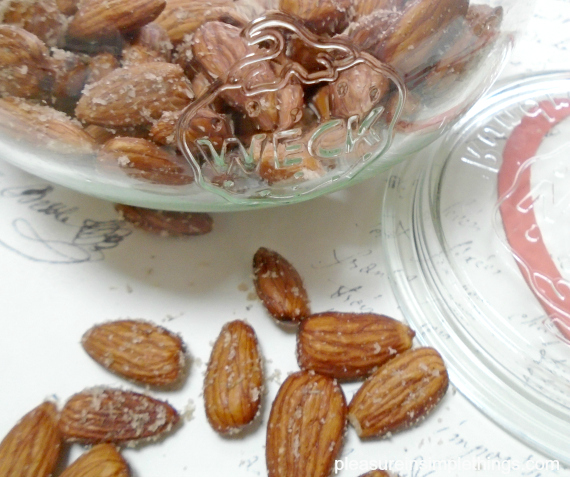
I think this treat is great to gift for Mother’s Day!  Try packaging the almonds in a pretty jar or a vintage teacup!

lavender almonds in a Weck jar

Maybe for the next holiday I will try to recreate my second favorite flavor –  the bananas foster flavored nuts!

Thanks for stopping by!  Remember to take pleasure in simple things, Jackie

Comments Off on mother’s day lavender almonds | food & festivities, gift ideas, holiday, recipe

green tea holiday bark

8
December

close up candy bark

I mentioned in a previous post that I found a great recipe book for trying some new food gifts this year.  Today, on Friday field trip, I am taking you into my kitchen to check out the first one I chose to make.  The recipe I tried is candy bark from the new recipe book Holiday Cookies:  Showstopping Recipes to Sweeten the Season by Elisabet der Nederlanden.  (For more on this book, click here.)

I couldn’t wait to make this!  I have friends that love green tea and I was sure the bark would look festive with green from the tea and red from freeze dried berries.

piece of candy bark

As it turned out, the recipe did not disappoint!  It looks super festive and tastes great.  I do have a few tips if you decide to make this for giving.

First, green tea powder can be super expensive – shop wisely!  I found some at HomeGoods in the food section for a great price!  You can also probably find it as a teabag.  Just be sure to check the label on whatever you purchase and be sure green tea is the only ingredient.  I found the freeze dried berries at a great price at Target in the section where trail mix and nuts are sold.

collage making candy bark

As far as preparation – do not let the dark chocolate layer get too cold before layering the green tea mixture on top!  What I found out is that the green tea layer does not adhere to the chocolate if it is too cold – as soon as the chocolate is firm, spread the green tea layer on top.  Also, work quickly to add the ingredients to the green tea layer because it sets up quickly!

christmas candy bark

This candy was so easy to put together and so quick to make!  Now, it just needs a cute package for gifting!

gift package of candy bark

Thanks for stopping by today!  I hope you are inspired to make a food gift of your own.  I have a couple more new recipes I want to try before Christmas!

last of candy bark

Have a wonderful weekend and remember to take pleasure in simple things, Jackie

Comments Off on green tea holiday bark | food & festivities, gift ideas, holiday, inspiration

summer garden mint

2
September

apple mint pleasure in simple things blog

Now that summer is on its way out, you are probably thinking about all the ways you can use or preserve the remaining herbs in your garden.

For Friday field trip today, I am sharing a way to use your overwhelming crop of garden mint.

end of summer mint pleasure in simple things blog

If you grow mint, you know exactly what I am talking about!  Mint can easily take over a garden!  I learned years ago, the best way to plant mint in the garden is to first plant it in a terracotta pot and then plant the entire pot in the ground.  This contains the growing area and prevents the mint from taking over the entire garden!

pineapple mint pleasure in simple things blog

A great way to use your mint is to make some mint syrup!  I love to experiment with all types of simple syrups, but this easy, three ingredient recipe I am sharing today comes from The Beekman 1802 Heirloom Vegetable Cookbook by Brent Ridge and Josh Kilmer-Purcell.

Chocolate mint pleasure in simple things blog

Make up plenty, keeping some for yourself and package some up in pretty bottles to give as gifts.  It can be used in iced tea or seltzer or spooned over fresh fruit or ice cream.  Or, in my case, used on shaved ice or spooned over The Pantry’s sorbet!  Enjoy!

Fresh Mint Syrup

  • 1 ¼ cup packed, fresh mint leaves
  • 1 cup sugar
  • 1 cup water

In a medium saucepan of boiling water, cook the mint leaves for 10 seconds to set their color.  Drain, run under cold water, and drain again.  Transfer the mint to a food processor and puree.

In a small saucepan, combine the sugar and water and bring to a boil over medium heat, stirring to melt the sugar.  Stir in the mint, remove from the heat, cover, and let stand for 30 minutes at room temperature.

Strain the syrup thought a fine-mesh sieve set over a bowl, pushing on the solids to extract as much liquid as possible.  To store, transfer to a jar and refrigerate up to 1 month.

Gilberties herb farm pleasure in simple things blog

Remember, if you don’t have mint growing in your garden, you can always purchase some at your local farmer’s market or specialty store.  The photos here are from Gilbertie’s Herb Farm in Westport, Connecticut – a great source for fresh herbs.  As you can see, mint comes in many varieties at Gilbertie’s!   Chocolate mint, grapefruit mint, orange mint, ginger mint or any of the many varieties sold at the herb farm would be wonderful to create a syrup this year – and, when planted – many years to come!

Have a fabulous holiday weekend!

flowers at Gilberties pleasure in simple things blog

Thanks for stopping by!  Remember to take pleasure in simple things, Jackie

Comments Off on summer garden mint | food & festivities, garden, recipe

fresh fruit topiary diy

5
May

finished fruit topiary pleasure in simple things blog

Why not pass on the flowers this Mother’s Day and instead, make your mom an edible arrangement as a gift?

Healthier than a box of chocolates, a fruit topiary is a tasty way to show Mom you care. And, when you create it yourself, you can be sure to include all mom’s favorite fruits and treats!

prepared strawberries for a fruit topiary pleasure in simple things blog

I started with a 4” high pot – the perfect single serving size! Choose a container in a color to coordinate with mom’s kitchen so she is sure to reuse it!  To prepare the container for the arrangement, fit some Styrofoam into the container and covered it with some salad greens.

pot preparation for fruit topiary pleasure in simple things blog

I will show you what I used to make mine to give you an idea of what you need to get started on your own creation!

My supplies:
– 4” pot, 4” high
– 4 oz. bag Lancaster soft caramels (I had a few left for tasting)
– 3” (approximately) square Styrofoam, trimmed appropriately
– Salad greens
– Assorted fruit
– Skewers (if you only get one size, purchase long ones – they can always be trimmed)
– Ribbon (optional – a bow can be added by attaching to a skewer)

fruit skewers to make a 4 in topiary pleasure in simple things blog
preparing caramels for a fruit topiary pleasure in simple things blogMy skewers:
3, 8” skewers of cantaloupe slices
2, 8” skewers of grapes (4 grapes)
3, 6” skewers of grapes (4 grapes)
4, 6” skewers of strawberries
9, 6” skewers of chocolate dipped strawberries
15 caramels on toothpicks

Tips for assembly:
– Don’t use really fresh fruit – you want firm fruit so it will hold up.
– For the same reason, only use sturdy fruit. (I learned this lesson pretty quick when I tried to use raspberries – they are too soft.)

creating a fruit topiary pleasure in simple things blog

– Use Styrofoam in your pot, not floral foam.
– Cater to your recipient – use edible items that will appeal to the recipient.  Instead of caramels, you may decide to use baby rounds of cheese, cookies, dried apricots, etc.
– Use decorative cutters – you can use cookie cutters to cut hearts, melon ballers, etc. to ‘fancy up’ the fruit.
– Don’t put it together too far ahead. You can wash and dry the fruit, dip the strawberries, and cut the fruit ahead – but wait to assemble your creation until the last minute.
– Lay salad greens over the Styrofoam before you start assembly and use some after assembly to fill in any holes or skewer parts that may show.

assembling fruits for a edible topiary pleasure in simple things blog

Lastly, have fun with it!

Thanks for stopping by!  Remember to take pleasure in simple things, Jackie

Sharing at Craftberry BushThoughts from Alice, Sand & Sisal, and Coastal Charm.

Comments Off on fresh fruit topiary diy | diy, food & festivities, gift ideas

Back to top