Subscribe to Pleasure in Simple Things via RSS ReaderFollow Pleasure in Simple Things on InstagramFollow @InSimpleThings on TwitterLike Pleasure In Simple Things on FacebookFollow Pleasure In Simple Things on PinterestEmail Jackie

Tag: fall decor


painting acorns

18
September

painting acorns for fall decor pleasure in simple things blog

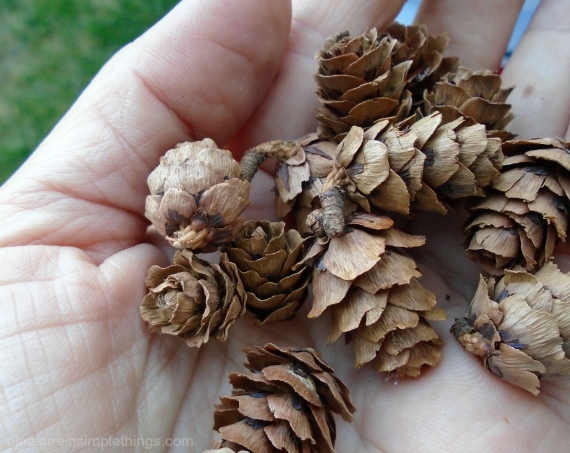
For Friday field trip today, I am painting some acorns! This is my last ‘neutralizing fall’ element. After completing some pine cones and some leaves, the acorns are my final painting project.

acorns pleasure in simple things blog

These little fall icons are very easy to paint and they can be painted to match any décor. I don’t use paint brushes any more when painting these small pieces; I much prefer paint pens.

painting acorns for a neutral home display plesasure in simple things blog

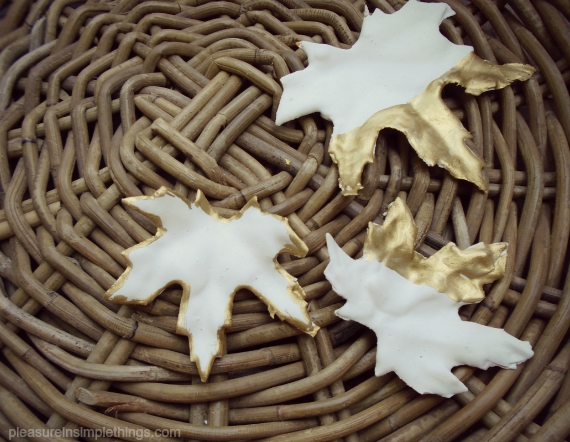
For this year’s fall display, I first painted the bottoms of all the acorns with white paint pens. After the paint was good and dry, I used a little piece of a clean rag to rub the white paint with gold metallic paint.

For the tops of the acorns, I used a cotton swab to add some clear paint glitter to give them a little bling!

neutralizing natural elements for fall pleasure in simple things blog

That’s it! Now the acorns have been painted to match the rest of my ‘neutralized’ elements! I will team these elements up with some of my hand crafted velvet pumpkins and will add some white pumpkins of varying sizes throughout my home.

netural fall display pleasure in simple things blog

Thanks for stopping by for Friday field trip! Have a fabulous weekend and remember to take pleasure in simple things, Jackie

P.S. If you prefer velvet acorns, click here for a tutorial from my archives…enjoy!

Sharing at French Country Cottage.

Comments Off on painting acorns | diy, inspiration, style

plaster of paris leaves

15
September

basket of plaster of paris leaves pleasure in simple things blog

Last week I talked about ‘neutralizing’ fall and I demonstrated how to get started with some pine cones and bleach. This week, I am continuing on my quest to ‘neutralize’ natural elements for my fall décor.

plaster of paris leaves with gold pleasure in simple things blog

Today, I am ‘neutralizing’ leaves! Actually, in this instance, the leaves are not natural elements – I am using super inexpensive fabric leaves. The way I ‘neutralize’ them is super easy and super messy! I use plaster of Paris to add a porcelain-like look to the leaves.

Plaster of Paris is one of those things every crafter should have in their workshop. There are so many uses for it and it is very inexpensive. Plaster of Paris is a dry powder that is mixed with water to create a mixture that hardens. It can also be mixed with paint to create homemade chalk paint.before and after plaster of paris leaves pleasure in simple things blog

To make the leaves, I simply mix up some of the plaster (2 parts plaster of Paris to 1 part water) and use it to cover the leaves. I use a disposable plastic cup as a measure and stir the mixture with a paint stirrer or plastic spoon in a disposable container. Believe me, you don’t want to keep any utensils you use for this project – it gets very messy! The plaster gets thick pretty quickly, so I don’t waste a lot of time as I dip each leaf to coat, one at a time, into the mixture. I also keep an inexpensive paint brush handy to add extra plaster as needed.

plaster of paris gilded leaves pleasure in simple things blog

Once the leaves are covered, they are left on wax paper or parchment paper overnight to harden completely. A leaf can be draped over a plastic cup to dry with a curve, if desired.

forming a plaster of paris leaf pleasure in simple things blog

The plaster leaves, once dry, can be enhanced with paint or glitter. I like to use metallic gold paint to paint the edges or create a ‘dipped in paint’ look.

These plaster leaves look great on a table, in a bowl, or as part of a fall display. Adding a name to a single leaf with a paint pen turns it into a great looking and unique place card! I use gold thread to make a garland of leaves for a window. (A hole can be added for hanging the leaf, but this must be done as a first step – before the plaster is added! )

add gold thread to hang a plaster of paris leaf pleasure in simple things blog

I hope I have inspired you to ‘neutralize’ some leaves!  Have fun with it!

Thanks for stopping by!  Remember to take pleasure in simple things, Jackie

Sharing at Shabby Nest.

Comments Off on plaster of paris leaves | diy, inspiration

neutralizing fall

11
September

a bleached pine cone with glitter pleasure in simple things blog

It seems everyone is bleaching pine cones these days – and rightly so! For those of us with a passion for neutrals, pine cones can now be happily included in our fall decorating mix!

For Friday field trip today, I am demonstrating the start of how I ‘neutralize’ fall! Since I was in the woods last weekend, it was the perfect time to collect and bleach some pine cones.

pine cones before bleach pleasure in simple things blog

I prefer a 50/50 bleach and water mix in a plastic bucket; keeping the pine cones in the solution 24 hours and drying them outdoors in the sun. If you haven’t bleached pine cones before, be warned that they close up when wet. It gets a little scary when you see them this way, but they open up as they dry.

bleaching pine cones in the woods pleasure in simple things blog

Since the pine cones will float in the bleach solution, I put some paper plates on top of the pine cones and added a few rocks to be sure they were covered completely in the liquid.

That’s all there is to it! Those dark brown pine cones are transformed in a beautiful neutral hue!

a bleached pine cone pleasure in simple things blog
I like to dip the tips of the bleached pine cones into some white or off-white paint or to add a little glitter (like I did with this batch) for some added sparkle!

I hope I have inspired you to do some ‘neutralizing’ of your own! Stop back next week and I will demonstrate how I ’neutralize’ acorns and leaves!

Have a wonderful weekend! Remember to take pleasure in simple things, Jackie

Comments Off on neutralizing fall | diy, inspiration

pine straw bale planting

4
October

pine straw bale

How many times have you seen hay bales and corn stalks used to decorate the outside of a home at this time of year?  Pretty standard, right?  When I saw a workshop scheduled at Terrain for planting pine straw bales, I was intrigued…what exactly would be done with the bales?

pansies for pine straw bale planting

It turned out that Terrain designer Angela actually planted right inside the bale!  I thought it was so cool that I wanted to share this week on Friday field trip.

flower for pine bale planting

A really great idea that can be tailored to any color scheme or taste.  Start with a pine straw bale and some plants that you like or that will coordinate with the outside colors of your house…

mums for pine bale planting

Using scissors or something sharp, cut out spots to plant inside the bales – adding soil as your planting medium.

pine straw bale planting

Looking down on a finished pine straw bale planting created by designer Angela at Terrain in Westport, Connecticut.

pine straw bale planting

After Angela planted the selection of plants she had chosen, she added some green moss around the plants and a few white pumpkins (I wonder if that was for my benefit lol!) to complete the look.

pine straw bale planting

Great idea, right?

pine straw bale planting

Just be sure to place your pine straw bale in it’s spot before you start planting…Angela had hers on a cart so she didn’t have to worry about lifting it after it was completed.  It looks great from every angle!  I love the contrast between the plants and the pine straw.

pine straw bale planting

I hope this will inspire you to try creating one of your own bale plantings…something a little different for your seasonal decor…thanks Angela!

pine straw bale planting

If you don’t have a Terrain near you, you can easily find pine straw bales at Home Depot.

pine straw bale planting

Thanks for stopping by!

Have a great weekend and remember to take pleasure in simple things, Jackie

Sharing at Craftberry Bush and The Tablescaper.

1 comment » | diy, field trips, garden

planting succulents in a pumpkin

23
October

Succulents planted in a pumpkin

seasonal succulents

I have taken a real interest in succulents recently.   There are probably two big reasons for this.  One is that I saw a photo of a succulent garden in a huge conch shell.  I love shells, so the photo immediately caught my interest and got me excited to try and plant some succulents in shells.  Second, a new Home Depot nearby carries a huge selection of succulents.

I actually had a really early love for succulents.  The first plant I ever personally owned as a kid was a cactus plant I bought in Arizona when I visited Phoenix with my grandparents.  My first magazine subscription wasn’t Teen Beat, but rather Arizona Highways because I adored the pages filled with photos of various desert plants across the backdrop of gorgeous sunsets! Although the varieties of succulents available here in New England aren’t the same as out West, Home Depot does have quite a large selection.

I read as much as I could find on the subject of succulent container gardens and also watched some videos on the subject.  The cool thing about succulents is that they can be planted in virtually any type of container.  I decided since it is October, I would try a pumpkin as my first container garden.  Also, because I love the way white pumpkins mix with succulents.

Planting is pretty simple.  The big difference from planting any other type of plant is that succulents require a fast draining soil.  Instructions on creating an appropriate soil are easy to find, but it is actually more cost effective to just buy a prepared soil at Home Depot.

Most succulent container gardens use a top dressing – most often rocks.  I would love to use sea glass in a future garden, but for the pumpkin I decide to use some reindeer moss and also decorate with some Spanish moss.  I will probably use the sea glass idea for a terrarium when the pumpkin starts breaking down and I need to move the plants to a new container.

photo of succulents in a pumpkin

A photo of succulents planted in a white pumpkin.

Don’t they look great in the white pumpkin?  Small white pumpkins planted with succulents would look great at individual place settings at the Thanksgiving table!

I hope you enjoyed succulent gardening in a white pumpkin!

Thanks so much for visiting, Jackie  

7 comments » | garden

Back to top