Subscribe to Pleasure in Simple Things via RSS ReaderFollow Pleasure in Simple Things on InstagramFollow @InSimpleThings on TwitterLike Pleasure In Simple Things on FacebookFollow Pleasure In Simple Things on PinterestEmail Jackie

Tag: diy


diy nautical necklace

30
July

diy nautical necklace

I have never made any jewelry.  When I see some of the beautiful beads in the craft store, I am tempted to make something.  The thing is, it seems when you add the price of all the items needed to make a piece, it can be much less expensive to buy something already made!  Some day I plan on experimenting with jewelry making with my sea glass collection, but today I want to tell you about a necklace I created for less than $5!

A while back, I ripped a photo of a necklace I really liked from a magazine…it had a nautical feel to it since it was made from rope.  But, at $215., it was way beyond my accessories budget…actually, I don’t even have an accessories budget!  So, $215. more than my budget!

diy necklace collage

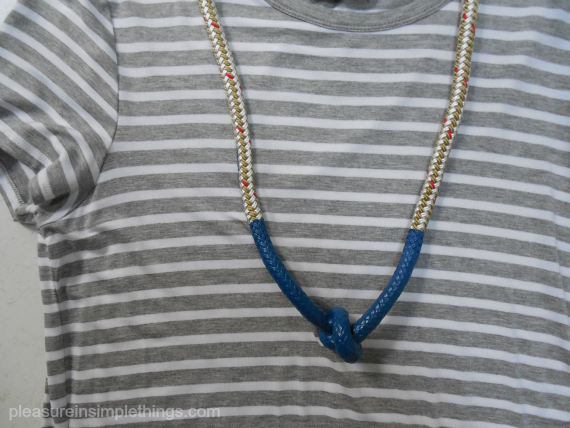
I was able to create the same look as the necklace in the magazine with a piece of rope from the marine store (less than $2.) and some Plasti Dip I had left over from my seafood fork project.  I got a little fancy and bought a bracelet clasp and some wire to use as an attachment and the total for supplies still came out under $5.

The best part is that I love the necklace!  I thought I would wear it with t-shirts, but I really like the way it looks with my gray and white striped long t-shirt dress…so perfect!  All I did was to knot the rope and dip it in Plasti Dip.  The necklace I saw had a red accent, but I decided to use blue since I had some blue Plasti Dip on hand.  I liked the look of two coats of Plasti Dip, but you can easily add more coats if you want the colored area to have a thicker look.

diy necklace

When you buy the rope at the marine store, it is best to get the exact length you want, because they will burn the edges for you to prevent it from unraveling.  There are plenty of different rope options to choose from and the cost is calculated per yard.  I thought the craft store would have some type of clamp to use as a fastener, but I couldn’t find one large enough to fit the diameter of the rope so I crafted a fastener out of a bracelet fastener.  Maybe a jewelry supply store would have something different or, another fastening option would be to tie or fuse the two ends together – slipping the necklace over your head.

So, that is a simple way to create a nautical feel necklace!  I think knotted napkin rings dipped in Plasti Dip would be another great variation on this project.  Plasti Dip can be tinted any color, so there are plenty of color options…have fun with it!

Thanks so much for stopping by.  Remember to take pleasure in simple things, Jackie

Sharing at Elizabeth & Co. and Silver Pennies.

1 comment » | diy, sand & sea, swag

lovely apron upgrade

16
July

diy apron

diy apron

Today I wanted to share an easy way to upgrade a standard chef’s apron into something lovely. I was recently involved with organizing a charity garden event and I really wanted the hostesses to have coordinating aprons. The gardens were so amazing and we had some very tasty food prepared with a flower and herb theme…I needed aprons that were as lovely as the rest of the event.

Not wanting to spend much money, I decided to use a few embellishments to make a white chef’s apron contribute to our theme. If you know someone in the restaurant business, you may be able to score an apron or two at no cost. If not, you can purchase one at a restaurant supply store for $5 or $6.

The first thing I did was to add a flower photo onto the top of the apron front. This was easy to do with T-Shirt transfer paper. You can pick this up at any store that sells office supplies. I found my package at Target near the copy paper. I bought Avery brand Ink Jet T-Shirt Transfers. Six 8 1/2″ x 11″ sheets come in the container. Since I was printing a 5″ x 7″ photo, I was able to print two photos on one sheet. I chose a photo I had taken last spring of my lilly of the valley.

pretty napkin basket

I printed the page using a color printer and ironed the photos onto the aprons, carefully following the directions on the transfer package. I decided to add a little sparkle around the edges of the photo by applying some silver sparkle paint with a cotton swab.

pocket on diy apron

Then, I added a couple pockets by sewing on a rectangular shaped piece of fabric I found on the clearance table at the fabric store. First I sewed a hem on one of the long sides of the fabric – this would be the top of the pocket. Then, I attached the piece of fabric by sewing the two sides and the bottom

onto the apron. Sewing vertically down the middle of the pocket created the two pockets.

Rosemary sea salt shortbreads – one of the treats I made to serve at the Garden Tour.

And that was it! Using a photo transfer sheet and some scrap fabric that coordinated with my photo, I was able to upgrade my standard white apron into something garden party worthy!

diy apron

You can do the same for your next event!

Hope you enjoyed today’s post on upgrading an apron. I look forward to sharing more about the garden event in future posts.

Thanks for visiting! Remember to take pleasure in simple things, Jackie

Sharing at A Pinch of Joy and Timewashed.

3 comments » | diy, garden, gift ideas

making candles in the sand

5
July

candles in scallop shells

For a long time I have wanted to make a sand candle like the ones I made as a kid.  Recently I came across a rock I painted back in junior high school and it got me thinking once again about making a sand candle.   So, today’s Friday field trip is a nostalgic trip back to my childhood to make some sand candles.

rock painted with owl

Back in junior high, our candle making was very basic – we melted candle wax in a tin can over a hot plate.  Rather than spoil the nostalgia, I decided to make my sand candle from memory and forgo any formal candle making research.

Candle makers probably use thermometers, scents, colors and other ‘fancy’ equipment for accuracy and safety.  My equipment is some wax and an old pan.  I did purchase a package of votive candle wicks from the craft store that I happen to notice when I stopped in to pick up a 1 lb. block of wax.  I think in junior high we just used twine dipped in wax.  So, I am going a little bit ‘high tech’ with this project. ;)

steps to making a footed candle in the sand

To make a sand candle, sand is used as the mold for the candle.  At low tide, the candle ‘mold’ is made in the sand.  I made an oval shape in the sand and then poked a stick into the bottom in three places to make three ‘legs’ for the candle to stand on.  It’s a very simple premise.  And then, before the tide comes up again and the wax has hardened, I dig the candle out of the sand.  Sand adheres to the hot wax, creating a sandy outside to the candle.

I really didn’t want to keep the wax its natural white color.  Thinking a light lavender color may be pretty against the sand, I checked to see if I had a lavender crayon to add a little tint…nope.  I chose a ‘sea green’ crayon from the colors I had and threw it into the pot with the wax.

making scallop shells in the sand

I used an old pot that I keep specifically for various craft projects –like tie dyeing, or other projects where I don’t want to ruin my good pans.  I melted the wax using a double boiler method, melting it slowly since I wasn’t sure about the safety of melting wax and wanted to be as cautious as possible.

candle made in the sand

Once the wax melted, I used a pot holder to carry the pot out to the mold in the sand.  After I poured in the wax I needed, I poured the remaining wax into shells I found on the beach after adding wicks from the bag I had purchased.

sea green shell candles and flowers

candle in a scallop shell

And, that is it!  The hardest part is timing the tide!  If you don’t have a beach, you can certainly use this method with a bucket of sand…and then you don’t have to worry about the high tide coming in and taking your candle out to sea! ;)  I was so excited about my nostalgic creations, the next day I couldn’t wait for it to get dark so I could light them!

candles in scallop shells

dusk at the beach with shell candles

Now that I got that out of my system, I wonder what other crafts from my past I can recreate…

flowers at nightfall at the beach

Until next time…

Thanks for visiting.  Remember to take pleasure in simple things, Jackie

Sharing at The Shabby Nest.

4 comments » | diy, field trips, sand & sea

seafood swag

2
July

diy seafood forks

You may already know that I am a big Plasti Dip fan from my wooden spoon tutorial.  Today, I am going to show you how I used Plasti Dip to give an old set of seafood forks new life by putting a colorful plastic coating on the handles. 

'before' seafood forks for Plasti DipI was lucky enough to be the recipient of an old set of seafood forks from my friend Terry…thanks again T ;)  If you don’t have a friend like mine to give you good stuff to recycle, you can head to a thrift store.  The forks don’t need to match since the color you choose for the Plasti Dip will tie the set together.

I wanted my seafood fork set for eating shellfish on the beach and decided on royal blue for my Plasti Dip color.  Following the directions on the ‘Make Your Own Color Kit’, I used blue and a little bit of black to mix the color I wanted. 

eating shellfish at the beach

DIY seafood forks

Plasti Dip is very easy to use.  You can follow my spoon tutorial if you need some instruction.  In the same way that I dipped the wooden spoons, I dipped each seafood fork into the Plasti Dip.  Easy! 

revamped seafood forks

After allowing for drying time, my forks are ready to use!

seafood fork DIY

Now I have a colorful supply of seafood forks that I love!  Mussels anyone?

shellfish on the sand

Thanks so much for visiting!

Remember to take pleasure in simple things, Jackie  Be sure to ‘like’ my facebook page and follow on Instagram to share more summer photos!

Sharing at Coastal Charm.

6 comments » | diy, food & festivities, sand & sea

got nuts?

18
June

squirrel gift jar

For a friend’s birthday, I wanted to give her a little something acknowledging her squirrel obsession.

squirrel jar

squirrel jarInspired by many jars I have seen across the internet, I decided to find a plastic squirrel to affix to a jar to make a birthday gift.

To make something similar for a friend or as a party favor, decide on something to fit an obsession or theme and purchase a toy version at a craft or dollar store.

For myself I would have chosen a mermaid or something sea inspired ;)

Once I found the squirrel, I glued the figure onto a jar rescued from the recycling bin.  After the glue dried, I spray painted the jar top…figure and all.  I know the brown I chose isn’t a very summery choice, but I wanted to match the décor of the recipient.  Chalkboard paint would have been a fun option as well -“got nuts?” could have been written right on the lid with chalk.

top to squirrel jarThere are so many fun alternative ideas for this gift.  I know exactly what I would have made for my son if he were still small…I would have used an army man, painted the top with olive drab, and wrote “got ammo?”, filling the jar with water balloon ‘grenades.’    Or, I could have addressed his childhood train obsession and put a train on the lid top.  Of course, the contents would have to be bubble gum so I could write “got choo?”  A perfect choice for a train themed party favor!

Other ideas?  A shark on top with gummy fish…“got fish?”  A fish on top with gummy worms… “got worms?” A baseball player with sunflower seeds…”got seeds?” …come up with some using your favorite theme or obsession.

I decided to tie the “got nuts?” message onto the jar so it could be removed, but you can use whatever you prefer.  A chalkboard label on the side of the jar is a cute option.  Or, even etching cream … etch the words onto the side of the jar for an elegant look. 

easy to make squirrel jar

I filled the jar with peanuts and it is good to go.  A perfect ‘little something’ designed specifically for the recipient.

squirrel gift jar

Can’t understand a squirrel obsession?  Does this National Geographic photo I found on the web change your mind? 

squirrel

See more examples of squirrel cuteness I found across the web on my Facebook page by clicking here.

I hope you will use this tutorial as inspiration to come up with your own gift creation!  Thanks so much for visiting.

Remember to take pleasure in simple things, Jackie

Sharing at Better With Age and Craftberry Bush.

1 comment » | diy, gift ideas

monogrammed shell package tie-on

4
June

monogrammed shell package tie

‘Tis the season for gift giving.  I know it is not December, but I find this time of year requires more presents than the holidays!  There are so many showers, weddings, and other festive occasions.

I have the uncanny ability to turn any gift-giving opportunity into a ‘beachy’ moment.  This summer I am truly in my element since I am invited to several beach-themed bridal showers.  For one of the showers, I created a simple, diy package tie-on using a couple of shells, a little bling, and some twine…easy and elegant!

monogrammed shells for gift wrap

Find or purchase two shells that you like and coordinate well with the item you are using them with.  The first thing to do is to put a couple holes in the top of each shell.  You may want to have a couple extra shells on hand in case this part of the process should offer up any complications…aka break the shell.  I am lucky enough to have a friend that has a dremel tool that can help me out with projects like this.  Using a dremel with water is the optimum way to go if you make holes in alot of beach finds!  If you don’t have this type of tool or can’t borrow one, you can use a nail, but there is a higher chance of cracking or breaking the shell.  You can get by with one hole in each shell…for my application, I found that the shells hung better with the two holes.

creating monogrammed seashells

diy monogrammed seashell package tie-on

You have seen me use chalkboard paint to write on the inside of shells…this time I wanted something more elegant, so I am using self-adhesive rhinestones that I bought at a craft store.  It is really easy.  Using tweezers, I just attached the rhinestones one at a time onto the inside of the shells in the shape of the the initials of the future bride and groom.  The rhinestones are inexpensive and go a long way…I still have some left from my Easter egg decorating!

monogrammed shell package tie-on

I am using my tie-on on a tote bag, so I used twine to tie a shell on each end and placed it around the handle of the bag as an alternative to monogramming the tote.  (The rest of the gift will be shared on a future post.)  So sweet!  A wonderful way to make a gift for a special couple truly special!

I hope you can use this idea and make some monogrammed seashells for one of your special bridal shower gifts this summer!

Thanks so much for visiting!  Please take a moment to click ‘like’ on my Facebook page and if you use Instagram, please click ‘follow.’  for more sharing!

Remember to take pleasure in simple things, Jackie

Sharing at Craftberry Bush, City Farmhouse,   A Pinch of Joy and Coastal Charm.

5 comments » | diy, sand & sea

displaying a special treasure

14
May

grandmas wedding ring

The most valuable piece of jewelry I own is probably made out of stainless steel.  It is my grandmother’s wedding ring.

Paper Source paper

Most valuable because it is a symbol of the generations…because of my grandmother’s wedding came my mom, because of my mom came me, because of me came my children….how can you measure the value of a symbol like that? 

displaying a wedding ring

This symbol was the one piece of jewelry I never took off…until recently…when I was getting a medical exam and I was asked to remove it.  Well, you know what?  I could not get it back on!  It seems my finger had miraculously grown in an extremely short period of time!  I certainly was not cutting the ring.  So, with Mother’s Day still fresh on my mind, and memories of generations of moms filling my thoughts, I decided to create a way to display my prized possession.

displaying a vintage ringI had a beautiful Pottery Barn frame in my closet for a long (too long) time, waiting to be used.  I had ordered a bunch of frames for a series of photographs and one had arrived to me broken.  The nice people at Pottery Barn quickly replaced it and told me not to go to the trouble of returning the broken one…So I was saving it for a future project.  Displaying my grandmother’s ring was the perfect use for it! 

To make it look a little more modern, I decided to cover the mat and headed out to the Paper Source that just opened in our area to select a suitable paper.  They have such a large selection of archival quality papers in an amazing array of patterns and colors.  Rather than choosing something nostalgic looking, I decided to go with something more modern and chose a paper that had a brown matte background with a silver metallic nature design.

It was an easy project.  I just glued the paper onto the mat board and sewed the ring onto a piece of linen after adding a piece of ribbon.  I love this project…so fitting for a nostalgic Mother’s Day activity.

steps to displaying a wedding ring

I hope my next nostalgic project will be one of wedding songs…The songs from my mom’s and my grandmother’s wedding….I asked my grandmother when she was still alive and 92 years old, the title of her wedding song…I wrote it on a piece of paper.  I asked my mom the same and added it to the list.  My intention was to create something special using the two song titles and the title of my own wedding song. 

paper from paper source

When I recently went to look for the song titles in the ‘safe place’ I had left them, I discovered I couldn’t remember where that ‘safe place’ actually was!  I hope to run across that slip of paper one of these days…I can no longer replicate it since my mom no longer remembers what her song was and my grandmother is no longer with us…maybe I will find that slip of paper before next Mother’s Day.  Hope so :) 

vintage wedding ring

Thanks for stopping by and sharing some memories with me.

Remember to take pleasure in simple things, Jackie

Sharing with Coastal Charm, Craftberry Bush, and Shabby Nest.

2 comments » | diy, nostalgia

repurposed brown bags

16
April

bookmark made from a Terrain bag

April 22nd is Earth Day…in the spirit of the day, I am repurposing the brown bags I have accumulated from my Terrain purchases to use them in some fun and beautiful ways.  If you aren’t lucky enough to have a Terrain near you, any brown bag will do!  The Terrain bags have one up on the traditional brown bag since they are embellished with some beautiful floral designs.  You may have other stores you frequent that use brown bags with some type of design that would make your creations more interesting…Trader Joe’s, as an example.

Once I got started with this, I realized I could create a number of posts…I had so many ideas!  But, I limited my creations to seven.  Here is the bag I started with:

Terrain shopping bags

This first item I made is a place card.  I used a piece of cardboard from the bottom of the bag and glued some of the bag onto the front and back.  Then, I rounded the corners and stamped a name onto the front of the card.  Anchoring it into a piece of driftwood gave it the perfect finishing touch!

place card from Terrain bag

Wrapping paper is an obvious use for the bags and here I used a bag as wrapping… in combination with some pretty forest green ribbon and a natural twig pencil (both from Terrain):

wrapping paper crafted from a Terrain bag

wrapping paper from a Terrain bag

Cutting a bag into strips and weaving the strips together suggests a wealth of possible items…here, I created a basket with some woven strips.  I also used the handle of the Terrain bag as an accent on the edges and shredded (in my home shredder) some of the tissue to create the filling.  I was even able to utilize a piece of Terrain ribbon that was used on one of the bags I received from the store.

basket woven from a Terrain bag

basket crafted from a Terrain shopping bag

For the next use, I created a pretty utensil holder using a bag, a bag handle, and a paper punch:

cutlery holder fashioned from a Terrain bag

If you read my Valentine post, you know I made Valentine treat containers…I love to make treat containers for any occasion.  Here, I printed this beautiful vintage rabbit image I found on The Graphics Fairy onto the bag…I cut a piece of the bag and fed it through my home printer.  Then, I used my sewing machine to create a beautiful treat container.  This one contains jelly beans…the container needs to be ripped open to discover the contents!  Fun, right?

Treat sack from a Terrain bag

treat sack from a Terrain bag

Here is another Terrain bag…notice the green stitching on the bottom of the bag and the cut out handle…

Terrain shopping bag

I was able to utilize the stitching and the flower description on the back of the bag in creating a couple different variations of a bookmark.  The one with the stitching also utilized the handle from another bag:

Bookmark from a Terrain bag

bookmarks made from Terrain bags

Bookmark from Terrain bags

I embraced the style of bag for the dry erase board I created.  I simply framed the bag.  I love how the opening for the handle serves as a place to write ‘notes.’

dry erase board from a Terrain bag

So, these are some of my creations made from repurposed brown bags…a great way to serve the environment.  I hope you will be inspired to create some repurposed projects of your own :)

Thanks for visiting!

Remember to take pleasure in simple things, Jackie

I am sharing at Little Red House, Pinch of Joy, Craftberry Bush, Common Ground,  The Shabby Nest, and Coastal Charm.

12 comments » | diy, style

transforming terracotta pots

12
April

Spring flowers

We won’t be going very far for Friday field trip today…just outdoors!  The weather this week in Connecticut has been amazing, and any free time I had this week was spent on planting preparations… It didn’t help that I had a garden club meeting this week…during the lecture portion of our meeting, I was furiously writing notes of all the things I want need for my garden.  My thoughts have been consumed with plants!

Planting isn’t done around ‘these parts’ until Mother’s Day (my traditional planting day), but that hasn’t stopped me from planning and dreaming.  It is going to be a particularly tough year to make the yard look nice since we had a couple really bad storms this year that destroyed much of the garden – particularly large shrubs and trees.

painted terracotta pot

The beautiful results of my terracotta pot transformation using house paint and gel stain.

Because of this, there is so much more I want  need than my budget will allow.  One thing I was determined to replace this year was the ugly terracotta pots that we use to plant some of the herbs.  I say ‘ugly’ because I really dislike that new terracotta orange (you know how I feel about orange) look.  For me, they are an eyesore.  I thought they may ‘accidently’ break in the garage before planting season this year, but I want to use my garden budget to buy more living things, not to replace pots.

terracotta pot transformation

So, I decided to see what I could do to transform the terracotta pots I already have into something I could enjoy looking at!  I found it was a really easy fix and I wanted to share the process with you in case there are others out there that are cringing over the look of their terracotta!

Certainly there are plenty of methods to ‘weather’ terracotta or to create moss, etc.  I did not do that.  I went on a ‘hunt’ around the house to find things I could  use for the transformation without making a purchase.

upgrading a terracota pot

And, I found I needed very little.  Some leftover house paint, stain, and a rag did the trick!

First, I simply painted the (bright terracotta) pot with some house paint (it happened to be Benjamin Moore Kingsport Gray).  This color will coordinate nicely with the exterior of my house which is sided in cedar and stained with ‘driftwood’ (of course my house is painted a color with a ‘beachy’ name…what did you expect lol).

After that dried (I left it overnight), I used some gel stain (Minwax in Hickory that I had left in the basement) on a rag to give some dimension to the look.  I rubbed some on, and using the rag, rubbed it off…pretty easy, right?  My pot had a design on it and I made sure to get a lot of stain on the design part so that I could have it settle into the crevices.  Although my pot had a bright, new look, it was a few years old which made it even better for this process since any cracks or scratches looked great when the stain settled in.  You can do this same process repeatedly if you want more color or depth.  After I was done, I dabbed a little of the paint onto the highest part of the design…just as a highlight.

Fresh herbs

My first purchase of the season…some herbs from Gilbertie’s.

What an easy way to give terracotta pots a little more interest without making any purchases!  If you don’t have these items in your house, you can do a simple whitewash.  Everyone has some white paint left somewhere…just thin it down a little bit and paint it over your pot to get rid of the new orange look.  These pots may be the least expensive, but they don’t have to look that way!  You can easily transform them with some leftover paint and/or stain.  Have fun with it!  I can’t wait to add some plants to my new creation :)

Have a wonderful weekend!

Remember to take pleasure in simple things, Jackie

Sharing at Crafts a la ModeCraftionary, and  The Well Crafted Home.

1 comment » | diy, garden

zip code catch-all tray

9
April

diy mercury glass zip code tray

I have been wanting to make something using a zip code for quite some time.  I don’t think 90210 is the only zip code worth embracing…the zip code from wherever you call home is the perfect one to display!  Or, a place you dream about visiting (should I look up the zips from the locales with the best beaches?…)  Anyway, this time I am using the zip code from my daughter’s home away from home…aka school.

mercury glass zip code tray

It is an easy DIY project…I will guide you through the steps…

diy zip code mercury glass tray

If you follow my procedure, you will need the following items:

  • a clear glass plate (I purchased mine at Target)
  • Con-Tact adhesive paper in clear
  • Krylon looking glass spray paint
  • a clear coat of some type (I used a spray)
  • a clean spray bottle
  • a computer printer

The first thing I did was to figure out how I would get the zip code onto the glass.  I decided to print it onto clear Con-Tact adhesive paper so that I could easily adhere it to the glass.  I picked out a font called Stohr Numbers on www.dafont.com.  Once you have the image you want to use, you will need to print it out in reverse image…to do this, either indicate the proper setting on the print settings of your printer or, you can use a graphics software.  You need to do this so that the sticky part of the Con-Tact paper is on the front of the numbers because you will be adhering it to the underside of the glass.

To accomplish this, I used clear Con-Tact paper (I love this product – I use it for so many things!).  I simply cut a piece of the Con-Tact adhesive paper and hand-fed it through my computer printer.  I used a scissors to trim closely around the numbers.  You can cut out the numbers individually, but I chose not to because I wanted to keep the spacing between the numbers exact.

I peeled off the backing of the Con-Tact paper and positioned the numbers where I wanted them, affixing them to the underside of the glass by rubbing firmly.  I scratched up the letters a little bit…just so they looked a little distressed.

Now, I just needed to create the mercury glass effect.  You have probably seen items created with the Krylon looking glass spray paint – it seems to be one of the hot craft items right now…with good reason!  It is so cool!  It creates a mirror effect on glass.  This is created by spraying five thin coats of spray on the underside of the glass.

But, I did not just want a mirror effect…I wanted a mercury glass look…that is where the spray bottle comes in.

Put a little bit of clean tap water into the spray bottle and adjust the nozzle to a fine mist.  Then, read the instructions on the Krylon paint.

Before you start your spray painting, spray a fine mist of water on the underside of the piece.  Immediately spray your first coat of looking glass spray paint, following the directions on the can.  I sprayed a fine mist of water onto the paint after each coat for the first three coats.  After three coats were completed, I blotted (not rubbed) the back of the piece to absorb the water so that the mottling would receive two fine coats of the paint.  I guess everyone develops their own technique after trying this product, but I like the depth created by this method.

After the paint was dry, I sprayed a clear coat on the underside of the piece to protect the paint from scratching.

mercury glass zip code tray

That was it!  I finally got my zip code tray and I think it is a perfect place to drop off car keys!

I hope you enjoyed this DIY for a zip code mercury glass tray…what zip code will you choose to display?

Thanks so much for visiting, Jackie

I am sharing at Coastal Charm,  The Shabby Nest, Craftberry Bush, A Pinch of JoyCraftionary, and Common Ground.

6 comments » | diy, gift ideas

Back to top