Subscribe to Pleasure in Simple Things via RSS ReaderFollow Pleasure in Simple Things on InstagramFollow @InSimpleThings on TwitterLike Pleasure In Simple Things on FacebookFollow Pleasure In Simple Things on PinterestEmail Jackie

a valentine’s day playlist

February 12, 2013

felt fortune cookies 014

No one can deny that many great events in life are marked by music.  Whether it be a song that marks a wedding, a sporting event, or a formal dance.  Songs can transport us back to our first school dance or remind us of a favorite movie.

There is definitely a special bond between music and romance, so in honor of Valentine’s Day, I compiled a list of 20 (in no particular order) of the most memorable of all-time (in my estimation anyway).

You should be able to find one or two to set the mood for the day ;)   Just click on the song title to bring you to the YouTube link.  Turn your volume down first…I don’t want to cause a commotion in your office!  To start you off, the first is sung by my favorite musical artist… It Had to be You ~ Harry Connick, Jr….enjoy!

20 Best ‘Set the Mood” Songs of All Time

/

What a Wonderful World ~ Louis Armstrong

I Will Always Love You ~ Whitney Houston

At Last ~ Etta James

Unforgettable ~ Nat King Cole & Natalie Cole

I’ve Got You Under My Skin ~ Frank Sinatra

Sway ~ Dean Martin

Reasons ~ Earth, Wind & Fire

Over the Rainbow ~ Israel “IZ” Kamakawiwo’ole

Lover Man ~ Billie Holiday

Chances Are ~ Johnny Mathis

Moonlight Serenade ~ Glenn Miller & His Orchestra

Can’t Help Falling In Love ~ Elvis Presley

Always and Forever ~ Heatwave

Got to Give it Up ~ Marvin Gaye

Your Song ~ Elton John

Crazy for You ~ Madonna

My Everything ~ Barry White

Just in Time ~ Tony Bennett & Michael Buble

Fever ~ Peggy Lee

I hope you enjoyed my list of the 20 best ‘set the mood’ songs of all time – compiled for you in honor of Valentine’s Day.

xxheart022

Enjoy your Valentine’s Day…I hope you find some music to bring back some great memories and also to create some new ones!

Thanks for visiting, Jackie xoxo

 P.S.  I made the felt fortune cookie to slip into my daughter’s Valentine’s Day care package :)

4 comments

in search of bubble tea

February 8, 2013

bubble tea 080

This week, our Friday field trip is to an Asian market to get the scoop on making bubble tea.

Bubble tea is a sweetened cold tea drink mixed with chewy tapioca pearls (boba).  If you have had it, you probably have thought, like me, ‘how the heck do they make this?’

bubbe tea 090

Since it originated in Taiwan, I thought an Asian market would be the best place to do some research on how to authentically create this beverage.

I made a trip to the most authentic Asian market I could find and discovered the manager was from Taiwan…perfect!

If you are a bubble tea lover, you know that the two most important requirements are 1. the tapioca pearls or boba, and 2. the straws… Yes, the straws are major.  An extra wide straw is needed to accommodate the boba.  Without the availability of the special straws, continuing the research seemed a waste…so, I first needed to confirm these two items were available in the market.  They were!!  I was so worried the straws would be hard to find.  But, the market carried them and a package was only 99 cents!

bublle tea 078

Now to figure out how to actually make the beverage…It quickly became evident that the manager did indeed know how to make bubble tea, but my accurate translation of her explanation was another story completely!  She barely spoke English and most every product in the store had few markings in English.  This would be a challenge!

I did find that the store sold a commercial mix for bubble tea in a variety of flavors, but I decided against using a mix since I thought this would be cheating!  I wanted to have an authentic bubble tea experience.  Plus, I wanted to forgo adding any unnecessary artifical ingredients to my beverage.

So, after quite a bit of discussion (and some creative sign language) I learned how to prepare bubble tea.  The store manager suggested coconut as my flavor of choice…I ran with it!

coconutmilkThe items I purchased at the market were:  boba, a can of coconut milk, STRAWS, and palm sugar.

Although it is not a difficult drink to make, the tapioca or boba used in the drink require some advance preparation.

tapiocapearls 002

The preparation of a sugar syrup also requires advance preparation.  I discovered, after some experimentation, I preferred the sugar syrup over the palm sugar as a sweetener for the drink.  Palm sugar was a sweetener option that was suggested to me.

A photo of Tapioca pearls (or boba) prepared for Bubble Tea.

A photo of tapioca pearls (or boba) prepared for Bubble Tea.

Tapioca preparation

bubble tea 064Add one cup of tapioca pearls to a couple of cups of boiling water.  The pearls should float – keep them stirred so they don’t stick to the bottom of the pan.  Boil the pearls for 25 minutes and then turn off the heat and let the pearls sit in the water for another 25 minutes.  Drain and rinse the pearls with lukewarm water.  The final consistency of the pearls will be like chewing gum.  I only prepared enough pearls for what I was going to use because I was told they harden over time.

bubble tea 100

Sweetener preparation

Combine 1 cup white sugar and 1 cup dark brown sugar with a cup of water.  Cook over medium heat until the sugars cook down and the mixture boils.  Cool and store in the fridge.  (If you don’t care about being authentic, you can sweeten your tea with honey or sugar while still hot and forgo this preparation.)

Coconut Bubble Tea Recipe

Prepare black tea. You will need 4 oz. for each serving.  Put in fridge to cool.

Combine 4 oz. of water, 4 oz. of coconut milk, 2 oz. of milk, and 4 oz. of prepared tea for each serving.  Add 1 or 2 Tablespoons of the prepared sugar syrup sweetener.  Blend until fully mixed.

Spoon 4 Tablespoons of cooked tapioca into the bottom of a large glass.  Pour coconut mixture into the glass.  Add ice.  Serve with an extra wide straw.  ENJOY! 

asianmarket

I hope you enjoyed sharing today’s field trip.  I was so excited to discover the authentic way to make bubble tea!  I don’t think it is something I will make on a regular basis, but it will be nice to be able to make it when the mood strikes… and, I may try making some other flavors in addition to the coconut!

Have a wonderful weekend…here in Connecticut we are expecting BIG snow…

Thanks for visiting and remember to enjoy pleasure in simple things, Jackie

8 comments

valentine coconut lime truffles

February 5, 2013

Valentine truffles

There is a certain amount of class in going ‘against the grain’…like wearing white in winter.

To me, this element of surprise adds a certain elegance…the same holds true in creating food…

This is the feeling that is captured in the coconut lime truffles made from white chocolate that I am creating for Valentine’s Day giving.  Although my Valentine’s Day confections may look like little snowballs, the flavor is more reminiscient of a tropical locale.  The white chocolate is a refreshing departure from the typical Valentine’s Day choice.

Valentine truffle

A photo of a Valentine coconut lime truffle… sure to steal a heart :)

If you haven’t made candy before, don’t despair…even a novice candy maker can have excellent results with truffles…no candy thermometer is needed, and there is plenty of room for creativity.  Try substituting your own favorite flavors and coatings.  If you don’t like coconut, you can try crushed gingersnaps as a coating – I have tried them  also and the flavor combination with the lime is great.

coconut lime truffles

Valentine Coconut Lime Truffles Recipe (makes 12,  1  1/4″ truffles)

  • 7 oz. of good white chocolate (Ghiradelli or Lindt)
  • 2 Tablespoons of heavy cream
  • 2 Tablespoons of fresh lime juice
  • 1 cup flaked,  sweetened coconut (spread onto a plate for easy clean up)

Melt the chocolate, very slowly, in a double boiler.  Remove from heat and whisk in cream and lime juice.  Put into fridge until firm enough to roll into balls (about 2 hours).  Roll into 12 balls – then rolling each into coconut to cover.  Store in the fridge, but be sure to let sit a little before serving so they will melt in your mouth :)

Funny that I buy 4 oz. bars of chocolate and my recipe calls for 7 oz. ;)

valentine truffles

What better way to a heart than a homemade truffle?  Enjoy.

valentine coconut lime truffles

 Thanks so much for visiting.  Remember to take pleasure in simple things, Jackie

P.S. I am sharing this recipe at Pinch of Joy, Blissful Whites Wednesday, The Well Crafted Home, and The Inspiration Gallery at Craftberry Bush.

4 comments

monthly book giveaway for february

February 2, 2013

author ayad akhtarphotos of Ayad Akhtar

Congratulations to Lucy, (from the blog Craftberry Bush) for winning the giveaway book for January!  I used random.org to pick a winner from the author of every comment that was made to pleasure in simple things during the month of January.  Lucy has won a copy of Sarah Ferguson, Duchess of York’s newest book Ballerina Rosie (click here to see more about it.)  I don’t know if Lucy has any small children, but knowing she is an artist, I am sure she will appreciate this beautifully illustrated picture book signed by Sarah Ferguson, Duchess of York.

A signed copy of Ayad Akhtar’s debut novel American Dervish is February’s giveaway book.  Last September I had the opportunity to meet the award-winning filmmaker, playwright, actor, and novelist Ayad Akhtar when he visited the Wilton Library in Wilton, Connecticut.  The author discussion with Ayad Akhtar was truly one of my very favorites in some time.  As an American-born, first-generation Pakistani-American, I found his discussion of the Muslim-American experience extremely enlightening.

photo of American DervishAmerican Dervish is a fresh and touching coming-of-age story of a first generation Pakistani-American that gives the reader a look inside the interplay of religion and modern life.  The book examines the strong cultural forces at play for young men and women growing up Muslim in America.  The child of immigrants in the story struggles to find a place in his life for the traditions and beliefs of his ancestral homeland in a new world of broader possibilities that are both enticing and threatening.  Although the main narrative unfolds in pre 9/11 America, it is a timely and thought-provoking story.  I always enjoy a read where I can better understand a culture different than my own and through the Shah family in American Dervish; the reader most definitely better understands the struggles, complexities, value, and cost of being Muslim in America.

photo of ayad akhtar

It is a great read and I am excited to give it away to one of you!  Make some comments during the month of February and you may win a signed copy of this beautifully written first novel by Ayad Akhtar, February’s giveaway book, American Dervish.  Good luck!

Hope you are all enjoying a wonderful weekend :)

Thanks for visiting, Jackie

1 comment

discovering orchids at terrain

February 1, 2013

orchids

It is no secret, whether I am in Connecticut or Pennsylvania, one of my favorite stores to visit is Terrain.  If you are a frequent visitor to pleasure in simple things, you have shared quite a few visits with me to the Connecticut store since its opening in Westport, Connecticut last spring.

Terrain

Friday field trip this week is to Terrain to check out a demonstration on planting orchids.  Not knowing very much about orchids, I was intrigued watching Mary Ann from Terrain demonstrate how easy an orchid can be planted and also to learn that their care is not that difficult.  This particular weekend, Matthew, the Terrain landscape designer from the Pennsylvania store, was also on hand.  It was great to have the opportunity to speak with him.  He is a great resource for design questions – pertaining to landscapes or to interiors.


I watched Mary Ann carefully remove an orchid from its pot, removing as much of the moss as she could.  She trimmed away any rotten or blackened roots (with the really pretty scissors they sell at Terrain!)  This particular orchid was put into a container Mary Ann had crafted from birch bark and made to hang.

planting orchids

orchid

In nature, these plants thrive in strong light (but not direct late afternoon sun); high humidity; air flow around roots; regular periods of drying, alternating with drenching rains; and in temperatures between 50 degrees and 85 degrees.  So, the closer you replicate nature, the more success you will have in growing orchids.

orchid

At Terrain, the orchids are watered infrequently, but misted on a regular basis.  In the summer orchids need to be watered weekly, but in the winter, closer to once a month.

orchid

Did you know in nature, orchids are epiphytes?  That means they grow on other objects, clinging to rough bark or even stone.  Here, Mary Ann has created an orchid planting very much embracing the way an orchid would grow in nature.  After covering the roots of the plant in moss, she tied it to a piece of a white birch log.  Terrain actually sells pieces of white birch logs so that if you wanted to create one of these plantings yourself, you could do so.  A screw eye, picked up at Home Depot, is easy to attach to the top of the birch log for hanging.  Or, you could have Mary Ann create one for you!  Either way, it makes for a beautiful hanging.

orchid

I had fun admiring many other beautiful orchids in varying colors and varieties throughout the store.

orchids

orchids

orchids

orchid

I think this deeply hued hanging orchid would make a wonderfully romantic Valentine’s Day gift!

orchid

I have a new appreciation for orchids after my visit to Terrain…I also feel a little less intimidated about trying to repot some plants myself!  This field trip definitely made me yearn for spring though!!  How many more days!?

I hope you enjoyed our Friday field trip to Terrain to discover orchids…maybe it inspired you to create a planting of your own?   Or, to give one as a gift?

Thanks for stopping by and have a wonderful weekend, Jackie

no comments

fun valentine ideas

January 29, 2013

diy felt heart

Valentine’s Day is coming up and I want to share some of my ideas to make it a little more fun!  As I got going on this post, I realized I had gotten really carried away…I had so much I wanted to share!  I was afraid it was just too much to read in one post (since we are all so busy!) and I went back and edited it down to my favorite six ideas.  Check back the next two Tuesdays for additional Valentine’s Day posts!  Enjoy! 

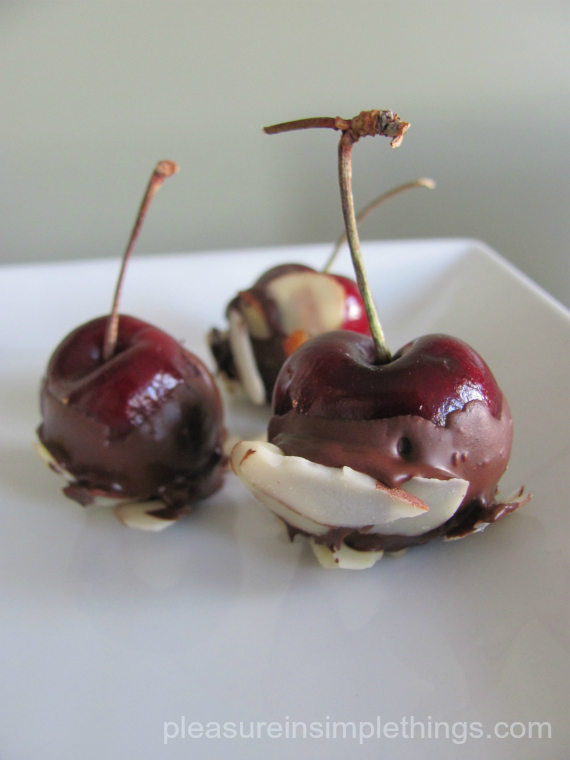
NOSTALGIC     When I was growing up, there were some ‘given’ items my grandmother would always have on hand…like, fried potato sticks in a can or candy that looked like orange circus peanuts.   These were items she could purchase at the local discount store that was within her walking distance – since she never learned to drive.  Every year around Valentine’s Day, one item she was sure to have on hand was a big box of chocolate covered cherries…the kind with the super gooey centers.  As a tribute to my grandmother, I am serving my own version of chocolate covered cherries (minus the gooey center) – now a standard on Valentine’s Day.  Simply dip some fresh strawberries in melted chocolate…I added slivered almonds…yum :)

chocolate covered cherries

REFRESHING     Forget the sugary sodas or diet drinks this Valentine’s Day.  Try a refreshing glass of water lightly flavored with fruits and/or vegetables.  I like cucumber flavored water – adding a few raspberries to give some Valentine’s color!  Just let the water sit overnight for a wonderfully subtle flavored water in the morning…a refreshing change from soft drinks.

diy flavored water

SALUD    If a more potent drink is you or your sweetie’s preference on Valentine’s Day, shot glasses fashioned from ice are a ‘cool’ way to deliver it.  These were made from a shot glass mold sold by Fred Flare, but if you wanted to be inventive, you could make your own from two disposable cups  – one inside the other .  To make them a little more romantic, I floated a couple of flower petals in the water before freezing.  Salud!

photo of ice shot

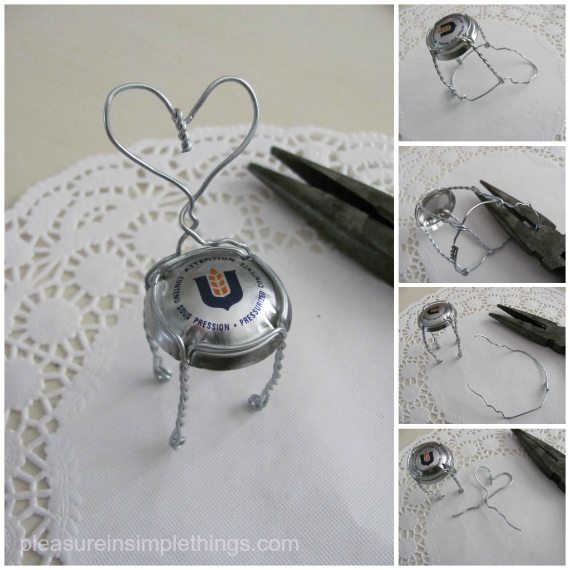
CREATIVE      If champagne is your beverage of choice, be sure to save those cages!  I guess chairs fashioned from champagne cages are nothing new, but I only recently became aware of this activity.  There are even established competitions on the best designed chair!  Who knew?  You may want to start your own competition!  For my first creation, I designed a chair with a heart-shaped back in the spirit of Valentine’s Day.  To make a basic chair, all that is needed is a leftover champagne bottle cage and some pliers.  Fun!  This may have started a whole new interest in champagne drinking for me :)

champagne cage chair

SURPRISE     Don’t forget the kids.!  Valentine’s Day is on a weekday this year and a strategically placed note in a lunch box is sure to brighten a little one’s Valentine’s Day.  (Some of my best work has been slipped into a grammar school lunch box!)

Anything a little different from the usual can make your child’s lunchtime special.  It has been a long time (longer than I want to mention) since my kids have been in grammar school…but, one of my favorite things to do for them was to make surprise packets from brown paper.  I would cut two identical shapes from brown paper.  On one, I would use the sewing machine to make a decorative pattern.  (If you don’t have a sewing machine, you can hand stitch.)  I would then sew the two pieces together – leaving a small opening to insert treats.  After enclosing the candy, raisins, etc., I would sew up the opening – totally enclosing the items between the two hearts.

The fun part was that the packet had to be ripped open to reach the treats inside!  If your kids are new to this, you might want to stamp the words “open me” or “rip me open” on the outside so they aren’t hesitant to do so.  If you are a room mother (like I was), these make great party favors for the class Valentine’s Day celebration.

diy treat containers

If you would rather give something nonedible, another great little surprise are these really fun temporary tattoos I recently found online.  Key word here is temporary!  These are sure to put a smile on your littlest valentine’s face!

THOUGHTFUL     I originally made these cute felt hearts last year after I found easy directions to make them on Purl bee. I filled them with candy and slipped them into the packages I sent out to the college students for Valentine’s Day.

diy felt heart containers

Since then, these cute little items have found a much more valuable use.  When heading to the gym after work, earrings worn during the work day are tucked into these felt pouches as a way to protect them and to keep them from getting lost.  Now, I make them to give to others as jewelry cases.  They are also great to house odd buttons…a thoughtful Valentine’s Day gift.

diy felt hearts

I enjoyed sharing some of my fun Valentine’s Day ideas with you.  I am also sharing at The Inspiration Gallery & Craftionary.   I hope you will try one or two…or, be inspired to create something new.

Thanks so much for stopping by, Jackie

11 comments

beach colors in january

January 25, 2013

What are “beach colors” to you?  Beige and blue?

Friday field trip this week is to the beach at sunset to explore January’s beach colors.

Not yet cleaned up after Hurricane Sandy, technically the beach I am visiting has been closed since the storm.  That, coupled with the fact that the temperature is in the single digits here in Connecticut, I wonder why I chose to make this a field trip!  Largely because of the frigid weather, my trip to the beach is a short one.

My stay is not more than twenty minutes long, but as always, I am not disappointed by the display of colors.  I don’t get as many opportunities to view the sunsets at the beach in the winter months since they occur during work hours…my sunset viewing usually limited to the weekends…until the days get longer anyway.

So, what do you think of as the colors of the beach?  Would these colors come to mind?

How about these?

Maybe not so much?

The photos I am sharing today were all taken at the same beach on the same visit and within a 20 minute time period.  I did not alter anything on any of the photos (not that I would know how to if I wanted to lol.)

colors of the beach in winter

Isn’t nature amazing?

winter beach colors

Can you tell one of my fantasies is to create a paint line lol?  I also dream about creating a collection of nailpolish colors with cute, cheeky names, but that’s for another day…

winter beach colors

I think showing swatches of some of the colors I saw on my beach visit is the best way to illustrate the amazing display and range of colors I witnessed on this frigid visit…I think it was even too cold for the seagulls!

winter beach colors

So beautiful!


winter beach colors


winter beach colors

I hope you enjoyed the amazing collection of colors from a winter day at the beach…especially those of you that may be landlocked.

Have an amazing weekend and remember to take pleasure in simple things…beauty is all around us!

Thanks for visiting,  Jackie

I am sharing this post at Mosiac Monday at Little Red House.

6 comments

homage to hot tea month

January 22, 2013

National Hot Tea Month

Did you know January is National Hot Tea Month?  When I happened upon this fact, I wanted to create a dessert as an homage to the occasion.  I am a little obsessed with Food Network, so, with Kitchen Stadium in the back of my mind, I attempted to create a dessert using tea as the secret ingredient.

Earl Grey is my favorite tea, so I knew that was the starting point.  My first impulse was to make a cookie…the wonderful flavor of the rosemary shortbreads I made over the holidays was fresh in my mind.  Earl Grey shortbread?  Seemed a little too obvious for Kitchen Stadium.

Ice cream?  Creme brulee?  My final idea:  a cream puff filled with Earl Grey infused whipped cream.  To finish it off; a lemon glaze…it is tea after all…lemon should pair well.

cream puffs infused with Earl Grey infused cream

A photo of pleasure in simple thing’s homage to National Hot Tea Month. Cream puffs filled with Earl Grey infused cream and topped with fresh lemon glaze.

After a few experiments, I found that six Earl Grey tea bags were the amount that gave the result I was looking for.  I heated up whipping cream and used the tea bags to infuse the cream.  Then, I put the cream in the fridge overnight…okay, in kitchen stadium I would need to use the blast chiller.  Anyway, I chilled the cream.  That way, I was able to get the Earl Grey flavor into the cream.  After I made a standard cream puff, I filled it with the cream and added a simple lemon glaze.  Perfect!  I think I was pretty successful in creating my homage to National Hot Tea Month!

Probably everyone has a cream puff recipe, but I will include one here with the cream and glaze recipes, for your convenience.

Earl Grey Infused Cream

  • 1 1/2 cups of heavy whipping cream
  • 1 1/2 Tablespoons of confectioners sugar
  • 6 Earl Grey teabags

Heat the cream until very hot, but not boiling.  Steep 6 Earl Grey teabags in the cream for a good 15 minutes, until the cream turns a beige color from the tea.  Squeeze the excess cream from the tea bags before discarding them.  Cover the cream and put in the fridge overnight (or the blast chiller for a short time ;) ).  When you whip the cream, add the confectioners sugar gradually.  Don’t whip the cream too far ahead of the serving time.

Lemon Glaze

  • 1/2 cup confectioners sugar
  • 1 1/2 Tablespoons fresh lemon juice
  • grated lemon peel (optional for garnish)

After cream puffs are filled, mix the sugar and lemon together and spread over the top of each puff.  Sprinkle with grated lemon peel, if desired.

Cream Puffs (Choux Paste)  18 to 20, medium-size

  • 1 cup water
  • 1/2 cup unsalted butter
  • 1/4 teaspoon salt
  • 1 teaspoon sugar
  • 1 cup flour
  • 4 eggs (plus 1 additional egg for glaze)

Preheat oven to 425 degrees.  Lightly grease a baking sheet and set aside.  In a pan over medium-high heat, bring water, butter, salt, and sugar to a boil.  When butter melts, remove pan from heat, add flour all at once, and beat with a wooden spoon until well blended.  Reduce heat to medium.  Return pan to heat and stir vigorously with a wooden spoon until mixture forms a ball and leaves sides of pan.  Remove pan from heat and let mixture cool for 5 minutes.  Add eggs, one at a time, beating mixture after each addition until smooth.  Let batter cool for 10 minutes before shaping.

Use two spoons to shape the cream puffs.  With one spoon, scoop up about 1 heaping Tablespoon of batter.  With other spoon, push batter off first spoon and drop in a mound onto prepared baking sheet.  Place mounds about 2 inches apart.

In a small dish or cup, beat 1 egg with 1 teaspoon water.  Brush egg glaze lightly over tops of puffs, being sure it doesn’t drip down sides and onto baking sheet (preventing proper rising of puffs).

Bake in upper third of preheated 425 degree oven for 15 minutes.  Reduce heat to 375 degrees and bake for 5 more minutes.

Cut a slash in lower side of each puff and continue baking for 10 minutes or until puffs are firm, dry to touch, and golden brown.  Let cool on wire racks.  Use within 24 hours; or wrap airtight and freeze.  Makes about 18 – 20 medium-size puffs.

When ready to fill, carefully cut the top (upper third) from each puff (scoop out moist , doughy interior if desired).  Shortly before serving, fill with a heaping Tablespoon of the whipped Earl Grey infused cream and spread top with lemon glaze.

Cream Puffs filled with Earl Grey infused whipped cream and topped with fresh lemon glaze.  How do you think they would fare in Kitchen Stadium?

Served with a cup of tea…what better way to celebrate National Hot Tea Month?

Thanks so much for visiting, Jackie

I am sharing at the Inspiration Gallery at Craftberry Bush, Blissful White Wednesday at Timewashed, and Well Crafted Wednesday at The Well Crafted Home

3 comments

grilled cheese from a truck

January 18, 2013

Caseus cheesetruck

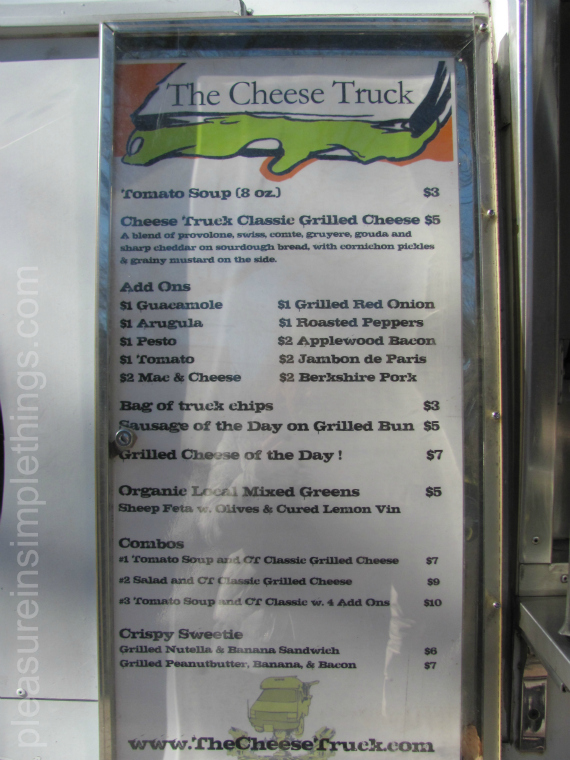
Today’s field trip is a lunch excursion.  I had some business in New Haven and decided, while I was in the Yale University neighborhood, to take a lunch break at my favorite food truck…The Caseus Cheesetruck.  This truck is a mobile version of Caseus Fromagerie Bristro – a restaurant and cheeseshop in downtown New Haven.  The star of its show is grilled cheese.  Who doesn’t like grilled cheese?  If you don’t, you will most likely find a version you will like here.

There are many combinations of ingredients available…one better than the next!  You can bypass cheese entirely and order a soup or salad….or, how about a grilled nutella and banana?

With temperatures in the 20’s and a stiff wind, it probably wasn’t one of my better ideas.  During the week, the truck is always parked on or around the Yale campus so the surroundings are always fun to admire, and on this trip I was trying to use them as a distraction from the cold.  I have an obsession with the doors on campus, so I tried to concentrate on them and not on my impending frostbite!  I almost decided to give up on taking any photos entirely as my fingers went completely numb!

I forged on…determined to show those of you that might not have ever seen the truck, just what it looks like.  Don’t let the sunny look fool you…it was freezing!!

Admiring the doors of the buildings on Yale University campus while walking to the Caseus Cheesetruck for lunch.

I opted to go for the traditional grilled cheese – in the case of Caseus, this involves a combination of seven or so cheeses.  I decided to add one ingredient – pesto (just because I love pesto).  I do think a classic grilled cheese and a tomato soup is a great choice for a first-timer.  It helps you realize just how elevated this standard can be when prepared by Caseus.

A photo of my choice for lunch from the Caseus Cheesetruck…the classic with pesto added. The sandwiches are served with a side of pickles and mustard.

There have been times (when the weather was nicer and my visit to the cheese truck was more leisurely) when I have been lucky enough to witness a ‘cheese truck challenge’ in process.  This is something worth witnessing at least once.  Any one customer able to consume 10 sandwiches in under an hour recieves the sandwiches free and can name the sandwich.  The challenger is required to add at least one ingredient other than cheese to the sandwiches.  The “tekin” for example, is named after Etkin Tekin.    Tekin was the first one to successfully complete the challenge.  His creation consisted of adding guacamole and bacon and he completed the challenge in 32 minutes and 4 seconds.

It is a fun visit, challenge or not…

The cheesetruck is definitely worth trying – if you go, maybe just pick a day where the temperature is at least a little above freezing!

Thanks so much for visiting!

Please have a wonderful weekend and remember to take pleasure in simple things, Jackie

no comments

gift for book lovers

January 15, 2013

I am a real fan of personalized pencils and I love to give sets related to a theme…isn’t it always about a theme? The last time I made up a set of pencils for a gift, it was with a beach theme. This time, I am creating a set for book lovers. Since I put myself in that category, I had fun coming up with sayings to have imprinted on the pencils…restricting them to 30 characters.


Packaging a gift is always part of the fun. Usually I give sets of pencils in the great plastic tubes available at Garnish (like I did with the ‘beachy’ pencils), but I knew for this book lovers set I really wanted to do something with pages of a book. This is what I came up with:

As a fun wrap for a set of pencils for a book lover, I sewed two pages of an old book together to make the package and adorned it with flowers fashioned from book pages.


book lovers gift wrap

I love using the sewing machine as an unexpected way to put paper together. In this case, I sewed two old book

pages together making the package for the pencils. I also made some paper flowers and a leaf out of a book page and glued them onto the package. A small scrap of linen and some rubber stamps created the gift tag. Writing the name on the paper leaf would be another fun option as a way to label the gift.

Consider giving a set of pencils as a gift..it is fun coming up with the possible imprints for a theme, staying within the number of characters allowed for the imprint. This is an affordable and fun gift that can be used creatively for any holiday or occasion. If you need purchasing information, check the beach theme link above for ideas.

Thanks so much for visiting.

I am sharing this project on Craftberry Bush…check out the other projects posted!

Hope you are having a wonderful week and remember to take pleasure in simple things, Jackie

4 comments

↑ Back to top