Subscribe to Pleasure in Simple Things via RSS ReaderFollow Pleasure in Simple Things on InstagramFollow @InSimpleThings on TwitterLike Pleasure In Simple Things on FacebookFollow Pleasure In Simple Things on PinterestEmail Jackie

its always half full

August 13, 2013

diy beach sign

Talk about pleasure in simple things…I can‘t believe how excited I got recently about a piece of garbage that ended up in my yard! 

When pieces of a neighbor’s rickety fence started falling into my backyard, I got a little irritated…until…one day, I went out to cut the lawn and found the most beautiful piece of old fence out in the grass.  It was one of the pickets from the old fence and it looked like a wonderful old weathered piece of driftwood.

photo of the shore

Such a simple thing…but repurposing that piece of fence gave me so much pleasure :)

I put that lovely piece of fence into my freezer for a few days…I always figure if there are any bugs or insect eggs inside the wood, they would not be able to survive the freezer!  Hope that is a correct assumption! 

beach sign from a fence picket

When I was sufficiently satisfied the piece of fence was bug free, I wrote “beach” on it with a white Sharpie oil based paint pen.  I had planned on sanding it after that to make the writing look worn.  But, as it turned out, the pen soaked into the wood in spots and created something of a worn look all on its own.

I love my beach sign!

I think I was meant to learn a lesson from that old piece of fence.

John Wooden quote

Thanks so much for stopping by!  Remember to take pleasure in simple things, Jackie

1 comment

the nation’s first hospital

August 9, 2013

Pennsylvania Hospital - the nation's first

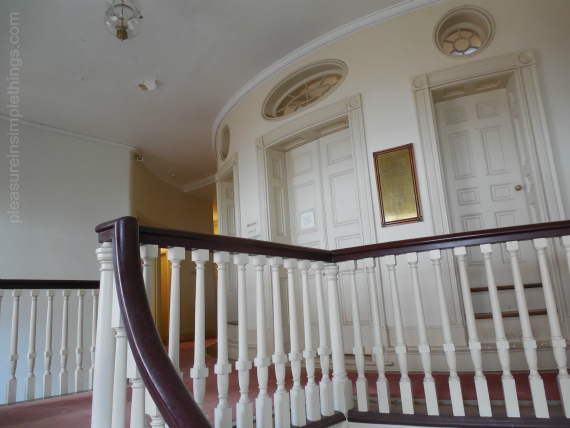
One place I have been meaning to go when visiting Philadelphia is the Pennsylvania Hospital…it is the nation’s first hospital and I have been really curious to see the operating room…especially since it existed before electricity!

For today’s Friday field trip, I am taking you to the nation’s first hospital and sharing some of the interesting facts I learned during my visit.

Even today, considered one of the finest examples of Colonial and Federal architecture in the city, the hospital was founded in 1751 by Dr. Thomas Bond and Benjamin Franklin “to care for the sick-poor and insane who were wandering the streets of Philadelphia.”  At the time, Philadelphia was the fastest growing city in the 13 colonies.

The Great Court at the Nation's First Hospital in Philadelphia

The Great Court was restored in 1976 for the nation’s bicentennial and was completed using traditional colonial colors.

The Great Court at the Nation's First Hospital in Philadelphia

In 1847 the American Medical Association designated the Pennsylvania Hospital library as the country’s most important medical library.  The collection now contains over 13,000 volumes dating back to the 15th century – including medical and scientific volumes as well as books on natural history.  The library includes the nation’s most complete collection of medical books published between 1750 and 1850.  The collection also contains several incunabula, books written before 1501, when the printing press was invented.

The Historic Library at The Nation's First Hospital in Philadelphia.

Some old plaster casts were displayed along the front wall.  They were the only method of teaching anatomy during the 18th century since using human cadavers for the study of medicine was illegal at the time.

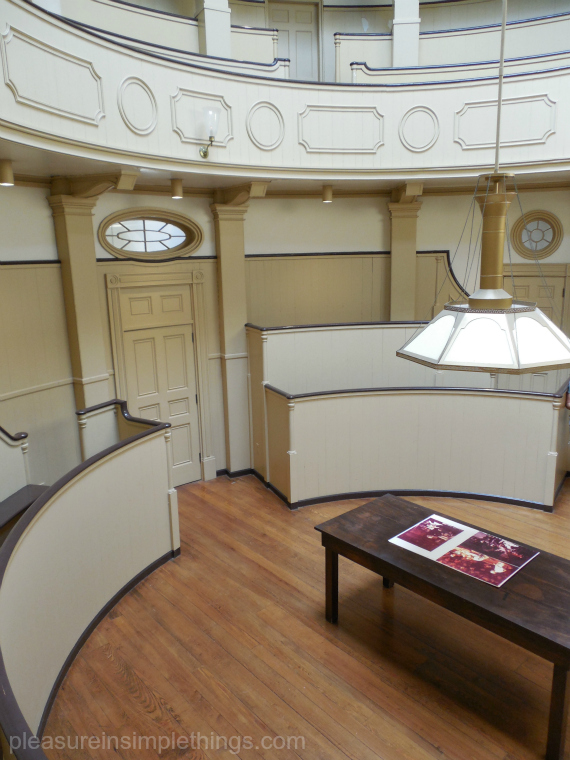
The top floor of the Pine Building is the home of The Nation’s First Surgical Amphitheater, the “dreaded circular room.”  The Amphitheatre served as the operating room from 1804 through 1868.  Surgeries were performed on sunny days between 11:00 am and 2:00 pm since there was no electricity at the time.  Candles also were used to help illuminate the room.  The light in the center is a reproduction of a gaslight and was probably not used until the 1830’s.

entrance to first surgical amphitheatre

The Nation's First Surgical Amphitheatre

The surgeons who first used this room were considered skilled craftsmen.  In this Surgical Amphitheatre surgery became the nation’s first medical specialty.  Medical students and locals paid to observe the surgical procedures.  Posters were placed around town to notify the public of the procedures being performed and the surgeons in attendance.  The Surgical Amphitheatre seats 180 and with those standing up to 300 people might be present during any given surgical operation.

The Nation's First Surgical Amphitheatre

The Nation's First Hospital

The most common surgical procedures of the day included amputation; removal of internal and external tumors, bladder stones and cataracts; repair of hernias; and the setting of fractures.  Patients were carried up the three flights of steps strapped to chairs or on stretchers before their operation.

The Nation's First Surgical Amphitheatre

The Nation's First Surgical Amphitheatre

Anesthesia was not used until the 1840’s.  Even then, anesthesia was used only on women because it was believed that they were less resistant to pain.  Prior to the use of anesthesia, the surgeons got the patients “blind drunk, gave them opium or administered a sharp tap on the head with a mallet enough to render the patient unconscious and hopefully not dead.”

The Nation's First Surgical Amphitheatre

Sterile technique was not used in this country until the 1890s.  Before that the surgeons washed their hands after the procedure.  They wore coats to protect their clothing and hung these coats outside the Amphitheatre on hooks on the walls – unwashed for years at a time.The Front Lawn of the Nation's First Hospital in Philadelphia.

The dry moat surrounding the hospital was used to exercise the mentally ill.  Out of morbid curiosity, townspeople gathered on Sundays to watch the patients.

A Physic Garden was proposed in 1774 to provide physicians with ingredients for medicines.  But, because of financial circumstances,  it was not until 1976 as a bicentennial project of the Philadelphia Committee of the Garden Club of America and the Friends of Pennsylvania Hospital that the garden was planted, containing the plants and herbs that were used for medicines in the 18th century. 

The Physic Garden at the Nation's First Hospital

More than 250 years later, Pennsylvania Hospital continues to thrive.  Pennsylvania Hospital has been designated National Historic Landmark since 1965.

If you find yourself with some free time in Philadelphia, I recommend you take the Pennsylvania Hospital Walking Tour and visit some of the oldest parts of the hospital…particularly the Nation’s First Surgical Amphitheatre!  I hope you enjoyed today’s Friday field trip.

Thank you so much for visiting!  Have a wonderful weekend, Jackie

1 comment

summer napkin fun

August 6, 2013

DIY watermelon motif napkins

It is that time of year…the time when we all wonder how the summer could be flying by so fast…and a time to try and pack as much summer fun into the remaining days as possible!

Today, I want to show you some DIY ways that I am making my summer entertaining more fun.  With meals that can include lobster, corn on the cob, and watermelon; summer fun can be messy!  I love to use dish towels as an inexpensive and practical napkin for summer meals.  IKEA is a great spot to pick up some dish towels (for less than $1. a piece!) that can easily be embellished to fit a summer party theme.

In a previous post, I made wrapping paper using an anchor shaped sponge.  Now, I am using it to add an anchor motif to a set of dish towels that I will use as napkins for a summer meal.  These are easy to create by simply dipping a patterned sponge into acrylic paint and applying to a dish towel.  Print the pattern a couple of times on a piece of scrap paper before painting the fabric…this removes some of the paint from the sponge and creates more of a ‘worn’ look to the anchor when it is painted; rather than a solid pattern of paint.

DIY anchor motif napkins

Be sure to put a piece of cardboard under the spot where you paint your design to protect your work table.  After letting the paint dry for 24 hours, use a hot iron or your dryer to set the paint.  You may want to use a paint specifically for fabric…I use acrylic paint that I already have – it has always worked well for me.  I find washing, drying, and ironing the fabric before painting it gives the best results.

DIY anchor motif napkins

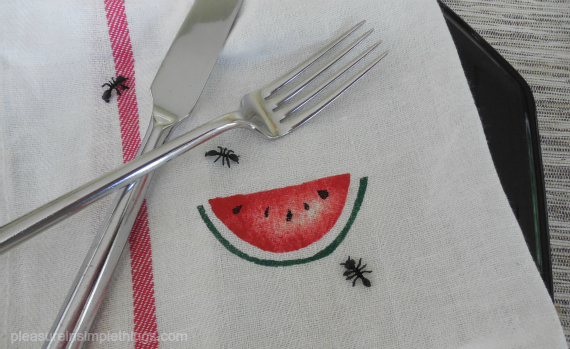
Another way to add a motif to a dish towel is by stenciling.  I always make my own stencil from a piece of cardboard or baking parchment paper.  One of my favorite designs for summer is a watermelon…I love the graphic quality and the colors.  Another great summer napkin!

DIY watermelon motif napkins

I can never resist adding a playful scattering of plastic ants when I am creating a watermelon designed item. :)

DIY watermelon motif napkins

For something a little more formal than a dish towel, a linen napkin with a napkin ring is a great summer entertaining choice.  Like the dish towels, these napkins were purchased at IKEA.  I created a napkin ring by using a piece of rope and some Plasti Dip.  In the same way that I used Plasti Dip to create a set of seafood forks, I used it on some rope to create a really great napkin ring!  You can purchase a jump rope from the dollar store or use any scrap piece of rope you have hanging around the garage to make your napkin rings.  After tying a knot in each napkin ring, I just dipped it in some Plasti Dip that I had tinted pink.  I love the way pale pink looks with linen and Plasti Dip is easy to tint any color…I dipped each napkin ring into the Plasti Dip three times (waiting between coats as listed on the instructions) to achieve this look.

DIY Plasti Dip napkin rings

I decided to coordinate the napkins by adding some painted pink polka dots along the hem.

Dotted linen napkin & Plast Dip napkin ring

After looking around the house to find something to create the size polka dot I wanted, I decided a carrot was perfect!  I mixed the color pink paint I wanted and used a freshly sliced carrot to paint the polka dots along the hem of each napkin.

Painting polka dots on napkins

I hope you enjoyed these summer napkins ideas and are inspired to create some fun summer napkins of your own!

DIY napkins from dishtowels

 Thanks so much for stopping by!  Remember to take pleasure in simple things, Jackie

Sharing at City Farmhouse and Craftberry Bush.

5 comments

revisiting a butterfly garden

August 2, 2013

photo of black and blue butterfly

Although I am not a big butterfly fan, I couldn’t help but visit the butterfly garden when I was recently at The Academy of Natural Sciences in Philadelphia.  You may remember my last trip to the Butterfly Garden.

Today’s Friday field trip is a revisit to the butterfly garden at the museum.

butterfly at ANS butterfly garden in Philly

I think the intriguing thing about the butterflies is their short life span…it does seem sad that they don’t live beyond a couple of weeks.  For me, the intriguing part is that every time I am in Philadelphia, I can stop by the butterfly garden and every single butterfly will be different from my previous trip!

butterfly in ANS butterfly garden in Philly

So, even though my intention was to just visit the “Glow” exhibit, I found myself stopping by the butterfly garden before I left the museum.  And, this time I got to thinking about butterflies in literature…wondering how others documented their feelings about butterflies.  I have included my favorite findings with the photos.  Enjoy!

butterfly at ANS in Philly

But these are flowers that fly and all but sing:

And now from having ridden out desire

They lie closed over in the wind and cling

Where wheels have freshly sliced the April mire.

~Robert Frost, “Blue-Butterfly Day”


butterfly at ANS in Philly

butterfly at ANS in Philly

Happiness is a butterfly, which when pursued, is always just beyond your
grasp, but which, if you will sit down quietly, may alight upon you.

~Nathaniel Hawthorne


butterfly at ANS in Philly

butterfly in the butterfly garden at Philly's ANS

We delight in the beauty of the butterfly, but rarely admit the changes

it has gone through to achieve that beauty. 

~Maya Angelou


butterfly in Philly's butterfly garden

“Just living is not enough,” said the butterfly, “one must have

sunshine, freedom and a little flower.” 

~Hans Christian Anderson

butterfly in butterfly garden

I only ask to be free.  The butterflies are free. 

~Charles Dickens


butterfly in Philadelphia butterfly garden

She liked being reminded of butterflies. She remembered being six or seven and crying over the fates of the butterflies in her yard after learning that they lived for only a few days. Her mother had comforted her and told her not to be sad for the butterflies, that just because their lives were short didn’t mean they were tragic. Watching them flying in the warm sun among the daisies in their garden, her mother had said to her, see, they have a beautiful life. Alice liked remembering that.
~Lisa Genova, “Still Alice”

Philadelphia butterfly garden at ANS

I hope you enjoyed our Friday field trip to the butterfly garden at the Academy of Natural Sciences in Philadelphia.  Thank you so much for stopping by.

Remember to take pleasure in simple things and have a wonderful weekend, Jackie

Sharing at The Tablescaper and Mona’s Picturesque.

1 comment

monthly book giveaway for august!

August 1, 2013

author colum mccannWriter Colum McCann

Congratulations to Jacqueline, who writes the blog Marbles Rolling, for winning July’s giveaway!  I know you will enjoy the signed copy of Wonder by R. J. Palacio!

The August selection is a New York Times bestseller written in 2009.  I read Let the Great World Spin some time ago and found it so wonderfully fascinating that when I got the opportunity to see the author speak in Philadelphia last week, I jumped at the chance.

Colum McCann spoke at the Free Library in Philadelphia and read selections from his newest book Trans Atlantic.  Although his newest book seems to contain the same poetic passion that I enjoyed in Let the Great World Spin, I decided to have his last book signed for the giveaway since it was such a favorite of mine.  A passionate, beautifully written book set in New York City in the ’70’s,  McCann provides a very unique reading experience that includes a richness of characters and a vivid depiction of New York.

The New York Times Book Review wrote:

“An emotional tour de force…electric, profound…Like a great pitcher in his prime, McCann is constantly changing speeds, adopting different voices, tones and narrative styles as he shifts between story lines…It is a mark of the novel’s soaring and largely fulfilled ambition that McCann just keeps rolling out new people, deftly linking each to the next as his story moves toward its surprising and deeply affecting conclusion…Let the Great World Spin (feels) like a precursor to…The Bonfire of the Vanities.”

Meeting Colum McCann in Philadelphia

My favorite part of meeting Colum McCann was when he asked me to signed his book!  How fun…although it did catch me off guard!  I guess I should have been a little more thoughtful in what I wrote (Big Fan!?)…but, I was so excited to meet him!

Be sure to leave a comment on a post or on my Facebook page (or Twitter or Instagram) to be entered in the random drawing to win a signed copy of Colum McCann’s Let the Great World Spin.  Good luck!

Thanks so much for visiting, Jackie

P.S.  Instagram users, please read on for the August word prompt challenge!  Share your photos daily with hashtag #pleasuregram.

august instagram challenge


5 comments

diy nautical necklace

July 30, 2013

diy nautical necklace

I have never made any jewelry.  When I see some of the beautiful beads in the craft store, I am tempted to make something.  The thing is, it seems when you add the price of all the items needed to make a piece, it can be much less expensive to buy something already made!  Some day I plan on experimenting with jewelry making with my sea glass collection, but today I want to tell you about a necklace I created for less than $5!

A while back, I ripped a photo of a necklace I really liked from a magazine…it had a nautical feel to it since it was made from rope.  But, at $215., it was way beyond my accessories budget…actually, I don’t even have an accessories budget!  So, $215. more than my budget!

diy necklace collage

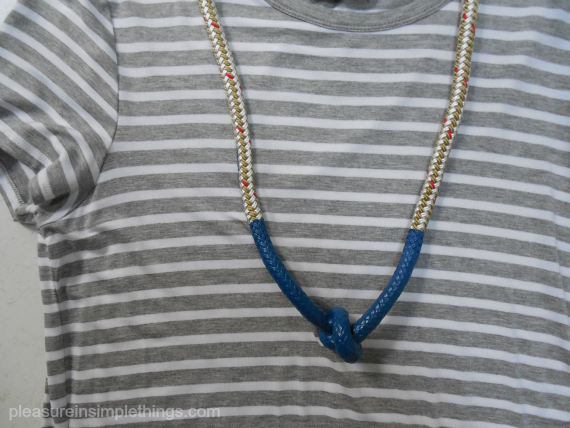
I was able to create the same look as the necklace in the magazine with a piece of rope from the marine store (less than $2.) and some Plasti Dip I had left over from my seafood fork project.  I got a little fancy and bought a bracelet clasp and some wire to use as an attachment and the total for supplies still came out under $5.

The best part is that I love the necklace!  I thought I would wear it with t-shirts, but I really like the way it looks with my gray and white striped long t-shirt dress…so perfect!  All I did was to knot the rope and dip it in Plasti Dip.  The necklace I saw had a red accent, but I decided to use blue since I had some blue Plasti Dip on hand.  I liked the look of two coats of Plasti Dip, but you can easily add more coats if you want the colored area to have a thicker look.

diy necklace

When you buy the rope at the marine store, it is best to get the exact length you want, because they will burn the edges for you to prevent it from unraveling.  There are plenty of different rope options to choose from and the cost is calculated per yard.  I thought the craft store would have some type of clamp to use as a fastener, but I couldn’t find one large enough to fit the diameter of the rope so I crafted a fastener out of a bracelet fastener.  Maybe a jewelry supply store would have something different or, another fastening option would be to tie or fuse the two ends together – slipping the necklace over your head.

So, that is a simple way to create a nautical feel necklace!  I think knotted napkin rings dipped in Plasti Dip would be another great variation on this project.  Plasti Dip can be tinted any color, so there are plenty of color options…have fun with it!

Thanks so much for stopping by.  Remember to take pleasure in simple things, Jackie

Sharing at Elizabeth & Co. and Silver Pennies.

1 comment

summer chillin’

July 26, 2013

Lil' Pop Shop Chocolate Salted Caramel Brownie

I adore frozen treats…Popsicles, freeze pops, snow cones…I love them all! A simple pleasure is definitely an icy pop on a hot summer day! Today’s Friday field trip is to Lil’ Pop Shop…a ‘cool’ store in Philadelphia that creates ice pops from natural ingredients.

The shop also has a food truck, and because I have a dream of creating and running a food truck myself someday, I always enjoying checking out food trucks that sell food I would be proud to serve myself. The Lil’ Pop Shop in Philadelphia has one of these trucks. Hand-crafted in small batches using seasonal ingredients, the ice pops are sold in the shop and from the truck that travels the Philly streets.

chocolate brownie ice pop

A Chocolate Salted Caramel Brownie ice pop from Lil’ Pop Shop in Philadelphia.

Lil’ Pop Shop owner Jeanne Chang, trained as a pastry chef at the Culinary Institute of America, comes up with inventive ice pop flavor combinations that truly appeal to me.

Some of the flavors?

To name a few… Red Hot Mango & Chile Pepper, Earl Grey with Vanilla Bean & Black Pepper, Chocolate with Salted Caramel Brownie, Raspberry Lemonade, Pineapple Basil, Vietnamese Ice Coffee, Green Tea with Mochi, and Goat Cheese with Black Raspberries & Honey.

On my last visit, Creamy Sweet & Salty Summer Corn was just added as a seasonal selection.

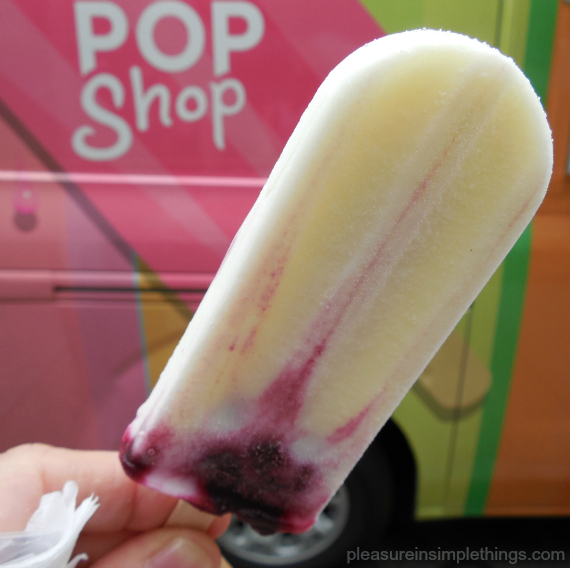
raspberry ice pop

Goat Cheese, Black Raspberry & Honey Ice Pop from Lil’ Pop

Shop in Philadelphia.

Would you like to try making your own unique flavored ice pops? You can start with this recipe, courtesy of Jeanne Chang at the Lil’ Pop Shop:

Avocado Coconut Pops

  • ½ cup coconut milk
  • ¾ cup water
  • ½ cup sugar
  • 2 small, ripe avocados
  • 2 Tablespoons lemon juice
  • Pinch of salt

Bring water and sugar to a boil in small saucepan until sugar is dissolved. Cool to room temperature. Cut and remove pits from avocados. Combine sugar-water mixture, coconut milk, lemon juice, salt and avocados in blender or food processor and puree until smooth.

Use mixture in your preferred molds. Freeze until solid. To unmold pops, dip the mold into warm water for a few seconds. Each recipe makes 8 to 10 pops, depending on your mold.

Lil' Pop Shop Food Truck in Philly

Try creating some unique flavor combinations of your own this summer! Don’t be restricted by traditional flavors…I am planning on experimenting with some farmer’s market purchases! Do you know what Popsicle lists as their best-selling flavor? Cherry. Sounds pretty boring to me. ;)

Thanks for visiting! Have a wonderful weekend!

Remember to take pleasure in simple things, Jackie

Sharing at The Tablescaper.

1 comment

pastry bites two ways

July 23, 2013

lemon raspberry pastry bites

I love bite-sized desserts.  People feel less guilty about eating a wonderful dessert when it is small. After all, there are less calories in a lot of little desserts, right?  Plus, an individual size is so pretty and easy to serve.

I am going to show you how easy it is to make these pastry bites two ways…lemon raspberry and cannoli.  Both use the same individual sized pastry shell.

Because the individual shells for these desserts can be made ahead on the morning you will be using them, it is a great dessert for serving a crowd. 

 lemon raspberry bites

For lemon raspberry pastry bites, the shells are filled with lemon curd and topped with a raspberry.  Lemon curd is really tart and gives a great big zing to this little bite.

There is some really great quality lemon curd that you can buy premade…often it is less expensive than buying the ingredients to make it yourself.  Trader Joe’s has a good one (since you only use 1 tsp. per bite, you can make 90 pieces with the one 10.5 oz. jar). If you would rather make it yourself, Ina Garten’s recipe is my favorite.

Just before serving time, carefully fill each shell with lemon curd, top with a raspberry, garnish with a little piece of mint, and dust with confectioner’s sugar.

 cannoli pastry bites

Cannoli pastry bites are filled with cannoli cream.  I love cannoli cream, but I am not a big fan of cannoli shells.  The reason could be because I am not a big fan of fried foods.  In any case, I much prefer cannoli cream with puff pastry and that is the why I decided to create a dessert with that combination. 

Use your favorite cannoli filling recipe.  Mine is by Alex Guaranschelli.  Click here for the recipe. 

Fill the shells just before serving.  Garnish with mini chocolate chips and drizzle with melted chocolate if desired.  Dust with confectioner’s sugar. 

If you use Alex’s recipe, it makes a lot.  Because you only need 1 tsp. for each pastry bite, you will have plenty left over. You can reduce the recipe, or use the extra, as I do, for deconstructed cannolis as a special treat for your family or guests.  I get the broken cannoli shells from an Italian bakery and serve the delicious cannoli filling with a garnish of mini chocolate chips…a sweet version of a chip & dip. :)

deconstructed cannolis

“Deconstructed’ cannolis are a great way to use leftover cannoli filling. Serve a bowl of cannoli cream with broken cannoli shells. Garnish with some mini chocolate chips. A sweet & stylish ‘chip & dip!’

Making the Shells

To make individual shells, use pastry sheets purchased at the grocery store.  I have used phyllo dough many times in my life…I can’t even count the number of times I have made baklava…but it is a little tricky if you haven’t worked with it.  I am going to give you instructions using the store bought sheets…I did a test before I put this post together and you can get a great result using the store bought sheets.  They are called puff pastry, pastry dough sheets and are located in the freezer section of your grocery store.  The box is 17.65 oz. and contains two sheets of pastry dough. 

The key to making a successful shell is in the cutting.  The dough needs to be really, really cold when you cut the shape so that the edges don’t seal.  Sealing the edges would prevent the pastry dough from rising.  This is the reason you should not wait for the dough to defrost, cut it as soon as you are able.  For the same reason, do not add an egg wash or brush with milk…if any of the wash gets onto the sides of the shell, the edges will seal. 

making individual pastry shells

You will need two different sized cookie cutters…I used one that measures 1 3/8” in diameter and one that is 2 3/8“ diameter.  I bought a set of graduated cookie cutters in a flower shape at Home Goods…5 cutters in various sizes came in the package for a price of $2.99.

Using the larger cutter, cut the shape from the dough.  Put it onto a parchment lined cookie sheet.  Using the smaller cutter, cut a center in the first shape, but do not cut all the way through…pierce the dough, but do not make a cut.  This will create the hole for your filling.  Each sheet will make 12 pieces if you use a similar sized cookie cutter as mine, so the box of two sheets will make 24.

Bake on parchment paper at 400 degrees for 10 to 13 minutes. 

individual pastry shell

After the shells are completely cool, use the point of a knife to remove the inner shape.  You can push it down if you are having trouble removing it.  After you have done this to each shell, they can be saved for later to fill.

lemon raspberry pastry bite

You can have your filling ready ahead of time and can make the shells in the morning.  All you need to do is to assemble when ready to serve!  Now that you know how to make the individual pastry shells, you can come up with your own versions using your favorite fillings!  Enjoy!

Thank you so much for visiting!  Remember to take pleasure in simple things, Jackie

Sharing at The Shabby Nest and Craftberry Bush.

1 comment

a special garden tour

July 19, 2013

garden tour photo

When I asked my friends Phyllis & John to agree to have their home included on a garden tour; they were hesitant.  In my mind, they were the perfect couple to ask…their yard was certainly my favorite.. Geez, I would like to retire to their yard!  They live on a golf course, have a beautiful built-in pool, a vegetable and herb garden, a potting shed, and gorgeous flowers and plants everywhere…what more could you want? 

potting shed on the garden tour

Anyway, once I explained that the tour was a scholarship benefit, they readily agreed to participate.  Today for Friday field trip, we are visiting the breathtaking grounds surrounding their 1852 home in Fairfield County, Connecticut on the day of the garden tour.  

view overlooking golf course

It was very hard to edit this post since there are so many facets to this yard, designed and planted solely by the homeowners.  Such a fun yard to explore…Phyllis has created beautiful vignettes in every nook and cranny.   

vegetable garden on garden tour

John’s ‘baby’ is the vegetable garden.  A retired giant pumpkin planter (yup…he once grew a prize winner that weighed 625 lbs!), he now concentrates on vegetables and herbs.  In addition to the planting, he built the stone walls and fences that so beautifully surround the space.  Yes, that is an outhouse in the back of the garden…original to the property.  John also crafted the handsome birdhouse that stands in the front section of the property.

vegetable garden on the garden tour

Friday field trip garden tour

Friday field trip garden tour

Friday field trip garden tour

What do you serve for refreshments on a garden tour?  I really wanted to create a menu that was true to the house…concentrating on fresh vegetables, herbs, and flowers.  I spent quite a bit of time on it and finally decided on rosemary sea salt shortbreads, rosewater meringues, fresh tomatoes with basil and marinated mozzarella, watermelon with fresh ricotta drizzled with extra virgin olive oil and finished with salt, pepper and mint, and lemon raspberry tartlets.  Beverages served were cucumber water with nasturtium and pansy ice cubes and home made iced tea lightly sweetened with simple syrup infused with lemon and mint.

Friday field trip garden tour food

Friday field trip garden tour

Friday field trip garden tour pool

Friday field trip garden tour

Friday field trip garden tour

I hope you enjoyed our Friday field trip garden tour!  Thank you John and Phyllis…your yard is truly a labor of love and it shows!  Thanks also to the beautiful and talented gals – Emma and Sara.;)

If you haven’t already, please ‘like’ my facebook page to see additional photos.  You can also follow me on Instagram and Pinterest.

Friday field trip garden tour front door

Have a wonderful weekend and remember to take pleasure in simple things, Jackie

Sharing at Mona’s Picturesque, Little Red House, and Craftberry Bush.

6 comments

lovely apron upgrade

July 16, 2013

diy apron

diy apron

Today I wanted to share an easy way to upgrade a standard chef’s apron into something lovely. I was recently involved with organizing a charity garden event and I really wanted the hostesses to have coordinating aprons. The gardens were so amazing and we had some very tasty food prepared with a flower and herb theme…I needed aprons that were as lovely as the rest of the event.

Not wanting to spend much money, I decided to use a few embellishments to make a white chef’s apron contribute to our theme. If you know someone in the restaurant business, you may be able to score an apron or two at no cost. If not, you can purchase one at a restaurant supply store for $5 or $6.

The first thing I did was to add a flower photo onto the top of the apron front. This was easy to do with T-Shirt transfer paper. You can pick this up at any store that sells office supplies. I found my package at Target near the copy paper. I bought Avery brand Ink Jet T-Shirt Transfers. Six 8 1/2″ x 11″ sheets come in the container. Since I was printing a 5″ x 7″ photo, I was able to print two photos on one sheet. I chose a photo I had taken last spring of my lilly of the valley.

pretty napkin basket

I printed the page using a color printer and ironed the photos onto the aprons, carefully following the directions on the transfer package. I decided to add a little sparkle around the edges of the photo by applying some silver sparkle paint with a cotton swab.

pocket on diy apron

Then, I added a couple pockets by sewing on a rectangular shaped piece of fabric I found on the clearance table at the fabric store. First I sewed a hem on one of the long sides of the fabric – this would be the top of the pocket. Then, I attached the piece of fabric by sewing the two sides and the bottom

onto the apron. Sewing vertically down the middle of the pocket created the two pockets.

Rosemary sea salt shortbreads – one of the treats I made to serve at the Garden Tour.

And that was it! Using a photo transfer sheet and some scrap fabric that coordinated with my photo, I was able to upgrade my standard white apron into something garden party worthy!

diy apron

You can do the same for your next event!

Hope you enjoyed today’s post on upgrading an apron. I look forward to sharing more about the garden event in future posts.

Thanks for visiting! Remember to take pleasure in simple things, Jackie

Sharing at A Pinch of Joy and Timewashed.

3 comments

Back to top