Subscribe to Pleasure in Simple Things via RSS ReaderFollow Pleasure in Simple Things on InstagramFollow @InSimpleThings on TwitterLike Pleasure In Simple Things on FacebookFollow Pleasure In Simple Things on PinterestEmail Jackie

top 5 from philly flower show 2014

March 14, 2014

Philly Flower Show 2014

The Philadelphia Flower Show had an amazing theme this year…ARTiculture!

I was so thrilled to have the opportunity to attend the longest-running and largest indoor flower show!

With so much to see, the show was overwhelming. What makes the show special is in the way each attendee has a unique visit – each person sees the show from their own perspective…in this way, the show is a very personal experience.

As a way to share this personal experience with you on Friday field trip this week, I am sharing my personal top 5 from the Philadelphia Flower Show 2014.

THEME. I loved the art theme this year! ARTiculture! Working in collaboration with Philadelphia museums and the local art world made the Flower Show theme the best in years! The art influences were everywhere…but this display, in my estimation, integrated the theme perfectly!

Philly  Flower Show Display

Philly Flower Show canvas

Even food was treated as art in this amazing display:

food at Philly Flower Show

DEMONSTRATION. The lectures and demonstrations offered at the Flower Show are always a high point for me…learning anything new is always fun and I enjoy watching the variety of demonstrations offered on the show schedule.

This year, while attending an evening sponsored by Philadelphia Magazine, I met the talented artist Denise Fike. Denise provided guests with their own fashion portraits…what a fun demonstration and a cool way to incorporate the theme of the show!

Artist Denise Fike at Philly Flower Show

FRIENDS. One great aspect of an annual show is to visit people you have met year after year. I had three in particular that I really enjoyed catching up with in the retail section of the show.

One was Michelle Masters…she creates this

beautiful topiary art…

Michele Masters topiary art

I was happy to have the opportunity to stock up on my notecards and to purchase a few great gifts. ;)

Michele Masters

I also had the chance to spend some time with Jill Schwartz. As owner of Elements, she creates some really awesome jewelry…you may have seen some of her unique pieces in Anthropologie.

Elements by Jill Schwartz

Jill Schwartz necklace

If you are a flower lover and have not seen the products from Chive you are definitely missing something great! It is so inspiring to see all their products ‘up close and personal’ at the flower show each year and to say ‘hi’ to the friendly staff. I love using their products for big events and small parties…they have wonderful pieces to use as favors and as centerpieces.

Chive Flower vases

SCULPTURE. Each year, I am intrigued by some type of sculpture at the show. Of course, everyone attending was mesmerized by the entrance of the show, where masses of flowers were put together and displayed in a ‘frame.’ I found a couple more I enjoyed.

The paper flower sculptures in the hallways leading to the main rooms were awesome and gave any of us dappling in paper flower construction a whole new level of inspiration!

paper sculpture

paper sculpture

paper sculpture

paper sculpture

As a typography lover, I enjoyed this sculpture in the Convention Center hallway.

Typography sculpture

GARDEN INSPIRATION. Admittedly, much of my day was spent oohing and aahing the amazing varieties of flowers on display. It’s great to be inspired to find something to incorporate into my own garden. This year, that inspiration was the witch hazel. As a winter bloomer, I know it would be a lovely way to add some color to the snow next year! My own state (Connecticut) is the witch hazel capital and was the first to harvest and market it for its medicinal purposes…surprisingly, I have not already included it in my garden! This is how it looks in bloom.

witch hazel

That is my little glimpse into the 2014 Philadelphia Flower Show. Hope you enjoyed this week’s Friday field trip!

Thank you for stopping by. Have a wonderful weekend, Jackie

Sharing at Mona’s Picturesque, Crafts a la Mode, and The Tablescaper.

9 comments

spring obsessions

March 11, 2014

spring 2014 obsessions

We are in the home stretch!  Spring is almost here!

Here are some of the top things I am ‘jonesing for’ as we start the new season!

keil jamespatrick


Even though I already own Kiel James Patrick, there are always plenty of  beautiful nautical-inspired items to add to my collection…for spring, I really want this ‘go with anything’ bracelet!  Anchors away! (photo from the KJP website)


I am totally obsessed with branches during the spring…after the long, snowy winter, I crave any nature I can bring into the house!  They don’t even have to be flowering branches…any branch will do..the bigger, the better…they just look so beautiful indoors!  (Of course flowering branches are always lovely too…I start forcing flowering branches in February.)  I took the photo here on Yale University’s campus, so I didn’t actually pick these – but aren’t they gorgeous!

aablossomsraybans


Okay, if you aren’t already obsessed with these Ray-Ban aviator flash lenses, you certainly should be!  They come in plenty of yummy colors and are the coolest!  (photo from the Ray-Ban website)


decorated eggs


Does it seems strange to see eggs on my list of obsessions?  It is not the actual eggs I am obsessed with…it is the decorating!  I start in February and continue until Easter and beyond!  It is good that eggs are on the less expensive side considering the amount I go through!  It doesn’t stop there…after Easter, I use the leftover pieces of colored egg shells to make mosaics!  Obsessed!


anthro candle

I become obsessed with a lot of the merchandise at Anthropologie – particularly the home goods.  For spring, these little beauties are the obsession of the season – sooo casual chic!  The beauty of the Anthro candle is that the container is always so awesome, that even when the candle is gone, the container finds a new use and lives on!  The Illume land & sky candle is totally gorgeous and the scents are addicting! (photo from the Anthropologie website)


essiemintcandyapplenail polishThe color mint is everywhere this spring…my favorite though, is in nail polish.  I think Essie’s mint candy apple is the perfect fun spring shade and is an easy way to add mint to my spring wardrobe with a very small investment!  (photo from Essie’s website)


Ben & Jerry's salted caramel ice cream


Like me, I am sure most of the country is obsessed with Ben & Jerry’s core ice creams flavors …how has this not been invented earlier?  My biggest obsession is the salted caramel flavor.  Other flavors include That’s My Jam, Hazed & Confused, and Peanut Butter Fudge.  (photo from Ben & Jerry’s website)


Yes, I am totally obsessed with white jeans…actually, it is not just a spring time obsession…I am obsessed with them pretty much any time of year!  I am currently obsessed with a pair offered by  J. Crew  J. Crew white jeanssince they offer a great tall size that accommodates my long legs nicely! :)  Can’t wait to pair them with a pastel sweater or with nautical stripe flats! (photo from the J. Crew website)

Right now, anyone that knows me is reading this and thinking my obsession with Harry Connick, Jr. is definitely not limited to the spring.  You are right…I am now, and always have been, obsessed with Harry.  I have seen him in person more times than any other entertainer…I have been in the front row of many concerts, holiday special tapings, and even his Broadway performance – sitting closer to the stage than Jill (if you are a Harry fan, you know Jill is his wife’s name)…BUT, NEVER until now, have I ever watched American Idol!  What power you have over me Harry! ;)  I am so happy that so many people in America are now discovering what I have always known about Harry…he is the coolest!  (photo from the American Idol website)

Harry Connick, Jr.

So there you have it…a few of my spring obsessions…what are yours?

Thanks so much for stopping by!  Remember to take pleasure in simple things, Jackie

Sharing at Coastal Charm,  Common Ground, and The Shabby Nest.

2 comments

‘eggs’traordinary

March 7, 2014

molded hard boiled egg
Inspired by the playful works of art in Japanese character bento boxes, Williams-Sonoma sells a product that changes the shape of a hard-boiled egg!  I was fascinated with the idea of this product when I spotted it at the store…and, with Easter quickly approaching, I knew I had to try it out!  I am sharing the adorable results with you on today’s Friday field trip.

Following the easy directions on the box of the Egg-Design Molds, I set out to create a heart, a star, a rabbit, and a bear from some hard boiled eggs.

molding a hard boiled egg
My true interest was in the rabbit (for Easter), but I also wanted to test the star to use for deviled eggs later this summer – very patriotic for our 4th of July party on the beach!

star shaped molded eggs
Creating these eggs was really easy.  I just followed the simple directions on the box.  Basically:

  1. Cook 4 extra-large eggs
  2. Dip one egg in a bowl of ice water, then peel off the shell
  3. Place egg in a mold
  4. Set in ice water
  5. Repeat for the other 3 eggs
  6. After 10 minutes, remove from molds

Egg Design Molds

Aren’t these sure to be a hit at the ‘kids’ table on Easter?

molded bunny egg

These molds can be purchased on sale online here.  Three sets would make a dozen eggs at a time – or, a half dozen star shaped deviled (half) eggs.

Since I tested my deviled eggs, I included the recipe.  I am not a big mayo fan, so my version cuts the mayo with sour cream.  Enjoy!

deviled eggs recipe

Thanks so much for stopping by.  Have a wonderful weekend.

Remember to take pleasure in simple things, Jackie

Sharing with Silver Pennies, Little Red House, and Crafts a la Mode.

5 comments

showing of the green

March 4, 2014

packaged St. Pat's cookies
St. Patrick’s Day is coming up…how do I celebrate?

I usually plant some shamrocks in an unexpected container…or make some homemade Irish Cream…this year, in addition, I am adding a little green to my baking.

Irish Blessing

I think anything green goes over well on St. Patrick’s Day…what other holiday could possibly make green bagels or green beer seem like a good idea?

This year, I am adding some green swirls to my cookies!  If you haven’t used this technique in your cookie making, it is relatively easy to do – it just requires a little bit of patience.

making swirl cookies
I have used this technique to create ‘wave’ cookies for a beach themed party (by adding blue paste food coloring) or to create mocha swirl cookies (by adding cocoa and espresso powder).  As you can imagine, it is easily adaptable to a number of different themes/flavors…so keep it in mind for future entertaining!

steps in making swirl cookies
Divide your cookie dough in half, dyeing one half with paste food coloring.  In addition, I added some lime juice and lime zest – just so the green color made some sense!  You can use your favorite butter or sugar cookie dough…I have never tried this with the packages of sugar cookie dough that is sold in the refrigerator section of the grocery store, but I bet they would work out just as well.

Just pat each half of (chilled) dough into a rectangle on a piece of wax paper…measure each piece – so they are the same size.  Wrap each piece separately in wax paper and put into the refrigerator until firm.  Invert the plain piece of dough onto a large, clean piece of wax paper and peel off the top layer of wax paper.  Invert the green rectangle of dough on top of the plain dough so that the edges are aligned.  Peel off the top layer of paper.  With floured hands, pat the dough so that the layers adhere.

Working from a longer side, roll the dough into a cylinder.  If the dough becomes too soft to work with, refrigerate briefly, then continue rolling.  Wrap the cylinder in wax paper and refrigerate until firm or overnight.  Slice and bake the cookies as usual.

daisy for St. Patrick's Day

I added some clear sprinkles before baking to give the cookies a little sparkle. :)

I packaged each cookie I was giving to a friend in a CD envelope – tying it with raffia and a fresh daisy and adding the message ‘Erin go Bragh’ – translation is “Ireland Forever.”

daisy

Do you have unexpected ways to add green to your St. Patrick’s Day?

Thank you so much for stopping by.

Remember to take pleasure in simple things, Jackie

Sharing at Coastal Charm,  Craftberry Bush, and Finding Silver Pennies.

no comments

book giveaway for march!

February 28, 2014

Cold Tangerines by Shauna Niequist
Since it is already the end of February, today’s Friday field trip will be used for the book giveaway.  First, Congratulations to Kelly from Michigan, the winner of the book Lots of Candles, Plenty of Cake signed by author Anna Quindlen.

For March, I have chosen a book titled Cold Tangerines by Shauna Niequist.  It is unusual for me to select a book I haven’t yet read, but that is the case this month.

I was looking for a book that might serve as an inspiration as we head into spring – a time for renewal.  Searching for a book that offers a fresh perspective and outlook on life, I came across Cold Tangerines.  This book is described as an inspirational collection of 40 short essays that celebrate the extraordinary moments hidden in everyday life…sounds like the perfect way to begin the season!  And, because it is a collection of short works, perfect for even the busiest of lifestyles!

Just leave a comment here, on Facebook, Twitter, or Instagram for a chance to be entered into the monthly contest.  A name will be chosen randomly from all the comments left during the month of March.  Good luck!

Thank you so much for stopping by.  Have a wonderful weekend!

Remember to take pleasure in simple things, Jackie 

Instagram users, please read on!  Finding a fun spring fashion on a shopping trip…noticing a new bud on a favorite tree or a crocus popping through the snow…these are things that scream spring to me – what says spring to you?  For March, the pleasure in simple things Instagram challenge is to document signs of spring!  Use hashtag #pleasuregram to share photos that signal spring’s arrival!

march instagram challenge


7 comments

diy snowman gift bag

February 25, 2014

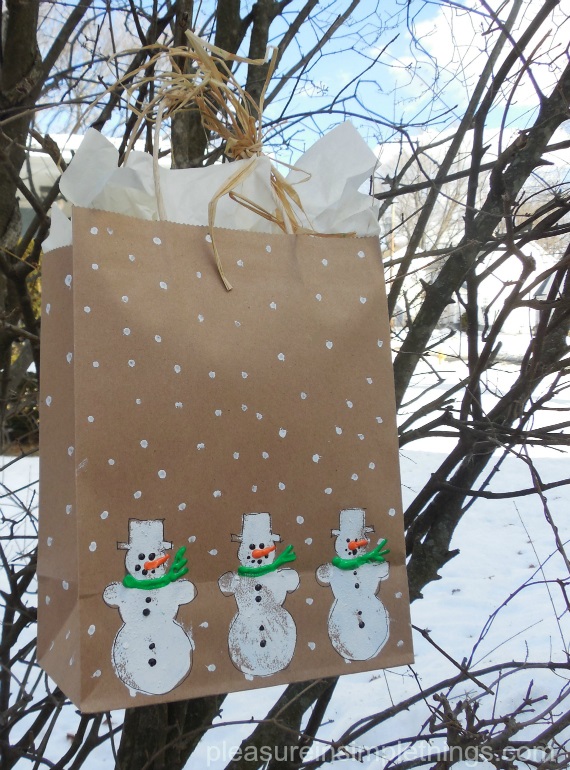
diy snowman gift bag

Today, I am creating an easy hand painted snowman gift bag.  I know snowmen are usually associated with Christmas decor, but based on the frequency of snowfall here in Connecticut this winter, a snowman certainly seems an appropriate motif for any project…so, it is with tongue in cheek that I use a snowman design for my gift bag.

If a snowman is strictly holiday for you, make up a batch of these gift bags to store away with your holiday wrappings for next Christmas…a fun activity to do with the children on the next snow day. ;)

snowman gift bag supplies

With just a few craft supplies, it is an easy item to create using a brown paper handled bag.  These bags are very inexpensive at the dollar store or paper supply store.

I like to use puff paint in squeeze bottles for the details on the snowman because it creates some dimension.  You can just as easily use paint and a paint brush.  If you don’t have a sponge shaped like a snowman, just cut your own from a household sponge…I happen to have a snowman shaped sponge, but I very often cut my own shapes from a sponge for my gift wrap designs.

This project is super easy…it just requires some drying time in between steps.

painting a diy gift bag

First, dip your sponge into some white paint, adding a thin coat on the entire sponge surface, and press onto the bag to add your snowmen.  Then, using a cotton swab, add the ‘snow.’  A cotton swab is the perfect tool for creating a snow storm!  (Opening the bag and standing it up will enable you to add additional ‘snow’ to the two sides of the bag.)

When this is dry, use the puff paint to add a scarf, buttons, eyes, mouth, and – of course – an orange carrot nose!  If preferred, paint and a brush or markers can be substituted for the puff paint to add the details to the snowmen.

When all the paint is dry, add an outline to the snowmen with a thin marker.

snowmen on diy gift bag

Repeat the same design on the other side of the bag, or, if preferred – just add ‘snow’ to the back of the bag.

And, that’s it!  Just add tissue paper and raffia to complete the look.  In addition, (for a little snow overkill) I plan to cut a snowflake from white felt to tie onto my package!

snowman giftbag tutorial

Hope you enjoyed this easy tutorial for making a snowman gift bag…a fun hand painted bag to add to your gift giving!

Here in Connecticut, we may just have to consider adding a snowman to our state flag!

Thank you so much for stopping by.

Remember to take pleasure in simple things, Jackie

no comments

diy button anchor wall hanging

February 21, 2014

diy button anchor wall hanging

For today’s Friday field trip, I am turning an item from the past into something unexpected that can be permanently displayed and fondly admired.

While my children were growing up, our family vacations always involved water – even when we were away from our own beach, we were tent camping on a lake or visiting the ocean at a state park. 

diy anchor wall hanging

Shortly after my children were born… I don’t think my oldest was even a year old… I splurged and bought a couple of good quality staple items to be used for our family’s water time…a mesh bag to tote toys (there were always plenty) and a large cotton beach blanket – both purchased from L.L.Bean.  Every family trip to an ocean, lake, or pool was accompanied by the large mesh bag filled with water toys and the brightly colored cotton beach blanket.   

Over the years, the mesh bag disappeared as the mountain of plastic toys was replaced with sand chairs and Baggo.  But, the blanket always remained…that is, until this past summer…when I noticed (to my horror), that someone had decided this old beach blanket, now a shredded mess, should be put out of its misery.  I found it tossed in an outdoor garbage can! 

discarded beach blanket

What did I do?  I immediately took it OUT of the trash, of course – determined to save it and preserve all the memories associated with this sacred beach blanket.  I gave it a good washing and decided I would come up with some way to use some part of it to keep forever.  After all, this blanket was like part of the family!  I can’t even begin to explain all the wonderful moments that happened on and around this blanket!

So, I came up with a wall hanging that serves the battered old blanket perfectly and evokes memories of happy times with my children every time I see it!

If you want to create something similar, here are the steps I used:

preparing a diy wall hanging

  1. Stretch fabric (blanket) onto an embroidery hoop sized appropriately for the design you have chosen.
  2. Sew buttons onto the fabric in a desired pattern.  (First, work up your design on a flat surface to determine the buttons you want to use and the size of the design.  I was inspired to use the anchor by a photo of a tote bag I saw in Marie Claire.)
  3. Trim the fabric edges and glue them to the back of the hoop edges.
  4. For a decorative edge, attach a thin piece of twine around the edge of the hoop using a glue gun.
  5. Tie on a piece of twine for hanging.  (This is a decorative option since the hoop can be hung without it.)
  6. Use a glue gun to add on a ribbon accent.

wall hanging close up

Have you found unexpected ways to display items with special meanings?  I would love to hear about them…I still have blanket left. ;) 

Thank you for stopping by.

Have a wonderful weekend, Jackie

Sharing at Craftberry Bush and Common Ground.

no comments

beauty in the details

February 18, 2014

pretty vitamin jars

For me, beauty is definitely in the details. 

I love William Morris’s golden rule:   “Have nothing in your house that you do not know to be useful, or believe to be beautiful.”  But, I would take that a step further since I believe anything useful can also be beautiful.

As you know, taking pleasure in simple things makes my heart sing…and I truly believe even the smallest detail in a home can (and should) be one that brings joy. 

William Morris quote

A wonderful example of this in my home is in my kitchen.  Until I found a way to replace the unsightly vitamin bottles on my kitchen table, I could not be happy.  I tried keeping them in the pantry and out of view, but this only succeeded in my forgetting to take them!   

My solution was to find some vintage looking jars to house my vitamins right on the kitchen table – replacing the ugly plastic vitamin containers.  Now my vitamins are housed in these aesthetically appealing beauties…I love to look at them! 

Keeping vitamins looking pretty

To make my vitamin regime even easier, I marked the inside of each jar top with the contents and description of dosage on a piece of attached masking tape.  If I should purchase a different mg than usual of one of the vitamins, I am sure to include that right on the tape.  Convenient, right?  And, no ugly labels on the jars…beautiful and useful!  (Of course after writing this post I had to redo the labels under the jar tops…now they are perfectly printed….beauty in the details!)

keeping vitamins

Since I am always on the lookout for a variety of items for my home, I ended up finding these jars in three different places during my travels.  The numbered jars actually came from the Christmas Tree Shops and cost 99 cents each!  I just used a little sandpaper on the painted numbers to ‘rough them up’ a bit.  

Have you found any super ways to put beauty in some of the little details around your home?  I would love to hear about them!

Thank you so much for stopping by.

Remember to take pleasure in simple things, Jackie

Sharing at City Farmhouse.

no comments

a valentine delivery

February 14, 2014

flowers in a teapot

This year is my favorite Valentine’s Day.

For Friday field trip today I am sharing the reason why.

I don’t have any big dinner plans…I didn’t receive a romantic gift…

I was given the opportunity to create and deliver fresh flower arrangements to residents of senior living facilities in my hometown.

Flowers for nursing home

The arrangements were created by some of the members of my garden club.  With some basic flower choices from a local wholesaler and some miscellaneous containers collected by members, arrangements were lovingly put together one night this week.

The gals got together – clippers and gloves in hand – enjoying conversation and indulging in refreshments homemade by some of the members.

There is such a joy in giving Valentines to people that may not otherwise receive them, and although I did not personally know any of the residents receiving the gifts of flowers, strong connections to all the nursing facilities visited made the impact of the gesture very real to me.

Nursing home on Valentine's Day

If you belong to a garden club, consider adding this activity to your calendar for next year  :)…if you don’t belong to a garden club, think about inviting a group of friends over next February for a special Valentine activity.  Cute containers can be collected all year at yard sales or from flower arrangements you receive.  (Just remember to keep the arrangements small since there is usually limited space in resident rooms.  Also, call the residence in advance to find out about any special needs.)

quote about senior citizens

Thank you for stopping by.  Have a wonderful evening.  Here is my Valentine gift to you…the best  ‘set the mood’ songs of all time!  Enjoy!

Here in the Northeast we are again getting blanketed with snow.  Luckily, the Valentine’s Day arrangements have all been safely delivered. :)

Remember to take pleasure in simple things, Jackie

1 comment

diy dishtowel pillow

February 11, 2014

diy dishtowel pillow

I am not much of a seamstress.  My only formal training was in 8th grade home economics class where I attempted to make a purple skirt.  The school colors were purple and gold and I wanted to make something worthy I could wear on purple and gold day…Go Hawks!…Sadly, I don’t think it was ever even worn.

I do know the basics of using a sewing machine and I can sew a (pretty close to) straight line.  As far as following a pattern – that is not something I picked up in 8th grade.   But, when I am determined to make something, it does get made. 

Pedal power dish towel

So when I saw the cutest bicycle dishtowel in Anthropologie and decided it needed to be a pillow, I knew it would become a pillow…

making a diy pillow

I was determined to keep the integrity of the towel – without cutting or damaging it in any way.  By simply using folds and straight sewing,  I was able to create the pillow I wanted.  Admittedly, the hardest part was pinning the trim into place! 

DIY dishtowel pillow

1. “Pedal power” dishtowel from Anthropologie   2. I added material to the length of the towel to use as part of the back when it was folded (I used four of the bicycle photos on the front of my pillow and two on the back).    3.& 4. I positioned and pinned trim on the left and right sides of the pillow between the front and back.   5. View of the back.    6. After the sides were sewed with the trim, I turned the pillow inside out. Then, I sewed the bottom edge, leaving some room to add polyfill. (I added almost an entire 12 oz. bag.) I completed the pillow by turning it right side out and stitching the opening closed by hand.

I am enjoying it so much more as a pillow than I ever would as a dishtowel!  A fun addition to a spare bedroom!

a bicycle pillow

dishtowel pillow

Wouldn’t this pillow make a great Valentine gift?  If you don’t want to take the time to make a pillow, just wrap up the towel with a homemade card that reads:  my heart races for you!  :)

Thanks for stopping by.   

Remember to take pleasure in simple things, Jackie

P.S.  If you are a bicycle lover, you may also enjoy this bicycle post. :)

Sharing at Shabby Nest, Craftberry Bush, and Coastal Charm.

4 comments

↑ Back to top