Subscribe to Pleasure in Simple Things via RSS ReaderFollow Pleasure in Simple Things on InstagramFollow @InSimpleThings on TwitterLike Pleasure In Simple Things on FacebookFollow Pleasure In Simple Things on PinterestEmail Jackie

decoupaged oyster shell pendant necklace

May 19, 2020

oyster shell sweater combo

How many oyster shell trinket dishes can one person use?  After making quite a few of these beauties during quarantine, I started coming up with some other ways to use these decorative pieces.

Living in a spot where oyster shells are readily available makes it easy to go a little overboard when using them in a craft!  I love the way the shells come out when decoupaged, so I needed to start coming up with some additional uses for them other then what I’ve done in the past.

There are plenty of ways to use masses of shells – in a wreath…or, even as I have shown you in the past – as ground cover in place of mulch – but this time, I am utilizing shells in a way that highlights each one individually.  Because, once decoupaged, each oyster shell is so unique and beautiful, a great way to highlight an individual one is to make it into a necklace, using the shell as a pendant.

decoupaged oyster shell pendantAfter the shell is decoupaged (full tutorial here), simply add it to a chain or a piece of leather.  Here, I have added beads to a chain.  Wooden beads are also a great choice – some natural colored wood beads highlighted with a few painted gold would have set off this shell nicely!

The only real challenge with creating a necklace is to add a hole to the shell.  I say challenge because of the shape and texture of the shell.  Caution is required so that the tool you are using does not slip.  And, because of the texture of the shell, caution is also required so as not to split the shell while drilling.

ootd necklace oyster shell decoupage

I made this necklace to go with one of my favorite sweaters…just need to add some gold sandals and white jeans and I have a super OOTD!

Probably the best and safest way to make a hole in a shell is with a Dremel using water.  Because of quarantine, the only tool I had available for my project was a regular drill.  I used a masonry bit and held the shell with some pliers so that if the drill slipped, it wouldn’t drill through my hand!  Like I said, caution is required!

If you plan on making a habit of putting holes in shells, I suggest you purchase a Dremel and follow the instructions very carefully!

Decoupage shells in colors/patterns that coordinate with your wardrobe and create some great statement necklaces!

Thanks for stopping by!

Remember to take pleasure in simple things, Jackie

no comments

a purple pop of flowers

May 15, 2020

purple pansies

We just had some snow here in Connecticut – not typical weather for May.  The cold snaps have made all the flower gardeners hesitant to get started with putting out annuals this year.

I usually use Mother’s Day as my ‘safe to plant’ indicator, but I know some of the experts say not to plant until after the new moon.

entrance purple flowers

With all the hesitation to get plants in the ground, it was so refreshing to see my friend Phyllis has started working on her garden décor.  The plantings she had put around her side entrance really look fabulous.  She changes things up each season and for spring she has incorporated a splash of purple into her creations.

porch topiary

purple with pussywillows

I hope seeing these flowers make you smile as much as I did when I saw them!

Thanks for stopping by and have a fabulous weekend!


Remember to take pleasure in simple things, Jackie

no comments

full instructions for decoupaged oyster shell trinket dishes

April 28, 2020

topiaries decoupage oyster shells

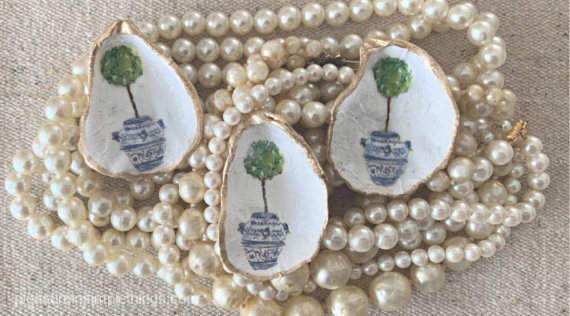
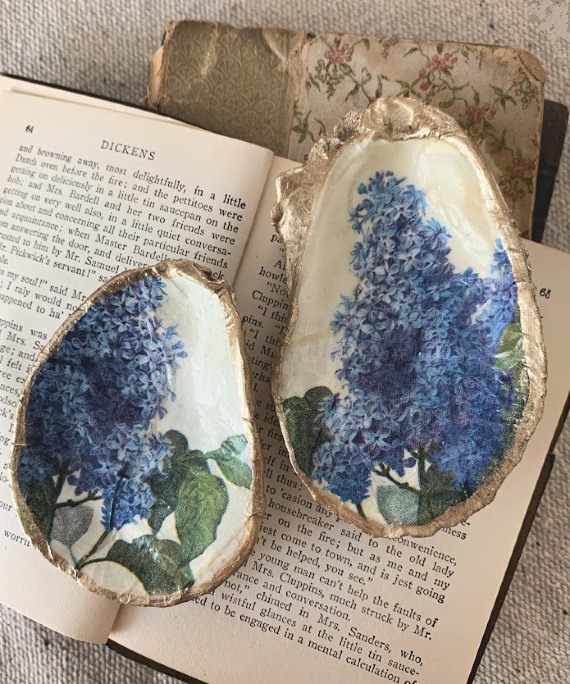
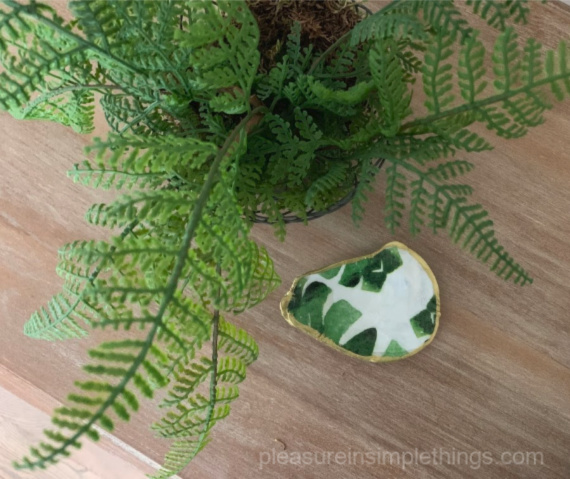
I usually don’t have a lot of patience for decoupaging, especially on a small surface like a shell since I could just as easily paint a pattern with a brush!  But, the challenge of finding an interesting pattern/color to use on the shell makes it a fun project for me – similar to picking out yarn combinations for knitted scarves!  Although, the current quarantine situation has strictly limited my choice of materials since I have to make do with what I currently have on hand.

lilac decoupaged oyster shells

Decoupaging is pretty easy.  A decoupage material is used to attach paper to a surface and is brushed on top of the paper as well to provide a protective surface.  Decoupaging shells is a little trickier because the surface you are applying the paper to is irregular.  This is the reason why using tissue paper or a napkin is a much better choice for this application over a heavier paper – it won’t show wrinkles as much when applied.  To get the best possible result when decoupaging a shell, use a paper napkin – removing the back layer and just using the top, thin layer with the imprinted design.

fern dish decoupage shell

Decoupage material is widely available at a craft store or Target – it is basically just a white glue mixed with enough water to make a thick, spreadable consistency.  When I was a kid, I would make it myself using the large container of white glue my dad kept in the garage.

oyster shell decoupage materials

To make decoupaged oyster shell trinket dishes you will need:

  • decoupage material (Mod Podge is a popular one)
  • 2 paint brushes – one with soft bristles (1/2” wide) and a smaller, detail brush
  • paper cocktail napkins in designs of your choice (separating them so you are only using the top layer of designed paper)
  • white acrylic paint
  • gold metallic acrylic paint (or gold leaf – but acrylic paint is less expensive) I prefer a more subtle gold color like antique gold or champagne gold rather than a bright gold.
  • oyster shells (or shells of your choosing) – any size but in general, the larger the pattern on the paper used, the larger the shell

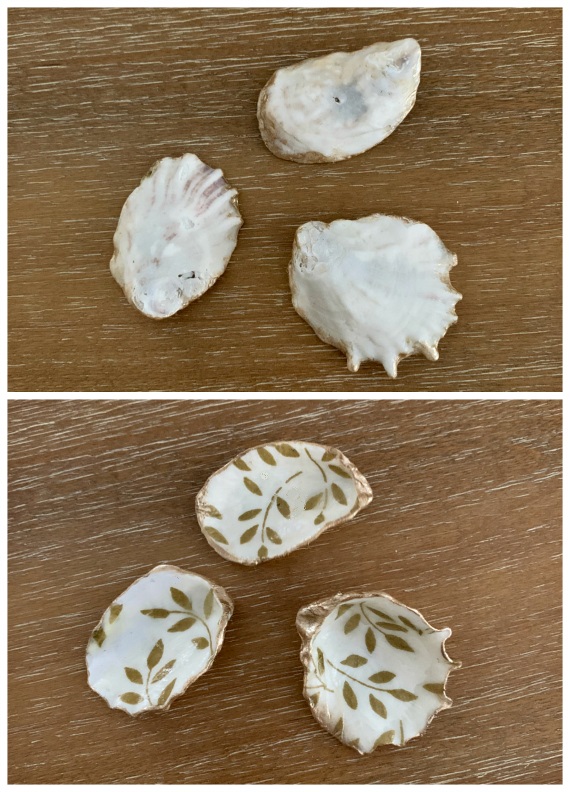
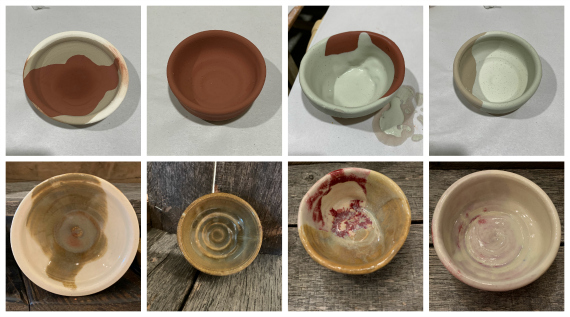
The decoupage process can get a little messy, so be sure to cover your work area.  The shells should be clean.  If you plan on using light colored napkins, be sure to use some white acrylic paint as your first step – to cover the dark spots on the inside of the shells so they will not show through the napkin material after decoupaged.  It is probably easiest just to paint the inside of all the shells white to start with nice, clean canvases.

butterfly decoupage oyster shells

After the white paint is dry, use the soft bristled paint brush to cover the entire inside surface of the shell with the decoupage material.  Then, take the desired napkin (top layer only) that has been cut to a manageable size and press it onto the inside of the shell (pattern side up), being careful not to move it (to prevent tearing).  Once it is in place, you can use your finger or the end of the paintbrush to gently push out any obvious wrinkles in the paper.  Next, use the paint brush to very gently brush a thick coat of the decoupage material onto the entire surface of the napkin you have just attached to the inside of the shell.

flamingo trinket dish

Once it is completely covered, you are going to carefully tear the excess paper away from the shell.  This is accomplished by gently using a pulling down motion while tearing.  The sharp edge of the shell makes it pretty easy to tear the thin paper.  The surface will look very milky – that is how it should look.  At this point, let your shell(s) sit overnight.  You will be pleasantly surprised to see how great the dry shell looks when you return the next day!

decoupaged shells with anchors

Clean your brush using very hot water – remember the decoupage material is basically glue!  (For the same reason, you may have to put the top of the decoupage material container under hot running water to loosen the glue when you next reopen it.)

lobster design on oyster shells

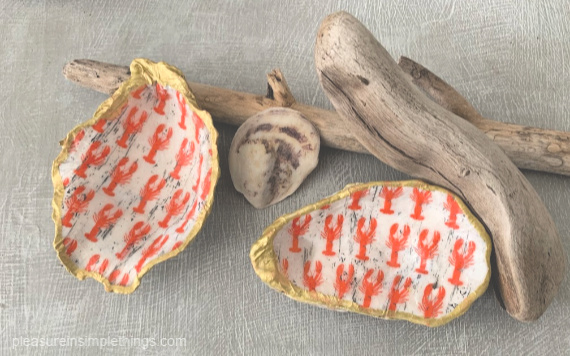
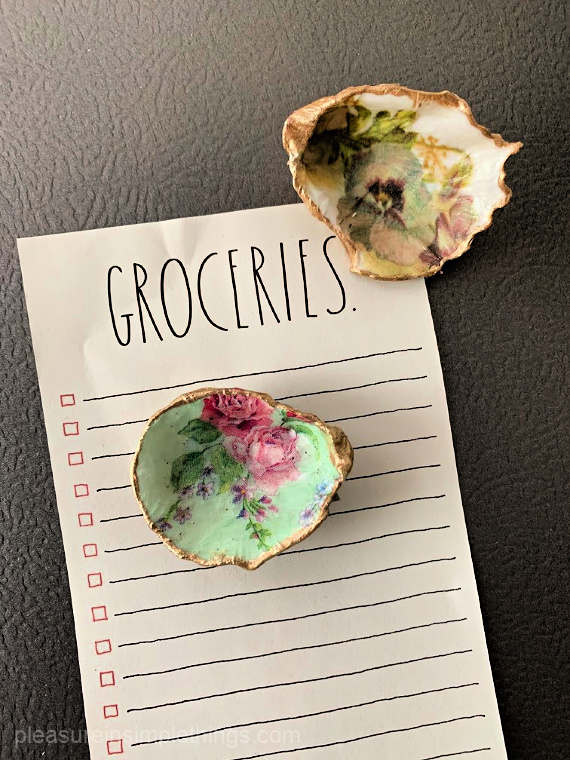
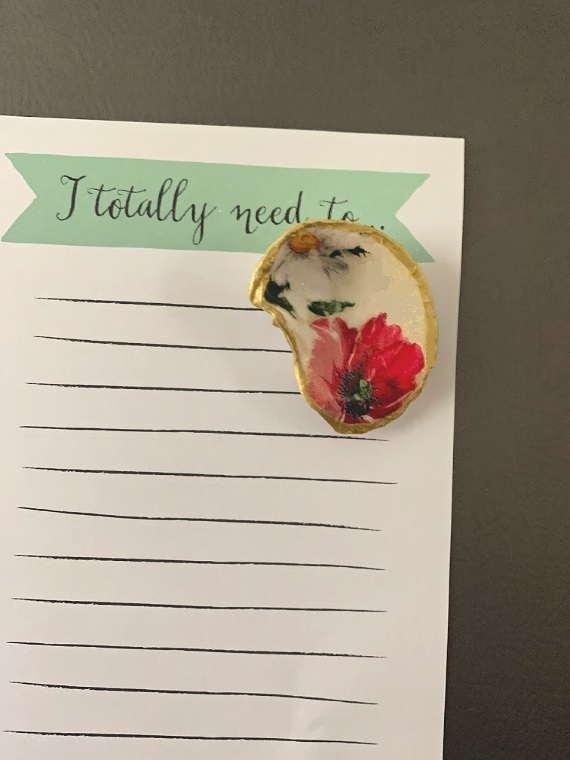
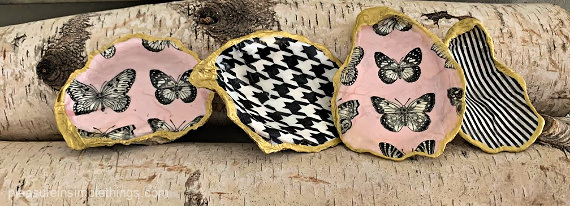
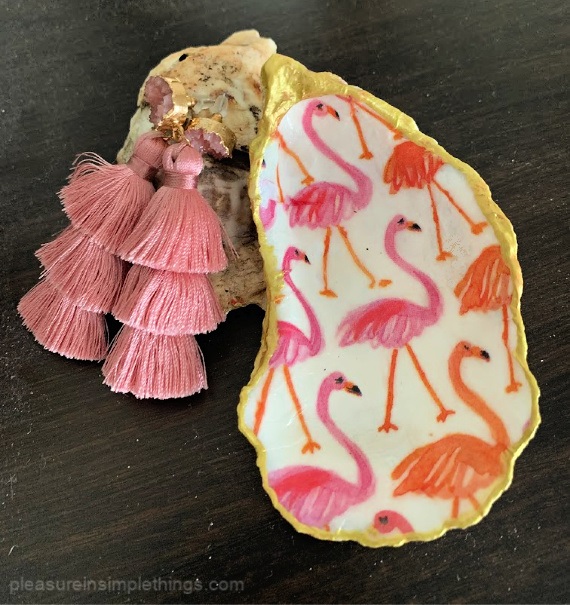
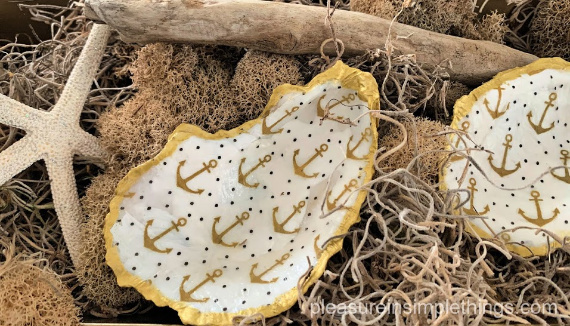
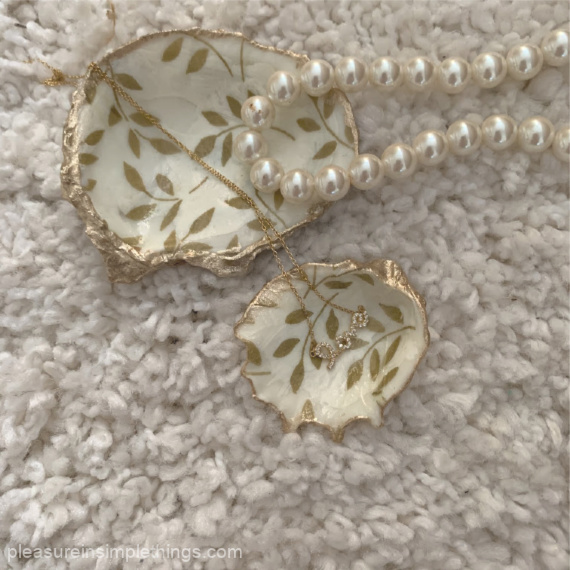
For the finishing touch, when your shells are completely dry, you can add a thin gold edge by brushing the gold paint along the edges of the shell with the detail brush.  A thin border of gold accentuates the beautiful organic shape of the shell – each one unique!

And that, my friends, is how to make a decoupaged oyster shell trinket dish!  As you can see, I did my best to explore different colors – using most all the cocktails napkins I happened to have on hand!  (I think most of the napkins I used came from Home Goods or Christmas Tree Shops.  I know the one with the rope motif came from Ikea.)

trinket dish gold and white shell

Thanks for stopping by!  Remember to take pleasure in simple things, Jackie

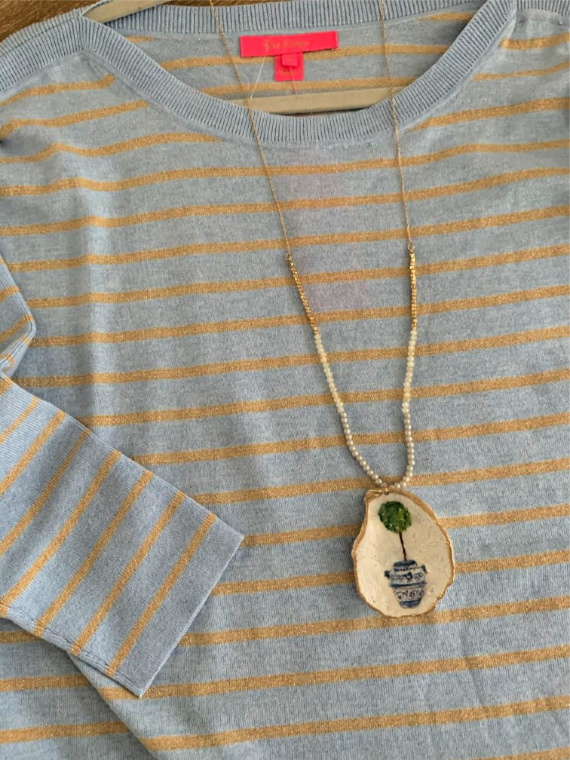
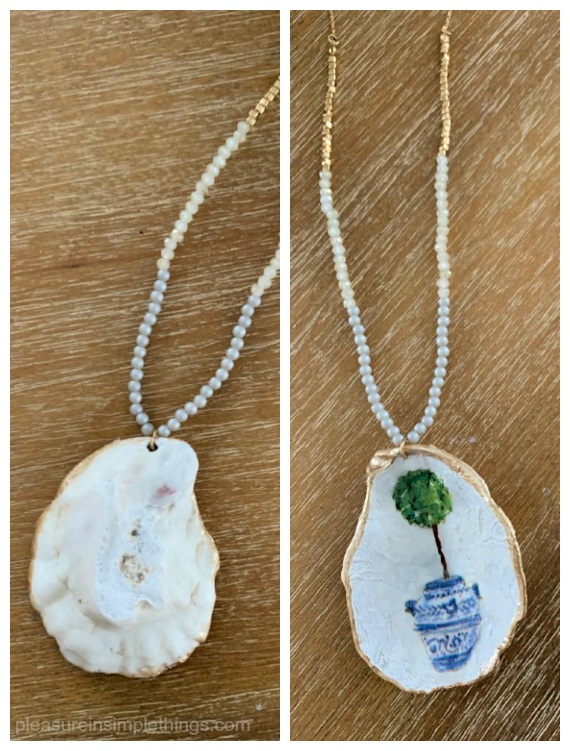
P.S.  Please note that a Dremel can be used to add holes to the shells if you would rather use them as ornaments and/or hang them.  I plan on using some to make necklaces.  If you are interested in other shell DIYs:  for another oyster shell project, click here.  For shell candles, click here.  For a monogrammed shell tie-on, click here.

1 comment

welcome sign redo

April 7, 2020

Painting supplies for sign

On my first project list of things to accomplish during extra time at home, I included ‘painting a sign for a friend.’  That was a great project because my friend really wanted it done and I loved helping her out.  Plus, I love painting!

The sign was a wooden one that spelled out the word ‘Welcome.’

welcome sign before

Welcome sign ‘before’ photo.

Looking through my Annie Sloan paint collection, I decided on the color graphite to use for the project.  I love this color – a deep gray.  I thought the dark color would be a nice contrast against the wall where my friend planned on hanging the completed sign in her home.

Because the paint color was so dark, no base or primer was needed.  I just painted two coats of Annie Sloan Chalk Paint in graphite directly onto the wood.  Next, I added a thin coat of dark wax.  I did this just to keep the paint in place for the next step – distressing.  I used a very fine sandpaper and sandpaper block to distress the sign.  Obviously, the distressing is a matter of personal taste and I went heavy to accommodate my friend’s taste.  After the distressing was accomplished to my satisfaction, I completed the project by adding a coat of dark wax.  I used the dark rather than the clear wax so that the wood showing through the paint would look aged and not bright white.  In addition, the dark wax deepens the gray color of the graphite paint very nicely.

welcome sign after.jpg

Welcome sign ‘after’ photo.

So, that was the only project left to check off on my first project list.  That list is completed…as well as several more!

hall sign.jpg

The completed sign in its home!

I hope I inspired you to update something in your home with paint!  Thanks for stopping by!

Remember to take pleasure in simple things, Jackie

no comments

lighting at coquina

March 10, 2020

best outdoor lighting

In my last post I shared some cool drinks I shared with friends at Coquina in Amelia Island, Florida.  Today, I am sharing some of the lighting at this new coastal restaurant.

nautical lighting

If you follow my blog, you know how much I love lighting – any new place I visit is a call to check out all the fixtures!

Because Coquina is basically right on the sand, the lighting is super cool coastal!

outdoor lighting

It looks great during the day, but even better as the day turns into night!

nighttime coastal lighting

pretty outdoor lighting

Wouldn’t you love to have some of these fixtures out on your patio!  Love them!

wall lighting

Thanks for stopping by.  Remember to take pleasure in simple things, Jackie

P.S. Don’t worry – I will show you what the rest of Coquina looks like in an upcoming post!

no comments

junior high dreams

February 18, 2020

two together

I loved junior high school art classes.  I took every one offered.  One class that was a huge disappointment to me was pottery.  Because there was only one potter’s wheel in the school, not everyone in the class was able to get the chance to use it – and, my hands never touched that wheel!

bottomwithout glaze

With this pot, I left the bottom unglazed.

It has been a long, long time since junior high school, and I still regret never having the opportunity to try the potter’s wheel!  When I recently found out about a four-session workshop that introduced its students to the potter’s wheel, I jumped at the chance to finally try out the wheel!  I did not expect 10 hours to offer much in the way of instruction, but I was pleasantly surprised!

before and after firing

Before and after firing. Glazing is an art in itself!


Why are there four photos of this little pot?  It is a very special little pot – the very first pot I ever made on the wheel!

two glazed

Not only did I learn the basics of the potter’s wheel in the short time offered, but I was also able to create four pots – from lumps of clay to completed, glazed, and fired pieces!

pot with raspberry

So exciting!  So fun!

threepots stacked

I am sharing with you today, photos of my pieces!

all my pots

Thanks for stopping by!

Remember to take pleasure in simple things, Jackie

no comments

lilly, palm beach

January 7, 2020

If you are a Lilly Pulitzer fan, you really have to visit the Palm Beach store!  I know in the past I have shared photos from the Lilly store at The Breakers in Palm Beach, but there is also a store on historic Worth Avenue.

This past stay at The Breakers, I had some time to visit this larger store and want to share some photos with you.

Of course any Lilly superfan would have something custom made while visiting the Worth Avenue store!

I love this piece of art hanging in the store!  If you know anything about the history of Palm Beach, you know the monkey is very significant!  Johnnie Brown was the pet spider monkey of Addison Mizner, an eccentric Palm Beach fixture of the roaring twenties – and Johnnie’s grave is located in the first shopping arcade built on Worth Avenue!

One of the best parts of visiting any Lilly Pulitzer store is checking out the dressing rooms!

To read about the origins of Lilly Pulitzer design (and see the Lilly store at The Breakers), click here.

Thanks for stopping by!

Remember to take pleasure in simple things, Jackie

no comments

the breakers, palm beach at holiday

December 17, 2019

palm beach breakers xmas

I know I have posted quite a bit about The Breakers in Palm Beach in the past, but today, I am sharing photos of this beautiful, historic hotel decked out for the holidays!  Enjoy!

close up breakers tree

lobby xmas at breakers

ceiling at the breakers


main lobby tree at breakers

lobby lights breakers


festive holiday at breakers

xmas at breakers lobby

How lucky was I to get the chance to stay at The Breakers at this time of year!

Thanks for stopping by, Jackie

evening at the breakers

P.S.  If you would like to see more on The Breakers, visit some past posts by clicking below:

no comments

pretty in pink at terrain

November 22, 2019

ornament with pink at Terrain

I promised to share some pink holiday accents from Terrain in Westport today…I am a gal of my word!

pink bottle brush at Terrain

Check out this ‘pretty in pink’ holiday décor inspiration!  Enjoy!

pretty in pink

shreds of pink


pinkpoinsettas

metallic candles

Terrain collage of pink xmas

Terrain in pink

pink candles

I hope these photos have inspired you to incorporate an unexpected color into your holiday décor!

baskets with pink

Thanks for stopping by!  Have a fabulous weekend!

tree with pink at Terrain

And, remember to take pleasure in simple things, Jackie

no comments

autumn in connecticut

October 29, 2019

pumpkingrouping

I know I complain about the end of summer but it is only because I hate to see my favorite season end!

fall in litchfield

Fall though, certainly has some redeeming qualities…

more pumpkins

I was able to appreciate some of them this weekend!

overhead view of pumpkins

I spent some time with family and when we took the time to slow down a little bit, we were able to reflect and appreciate the outdoor beauty of our state at this time of the year!

leaves

Driving anywhere here in Connecticut right now is truly breathtaking.

ppumpkin arrangement

These few photos were taken just walking from lunch…

pumpkin close up

pumpkins side view

I didn’t even grab any photos while we were driving – it was too spectacular to hesitate for a photo!  But I loved these groupings of pumpkins!

And, I loved to see how some of the flowers are still hanging in!

moon flower

I can’t believe these cosmos are still around!

fall cosmos

some pumpkins

It seems our leaves are at their height of  color right now – they seem mighty late this year!

row of pumpkins

I hope you are inspired to find some beauty in the season where you live.

Thanks for stopping by!

Remember to take pleasure in simple things, Jackie

no comments

« Previous Entries     Next Entries »