Subscribe to Pleasure in Simple Things via RSS ReaderFollow Pleasure in Simple Things on InstagramFollow @InSimpleThings on TwitterLike Pleasure In Simple Things on FacebookFollow Pleasure In Simple Things on PinterestEmail Jackie

brick stencil diy

August 13, 2021

finished brick stencil

I feel like I’ve organized and revamped just about every little nook and cranny in my home over the time of our COVID-19 isolation.  I think spending so much time in the house has motivated a lot of us to get our places organized and looking good!

It got to the point where I really had nothing else I could tackle without investing money (that I didn’t have).

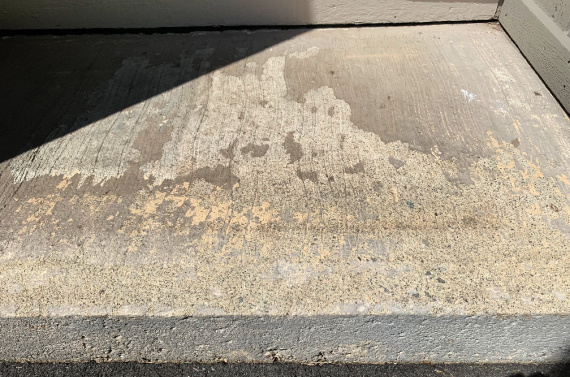
The one thing I started thinking about was the small rectangle (2 ½ x 4 foot) of concrete I had outside one of the house entrances that looked less than appealing to me.  At one point, I had a mason look at it to discuss my idea of covering it with some type of stone to improve its look.  I was discouraged from doing it because of possible drainage issues.  Of course, I didn’t want any water problems, but it still always bothered me to look at that cement!

before concrete

With so many projects completed and nothing in the queue, I decided to revisit that piece of concrete and figure out how to make it look a little better!  I decided I would paint it since it had some worn off paint on it and I wanted to neaten it up.

Instead of using solely a solid color, my plan was to use a stencil to paint a simple brick pattern.  I have stenciled many things, but never concrete.  I was willing to give it a try.  I figured it couldn’t look much worse than it already did and most of the finished product would end up covered by a doormat anyway.

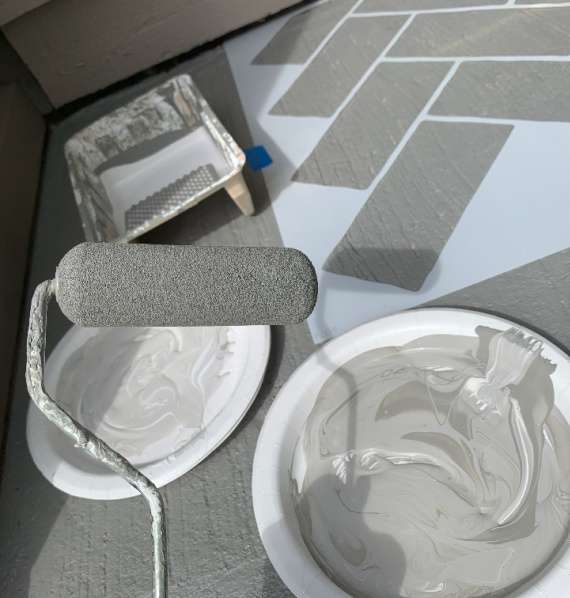
I used three colors of paint – gray, beige and white – utilizing some leftover concrete paint.  I wanted to paint the gray first and then stencil the ‘bricks’ using mixtures of gray and white.  The gray would serve as the ‘grout’ color.

setting up stencil

I checked the weather and picked a day to start the project when there would be a 3 day stretch without rain so I would have plenty of time to complete the project before any bad weather.

I started by using a putty knife to scrape off any loose pieces of paint.  It seemed the paint that was on the cement was very uneven in application so that there were some thicker sections that were peeling off.  After doing a quick scrape, I swept off all the loose pieces of paint in addition to any dirt, leaves, etc.  Then, I applied my first coat of paint with a small roller using the gray concrete paint, covering the entire surface.

painted gray concrete

I waited until the next day to apply the ‘bricks’ with the stencil.  This was the fun part!  I used the white as well as a mixture of white and gray to create a tonal look for the ‘bricks.’  I used three different colors that I mixed on paper plates – using the white and gray.

Using blue painting tape, I positioned the stencil in place.  I started painting early in the day since I knew I would need to wait each time I repositioned the stencil after painting a section.

I started from the section by the door first, starting with the stencil in the center.  I waited a couple hours before moving the stencil each time.

stenciled bricks on entrance

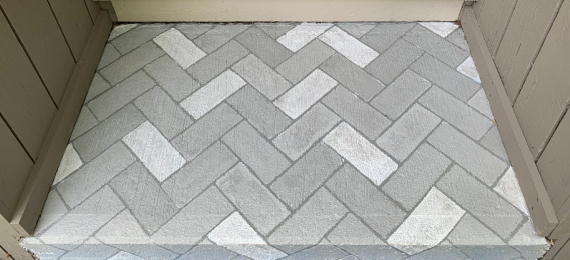
After I had the stenciling completed, I waited until the next day for my last step.  I painted a wash (a mixture of half beige and half white paint) over the entire surface and rubbed with a soft cloth.  This muted the colors of the ‘bricks’ and made the new paint coordinate perfectly with my house color.

An easy project!  The hardest part is buying the concrete paint – finding a small quantity.  Most places don’t sell quarts of concrete paint and buying anything larger is crazy for a small project like mine!  Using leftover paint is the way to go for a small project, if you can manage it.  Of course, a larger quantity would be needed if you were painting an entire patio – which could easily be done!

I am very satisfied with my result!

finished brick stencil

I hope you may be inspired to tackle one small project at your home!

Thanks for stopping by!  Have a fabulous weekend!

Remember to take pleasure in simple things, Jackie

no comments

touring broken arrow nursery

July 23, 2021

georgia plume butterfly clouds

If it seems like I travel all over my state of Connecticut to visit gardens – I do!

broken arrow entrance

What could be better on a Sunday morning than taking a tour of a nursery!  This trip is to Broken Arrow Nursery in Hamden where they specialize in rare and unusual plants.

hydrangea

There is no charge to enjoy a morning tour walking through the property with an extremely knowledgeable staff member.  It is a great opportunity, not only to see what is growing on the nursery property, but also to learn more about growing in Connecticut as well as discuss any personal gardening concerns with an expert.

raindrops

tree with white blooms

I definitely left the nursery with a heightened knowledge of trees and plants in my area and, because of my addiction with all things white, an obsession with this particular plant!

beauty berry

Also, love this Georgia Plume Tree!

a georgia plume tree

georgia plume tree with butterfly

Visiting a local nursery or taking a trip to a public garden (You know how I love Longwood Gardens!) is a wonderful field trip to take this summer and a super way to enjoy the outdoors!

jurassic leaves

I hope you are inspired to visit one this summer!

bird house at broken arow

Thanks for stopping by!

tree above

Have a fabulous weekend and remember to take pleasure in simple things, Jackie

no comments

life moves pretty fast

July 2, 2021

marco beach with birds

We are starting a holiday weekend and everyone is super excited because some of our COVID-19 restrictions have relaxed and people feel a little more ‘normal.’

pink sunrise on Marco

sunrise on Marco Island

I am grateful to our life with COVID-19 for teaching me to slow down a little bit.

huts on Marco Island beach

marco island beach

For the weekend, I am reminding you of a few words from a very wise man:  Life moves pretty fast.  If you don’t stop and look around once in a while, you could miss it.

ferris bueller quote

With these words in mind, I challenge you this holiday weekend to pick a single thing to find beauty in and really spend some time to examine it.

marco hut closeup

sunrise hut at Marco Island

You may choose something aesthetically pleasing or you may choose a person.  Whatever it is you decide to choose, spend some real time taking it in and examining it from every angle…appreciate the beauty in your choice.

hut at sunrise

marco hut at sunrise

Thanks for stopping by!

Have a fabulous holiday weekend and remember to take pleasure in simple things, Jackie

no comments

virgin garden

June 25, 2021

white cosmos

I love white flowers.

virgin garden collage

When I planned my current landscape, I planned for only white flower varieties.  June has been a fabulous month for me because all my new plants proved successful – everything I planted survived!  What a great feeling!

vintage watering can

Today I am sharing some of my favorite of the current blooms!  Look at the fabulous bloom on this  Little Henry!

Little Henry Collage

owl garden statue

If you notice a little bit of pink in the mix, that is a slip up from when I bought annuals marked as white before they were in bloom!

mermaid and flowers

virgin garden in bloom

I still have a couple of white varieties on my list that I haven’t been able to find!  Do you have any favorite white garden flower varieties to recommend?

birdbath collage

Thanks for stopping by!  It is wonderful gardening weather!  Have a fabulous weekend!

stone wall in hosta garden

Remember to take pleasure in simple things, Jackie

1 comment

diy oyster shell necklace

May 28, 2021

flamingo oyster necklace

I had some fun the last couple weeks making some necklaces from decoupaged oyster shells.

I had been putting holes in some shells to create some garlands and decided to drill some extras to create necklaces.

holes in oysters

I have shared plenty of decoupaged shells in the past.  If you still haven’t tried to make some, click here for simple instructions.  Summer is a great time to try this craft made from some collected beach shells!

nautical diy oyster necklaces

oyster necklace flamingo

For making necklaces, drill the holes in the shells first.  Then, decoupage – being sure to use the end of your paint brush to punch the appropriate hole where you have drilled after decoupaging.  Next, add the chain, beads, rawhide, etc. of your choice to complete the necklace!

oyster necklace succulent

diy necklace succulent

I happen to like a long necklace – with a 30” chain – but, your creation should reflect your own personal style.

silver and nautical oyster shell necklac es

Have some fun with it!

topiary oyster necklace

Thanks for stopping by!  Happy Memorial Day weekend!

necklace oyster shell navy

Remember to take pleasure in simple things, Jackie

no comments

The art of repurposing

April 16, 2021

seaglass in salt cellar

During a recent day of leisurely window shopping with a friend, she gifted me the sweetest little antique salt cellar that I had been admiring in a kitchen shop.

dish and wallpaper

The original purpose for this little dish was to hold salt at an individual place setting.

collage

salt cellar with pins

I fell in love with the design and the smallness of the piece although I never did consider using it for salt!  After all, is there anything better than finding new uses for old things?

with moss

I’m having so much fun styling this cute little dish!  I am finding it has so many more applications than I had originally imagined!  Can you guess which way I am currently using it?

match stick holder

with eggs

I hope I have inspired you to use something you love in a new way!

with vitamins

Thank you for stopping by!  Have a fabulous weekend!

quote

Remember to take pleasure in simple things, Jackie

1 comment

head in the clouds

April 9, 2021

finished cloud print

We all have certain motifs that appeal to us.  One of mine is clouds.

I would so love to plan a baby’s room or a baby shower around a cloud theme.  (I have collected a whole folder of items I would use!)  Or, decorate a bathroom in a cloud motif.  How cool would it be to design a room around one of these wallpapers!

spoonflower cloud wallpaper

Cloud wallpaper found on Spoonflower.

cloud wallpaper

Cole & Son Nuvolette Gilver & Charcoal Wallpaper.

When I saw this piece of art from Anthropologie, something about the black background of the art with the contrast of the gold frame really appealed to me.

cloud painting

I started thinking maybe I should paint some clouds!

More recently I saw this Anthro piece

anthro cloud painting

Lovely, but way out of my price range!

Then, one day in Target, I found a gold frame for $8. that I really loved and decided I would put my own cloud piece together.

finished cloud print

What do you think?  I find it so inspirational.

If you want your own original cloud art piece and can’t afford the Anthro prices, put one together yourself!  Get a Target or HomeGoods frame that you really love and a piece of original art from Etsy and put it together for not much more than $50. (depending on the size you choose).

What can you find on Etsy?  Here is an example of a piece of original cloud art by delizabethstudios on Etsy.

delizabeth cloud painting

An original art piece by delizabethstudios on Etsy.

Isn’t it beautiful?

I hope I have inspired you to create a piece for your wall!  If not a painting of clouds, whatever motif makes you happy!


Thanks for stopping by!  Have a fabulous weekend!

Remember to take pleasure in simple things, Jackie

no comments

easy diy marbled easter eggs

March 5, 2021

pink marble egg with tulips

You have seen me marbleize little white baby boo pumpkins.  The same technique can be used for marbleizing Easter eggs.  It is super simple!  All you need is a container of water and some nail polish!

gray marble eggs

I always blow out my eggs before I decorate them so I can keep the ones I like indefinitely.  That is up to you.  Either use a hard-boiled egg or a hollowed-out egg for the basis of your creation.  You can start with a plain, white egg or with an egg you have previously dyed.

marble egg with pom pillow

Find a shallow disposable container that will fit an egg.  I cut down a plastic container to size so I can just throw it in the trash when I am done.

Choose the nail polish you will use.  You won’t need very much.  Don’t buy some just for this project unless you get it at a bargain store.   Nail polish is expensive!   I know Marshalls sells mini bottles in a variety pack for under $5.  But, if you can, best to just choose a nail polish you already own.

marble egg with handpainted egg cup

Add water to your chosen container – enough that you can dunk the egg under the surface.  I use my fingers to do the egg dipping since the nail polish comes off easily with nail polish remover, but you can use a traditional metal egg dying tool (or make one from floral wire).  I prefer using my fingers so I have total control over the movement of the egg.

diy marble eggs nail polish

After the water is in the container, you are going to suspend the nail polish onto the surface of the water by gently pouring a thin random stream over the water.  Next, you will dip the egg under the surface of the water.  This will be fast – you don’t want to leave it for any time period – just pass it through and twist it as you go.  You really need to try it once to get the hang of it.

marble egg in straw

That’s it!  So easy!  The nail polish will dry hard pretty quickly.  For those who asked when I did the nail polish marbleized pumpkin – no, it doesn’t smell!  Just like your nails don’t smell when they have dried polish on them!  I’ll put some video on my Instagram stories.

After the nail polish is dry, you can repeat the process with a different/2nd color nail polish.

pink marble egg in wood cup

Finished egg displayed in a wooden egg cup purchased at Target.

Display your creations any way you’d like.  Target has some great inexpensive wooden egg cups.  Or, white ones are only 97 cents at Christmas Tree Shops!  I bought a few of the white ones and painted them with a gold rim.  An easy embellishment!

diy handpainted egg cup

A finished egg displayed in an egg cup purchased at Christmas Tree Shops for 97 cents. I added a hand-painted gold rim.

I hope you will try creating a marbleized Easter egg with nail polish.

pink marble egg with jasmine

I still have some egg decorating ideas to share.  (You can also find some good ideas in the archives by using the search bar.)

Thanks so much for stopping by!

Remember to take pleasure in simple things, Jackie

no comments

spring is in the air

February 26, 2021

making a twine wreath

A wreath can be made from anything.  Greens or grapevines may come to mind first but, with a little creativity, there are so many options.

I recently noticed a beautiful roll of twine in my craft room that wasn’t being used.  With spring on its way, the twine started me thinking about how I may use it with some ‘springlike’ materials.  I pulled some ribbons, dried flowers, and note cards from the shelves and started working on a wreath with the twine as a base.

materials for wreath

The photos here are from my first creation.  I love it.  Once I had it completed, it started a flood of ideas for additional creations.

The first wreath is on the small side, so the twine itself is enough to keep the wreath formed.  As I start with larger ones, I will use a thin metal base on the back of the twine.

close up twine wreath

That bowl of twine has me so inspired!  I looked through all my gift wrap supplies and I have started a whole series of twine-based wreaths!

materials for twine wreath

I hope I have inspired you to use some of your own unused materials in a different way for spring!

Thanks for stopping by!

Remember to take pleasure in simple things, Jackie

1 comment

easy paper garland diy

February 19, 2021

easy diy paper garland

I love reusing paper to make decorative garland!  You can do it too – it’s a no cost way to add a little festiveness anywhere in your home!

What to use for paper without a cost?  Examples of things I have used in the past include old book pages, old sheet music, vintage maps, paint swatches, vintage playing cards, Terrain shopping bags, Trader Joes grocery bags, comic books, newspaper, cookbook pages, coffee filters…basically, anything made of paper!

paper hearts for garland

I always have plenty of old books, maps, and sheet music on hand for projects.  Today, I’m using sheet music to create a super easy heart garland.  I am choosing to use it as is – black and white.  But the paper used can be embellished in a variety of ways before the garland shapes are cut.

For hearts, a pretty variation would be to use a pink watercolor wash on the paper before cutting the shapes.  I’ve also done this with gold paint.  For a vintage look, the paper can be ‘aged’ using coffee or tea – just leave the sheet in the liquid until desired color is reached and dry completely before using.

paper hearts from sheet music

For my heart garland, I made a cardboard template in the size I wanted and used it to cut out the estimated number of hearts I thought I would need.  To add a little sparkle, I brushed a little bit of clear glitter paint randomly on the hearts after they were cut out.  You may choose to use spray glitter for this purpose (or, at the holidays, flocking).

For a sturdier garland, glue the sheet music to pieces of cardboard before cutting out the shapes.  I didn’t choose to do so since I wanted the hearts to flutter and I didn’t plan on saving them.

After the glitter is dry, I string my hearts onto twine.  I don’t measure the space in between each heart, but rather add them randomly.  I use a small paper hole punch to put holes in the hearts and string them onto a length of twine – adding a knot front and back of each heart to keep them in place.

garland with heart sachet

I’m using a natural twine, but if adding color, a red and white baker’s twine would be cute!  Thread or embroidery twine can also be used.  Fishing line is also an option when making garland – to make it unnoticeable –a string of floating hearts.

In general, the smaller the shapes you use, the more strands of garland you may want to put together.  Multiple strings of little mini hearts are adorable…a string of little white lights can be added as well!

paper garland on books

Heart garland is pretty versatile and doesn’t need to be used exclusively for Valentine’s Day.  X and O shapes are another great choice for a Valentine’s garland.  As an alternative, other shapes that can be used for paper garland are birds, letters, numbers, stars, trees, geometric shapes, shells, etc.  With Easter on its way, you can choose to make little bunny shapes!  If you have children, make some egg shapes and have them decorate each one like an Easter egg before stringing the garland!

garland with gray heart

Cutting flat shapes out of paper is a super simple way to make a garland and can be created with materials you have at home.  I hope I have inspired you to make some of your own!

Thanks for stopping by!

garland over banister

Remember to take pleasure in simple things, Jackie

no comments

« Previous Entries     Next Entries »