Subscribe to Pleasure in Simple Things via RSS ReaderFollow Pleasure in Simple Things on InstagramFollow @InSimpleThings on TwitterLike Pleasure In Simple Things on FacebookFollow Pleasure In Simple Things on PinterestEmail Jackie

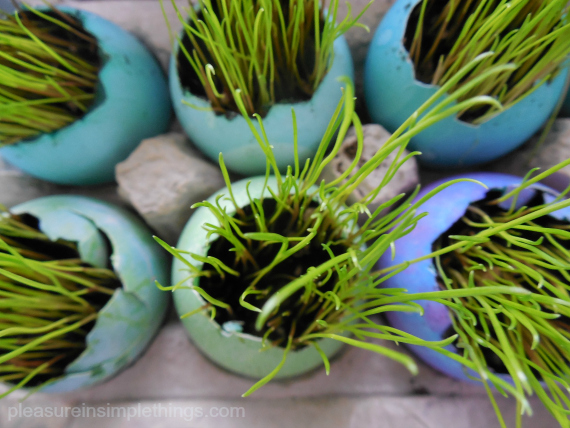
growing grass in an eggshell

March 18, 2014

growing grass in eggshells

The best place to plant Easter grass?  In an eggshell of course!

Planting grass in preparation of Easter has become a tradition in my house.  Containers of many types and varieties have been hijacked over the years for the annual planting, but eggshells remain the favorite vessel of choice!

It is easy to get beautiful results with just a little preparation.   First, decide how many eggs you want to use as planters.  Buy the number of extra-large white eggs you wish to plant.  Obviously, extra-large eggs give you the most room to plant, but you can use any size.  I prefer to use white eggs since I dye them in various colors before I plant in them.

To prepare the egg, use a sharp pointed knife to pierce the pointy end of the egg – this works best with a quick, sharp jab to make a hole.  Once the shell is broken, use your fingers to carefully remove some of the shell to make room for the planting.   (If you prefer, you can turn the egg horizontally, making a hole in the side and planting the grass the long way in the egg.)

growing grass in eggshells for Easter

Empty the contents of the egg.  You can also carefully remove the thin white membrane inside the shell (optional).  Treat the shell gently.  Next, dye the egg as you would any Easter egg.  It is easy to match any décor based on the way the egg is dyed/decorated.  Put the egg in the dye very gently – filling the inside of the egg with the dye so it will sink down and completely submerge into the dye.  (You can dye the eggs before you empty them if you find it easier…I don’t – in case I should ruin one in the emptying process, I haven’t wasted the time dyeing it!)

There is no need to go out and purchase a dye kit…dye is easily created at home with food color.  I like to use paste food color, because it comes in a wide variety of colors and is very vibrant, but liquid food coloring works just as well.  This is the dye I used:

Recipe for Easter egg dye

Once the eggs are dyed and dry, you can start the planting process.  You will need potting soil, grass seed, and a spoon.  If you need to purchase grass seed, go to Home Depot and purchase the smallest bag you can find.  Pick the fast growing seed that is sold for repairing existing lawns – it really does grow fast!

Spoon potting soil carefully into each prepared egg.  I put the eggs in the original carton for the growing process…it is an easy way to keep them in position and it makes for an easy clean up.  Next, spoon grass seed to cover the dirt surface in each egg.  Then, spoon a little more potting soil on top.

grass seed and potting soil

For your first watering, use about 4 teaspoons of water in each egg.  This will give your soil the initial moistness it requires.  For every day forward, add one teaspoon of water each day and keep the carton(s) in the sunniest spot in the house you can find.

grass in eggshells day 1

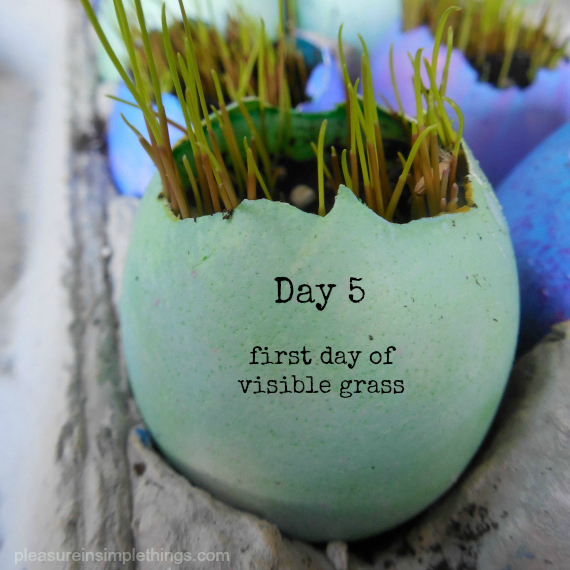
It is amazing how fast the grass will grow once it is sprouted.  The day grass begins to show, it will gain quite a bit of length.  The photos I am showing here were taken the first and second day the grass started to show.  The grass will be visible in less than a week, so plan accordingly.

day 6 grass in eggshells

Like any grass outside, this grass can be trimmed – just use scissors.

The same planting process can be used for any container…just be sure to protect any surfaces that are not waterproof…I line containers with a plastic sandwich bag if needed.

And that is it!  Very satisfying results in under a week!  What am I planning for these cuties?  I will share that with you in an upcoming post.  Meanwhile…give it a try!

Thank you so much for stopping by!

Remember to take pleasure in simple things, Jackie

Sharing at Craftberry BushCrafts a la ModeCoastal Charm and  We Call it Junkin.

15 comments

showing of the green

March 4, 2014

packaged St. Pat's cookies
St. Patrick’s Day is coming up…how do I celebrate?

I usually plant some shamrocks in an unexpected container…or make some homemade Irish Cream…this year, in addition, I am adding a little green to my baking.

Irish Blessing

I think anything green goes over well on St. Patrick’s Day…what other holiday could possibly make green bagels or green beer seem like a good idea?

This year, I am adding some green swirls to my cookies!  If you haven’t used this technique in your cookie making, it is relatively easy to do – it just requires a little bit of patience.

making swirl cookies
I have used this technique to create ‘wave’ cookies for a beach themed party (by adding blue paste food coloring) or to create mocha swirl cookies (by adding cocoa and espresso powder).  As you can imagine, it is easily adaptable to a number of different themes/flavors…so keep it in mind for future entertaining!

steps in making swirl cookies
Divide your cookie dough in half, dyeing one half with paste food coloring.  In addition, I added some lime juice and lime zest – just so the green color made some sense!  You can use your favorite butter or sugar cookie dough…I have never tried this with the packages of sugar cookie dough that is sold in the refrigerator section of the grocery store, but I bet they would work out just as well.

Just pat each half of (chilled) dough into a rectangle on a piece of wax paper…measure each piece – so they are the same size.  Wrap each piece separately in wax paper and put into the refrigerator until firm.  Invert the plain piece of dough onto a large, clean piece of wax paper and peel off the top layer of wax paper.  Invert the green rectangle of dough on top of the plain dough so that the edges are aligned.  Peel off the top layer of paper.  With floured hands, pat the dough so that the layers adhere.

Working from a longer side, roll the dough into a cylinder.  If the dough becomes too soft to work with, refrigerate briefly, then continue rolling.  Wrap the cylinder in wax paper and refrigerate until firm or overnight.  Slice and bake the cookies as usual.

daisy for St. Patrick's Day

I added some clear sprinkles before baking to give the cookies a little sparkle. :)

I packaged each cookie I was giving to a friend in a CD envelope – tying it with raffia and a fresh daisy and adding the message ‘Erin go Bragh’ – translation is “Ireland Forever.”

daisy

Do you have unexpected ways to add green to your St. Patrick’s Day?

Thank you so much for stopping by.

Remember to take pleasure in simple things, Jackie

Sharing at Coastal Charm,  Craftberry Bush, and Finding Silver Pennies.

no comments

care in a package

February 4, 2014

Care Package supplies

Do you remember the best Valentine gift you ever got?  Mine was from the first man I ever loved – my Dad. 

It was a heart-shaped sugar cookie frosted in red.  I can’t remember what the white icing on top spelled out, but I do remember that my mom thought the message made the gift totally inappropriate for a dad to give his daughter.

Maybe it said “lover” or something similar…but it didn’t matter…any sense of inappropriateness went over his head – and mine.  I was just thrilled to get a Valentine…and, I was thrilled my Dad thought to give me one.

Even now, with my Dad gone over twenty five years, his cookie Valentine to me remains my favorite Valentine’s Day gift of all time.

Maybe it is because of the significance of that gift from my Dad that I always show my kids some love on Valentine’s Day.  It isn’t ever anything grand – a card…a favorite treat…something to show I am thinking of them with love – like my Dad did for me so long ago.

For a daughter in college, this is always a care package to arrive on the 14th. 

As I assemble my daughter’s Valentine, I am sharing three easy ways to give your care packages some special ‘care’ this Valentine’s Day…and help create a lasting memory.

Think personal, not expensive.  You don’t have to spend a lot of money to send some great gifts.

Any favorite baked items that can survive the trip serve as great gifts!   Whether you are sending a package to your child in college or to a special someone – you know which items you bake that the recipient likes best – make their favorite!   Maybe there is a specific food item in your area that is not available in the area the recipient lives – a perfect item to include!

If your package is going to a college student, there are some things every college student appreciates.  Socks or underwear help delay the dreaded laundry run and are always appreciated – fun patterns for Valentine’s Day are available in all the stores.  Find a pattern that relates to the recipient of the gift.  Coffee or k-cups are always welcome for the apartment coffee maker and are sure to be available in the gift recipient’s favorite blend.  (I found that Target sells a two-pack so it is not necessary to buy a large box.)  Flash drives are used by all students and can be found shaped as items to reflect the recipient’s personality – I have found ones shaped as surf boards and sushi!  Fun!

Add humor.  Adding humor is always required when creating a care package.  Find something fun to tuck into the package.  After a long, hard day of studying (or work), anything that can bring on a little smile is a great addition.  For my package, I found some chip clips in the dollar store that were shaped like lips – so fun, so perfect for Valentine’s Day, and so practical!

lip clips

Chip clips shaped like lips, found in the dollar store, add some humor to a Valentine’s Day care package.

Create some packaging flair.  Decorating your package – both inside and out – makes it special for the recipient.

For my package, I painted a 69 cent unassembled brown box with messy pink stripes.  Then I found a decorative packing tape – packaging tape now comes in many different colors and patterns and adds so much more flair than using something traditional!  For a sports fan, this can be school colors or colors of a favorite team…be creative…the large selection at the hardware or craft store is sure to spark your imagination.   I chose a pink polka dot packaging tape to seal my daughter’s care package.

adding flair to a care package

Messages can be written on both the inside and/or outside of the box to make it personal.  When my son was in college,  it became a tradition that I would always write the address for a cool new website on the inside flap of his care packages.  If the gift is for one of your children, write a favorite saying or song lyrics from a song you both enjoy…or write something you always say before bedtime. :)

My daughter is a nursing student and I once decorated the outside of a care package, to arrive before a big anatomy test, with body part stickers.  Hey, it must keep the delivery person amused!

Create flair with your packaging material as well.  For my Valentine’s Day care package, I purchased some inexpensive neon pink tissue paper and put it through my home shredder…so easy and inexpensive.  Try using old book pages, newspapers, sports or fashion magazines, etc.  There are so many options…and, so many ways to make the gift personal…the stock pages from the Wall Street Journal for a finance major recipient, for example.

paper shredding

Add flair to a care package by using a home shredder to create packing material. Use tissue paper, newspaper, old book pages, fashion or sports magazine pages, etc. to personalize the gift.

I won’t show you the gifts I included in the care package I created, since I don’t want to spoil the surprises!  ;)  Just remember that the gifts you select should be unique to your recipient…a sure way to make the package personal and memorable.  My kids have exceptional senses of humor, so anything related to an inside joke is always a perfect choice!

Have fun with it!  I would love to hear some ideas inspired by this post and also some memories about your favorite Valentine’s Day gift! 

Send me an email if you need some help with ideas for your personalized care package.

Thanks so much for stopping by.  Remember to take pleasure in simple things, Jackie

1 comment

sweet nothings

January 28, 2014

 Valentine teabag diy

Do you ever write personal notes?

A few well- placed words can make anyone smile.  And, when Valentine’s Day rolls around, a corny pun is definitely in order!

Valentine teabags

A note slipped into a lunch box or a jacket pocket can let someone you care about know you are thinking of them.

Valentines Day pun

You can type a message or use stamps to create one, but I prefer a hand written one – nothing beats it on Valentine’s Day!

Diy valentine teabags

Here, I am using tea bags as a spot to include a Valentine’s Day message.  I love to ‘personalize’ mine using paint chips.  An easy DIY – just sandwich two heart shaped pieces over the tag and add a message.

personalize teabags with paint chips

Where can you place an unexpected pun on Valentine’s Day?

Thanks for stopping by.

Remember to take pleasure in simple things, Jackie

Sharing at City Farmhouse and  Coastal Living. 

1 comment

fireside field trip

December 27, 2013

white hot chocolate

How was your Christmas?

I want to share a recipe for something I enjoyed in front of the fire on Christmas Day…white hot chocolate!

candy canes for white hot cocoa

A nice change from the usual hot cocoa, white hot chocolate is comforting and delicious!  The key is to use a good quality hot chocolate – like Lindt or Ghirardelli.  I also add peppermint candy – crushing up some candy canes.  White chocolate peppermint…so festive…so yummy!

white hot cocoa

If you enjoy a really rich drink, substitute some of the milk in the recipe with heavy cream.  And, an ‘adult’  version is easy to create by adding some peppermint liquor.

white hot chocolate recipe

This tastes so good in front of the fire on any winter evening…enjoy!

white hot cocoa

Thanks for stopping by.

Remember to find pleasure in simple things, Jackie

Sharing at Finding Silver Pennies and Pinch of Joy

2 comments

almost wrapped & ready

December 24, 2013

woodland theme wrapping

I have really enjoyed embracing nature and the outdoors with my woodland holiday theme this year. 

woodland theme wrapping

I wish I had more time to create, but working most all of my waking hours made it difficult…so many ideas – so little time!

Maybe I should consider using the same theme next year so I can put more of my ideas to use!

woodland theme wrapping

As I wrap my gifts and set my table, the very best part of the holiday is approaching – the time spent enjoying time with family.  I want to spend my Christmas Day truly living in the moment…

Woodland theme Christmas tablesetting

No matter how many gifts I may open this year, none compare to the gift of family…

I thank you all for sharing pleasure in simple things with me and I wish you and your family a most blessed holiday filled with joy.

Peace & love, Jackie

no comments

christmas sweets

December 20, 2013

Italian Christmas cookies

Only a few days until Christmas and I haven’t even started my baking!

With this year’s work schedule, I haven’t had time for any of my usual holiday preparations.

Friday field trip this week is a kitchen visit as I fit in a little late night baking session to make the top priority holiday cookie.  I am referring to the one most requested by my family – the “Italian” cookie. 

Italian Christmas cookies

My recipe comes from an old Italian woman many years ago.  She was very ‘old world’ so I have always thought this recipe must be very authentic and I have never altered it.

And, I always stay true to the original recipe and use margarine, even though I never use it in any other baking. 

Holiday cookies

I am sharing the recipe with you here.  (I topped mine with white non-pareils.)

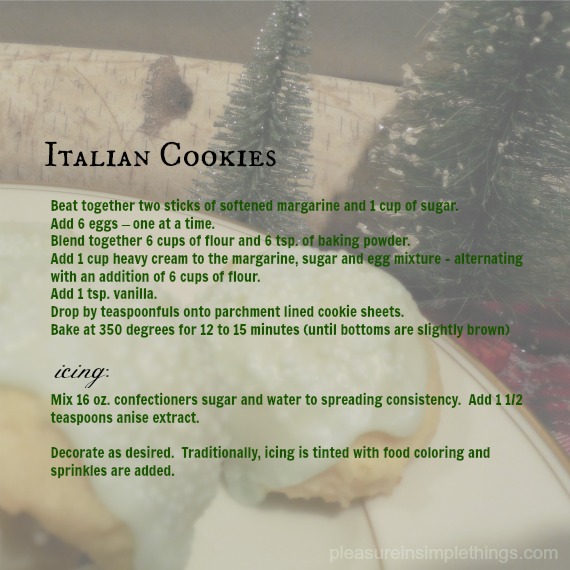
Italian cookie recipe

So now I have the favorite cookie baked and ready for Christmas Eve.  If I can’t squeeze in any other holiday baking, at least I have the most important baking done!  I hope you have time to bake some of your favorite holiday sweets!

Are you thinking these cookies aren’t very consistent with my woodland theme this year?  Don’t worry, I got that covered…maple crème brulees, ice cream ‘pinecones’ and fireplace s’mores should fit the bill…don’t you think?

Christmas cookies

Have a wonderful weekend! 

Thanks so much for stopping by.  Remember to take pleasure in simple things,  Jackie

no comments

brown bag tree ornaments

December 17, 2013

paper bag treat ornaments

I enjoy making treat containers using brown paper.

You have seen some of my brown bag creations for holidays in the past.

For Christmas, it is easy to use the same premise to transform brown bags into tree ornaments.

borwn bag tree ornaments

Using holiday bags is a fun and festive way to recycle!  (Click here to see other items you can create from brown bags.)

Many stores imprint their bags with a holiday motif at this time of year – my favorites are the ones from Trader Joes…such fun patterns!  They also happen to tie in well with my woodland theme this year. :)

I simply sew two pieces of brown paper together – stopping to fill them with treats before sealing them completely.

paper bag ornaments

I use a sewing machine, but they can just as easily be sewed by hand.  (Colorful embroidery thread works well.)

If desired, shapes can be created to fit your theme – doves, angels, snowmen,bells, trees, etc. are all possibilities.

paper bag ornament

Try this festive way to repurpose brown bags.  If you prefer not to enclose edible items, batting or cotton balls can be used to ‘stuff’  the ornament.

I hope you are enjoying your holiday preparations…remember to take pleasure in simple things

Thanks so much for stopping by, Jackie

no comments

seasonal spirit

December 13, 2013

Christmas pin

It seems every year I forget to wear my Christmas pins until the season is almost over.  I really should have a special calendar note reminding me at Thanksgiving to take out my holiday pieces!

holiday wreath pin

I thought I would share a couple of my favorite ‘jewels’ with you on Friday field trip today and it could serve as a reminder for you to be sure and wear your seasonal jewelry…or scarves…or socks.  Or, maybe to acquire some! ;)

Holiday pin

One of my favorite holiday pins…a miniature frame that contains a photo of my daughter dressed as an angel one Halloween long ago.

Wish pin

My first Christmas pin was given to me by my grandmother when I was a young girl.  It was a battery operated Santa pin and if you pulled a string, Santa’s nose would light up red!  I loved it!  One of my favorites in recent years is a hand painted one by artist Roberta Hyatt that says “I Believe.”

vintage woodland pin

This year my favorite is a special pin to coordinate with my woodland theme…it is a vintage piece that is leaves and acorns – so perfect!

Feel free to share your favorite holiday accessories on pleasure in simple things Facebook or Instagram…would love to see them!

Dust off that old stocking cap and take pleasure in the season and simple things!

Thanks so much for stopping by, Jackie

no comments

diy woodland tree garland

December 10, 2013

diy woodland tree garland

Have you noticed paper drinking straws now come in so many great colors and patterns?

I decided to take advantage of this to create garland for my woodland themed Christmas tree this year.

diy christmas tree garland

Using paper straws printed in a simulated birch bark pattern and some small collected pinecones, I created a DIY garland that was simple to make and perfect for my tree!

I simply cut the straws into sections and alternated them on strings with the little pinecones.  So easy!  A great late-night fireside activity. :)

Helpful tip:  I always use dental floss or fishing line to thread garland because both are very sturdy and hold up well when creating long strands.

diy woodland garland

My choice of straw fits in well with my woodland theme.  Now I just need my tree! 

Come up with a combination of materials to coordinate with your décor!  Straws come in so many varieties – both paper and plastic.  You can replace the pinecones I used with beads, candy, pom-poms, berries, popcorn, etc.  to create something appropriate for your décor.

diy woodland tree garland

Have fun with it!

Thanks so much for stopping by.

Remember to take pleasure in simple things, Jackie

no comments

« Previous Entries     Next Entries »