Subscribe to Pleasure in Simple Things via RSS ReaderFollow Pleasure in Simple Things on InstagramFollow @InSimpleThings on TwitterLike Pleasure In Simple Things on FacebookFollow Pleasure In Simple Things on PinterestEmail Jackie

transforming terracotta pots

April 12, 2013

Spring flowers

We won’t be going very far for Friday field trip today…just outdoors!  The weather this week in Connecticut has been amazing, and any free time I had this week was spent on planting preparations… It didn’t help that I had a garden club meeting this week…during the lecture portion of our meeting, I was furiously writing notes of all the things I want need for my garden.  My thoughts have been consumed with plants!

Planting isn’t done around ‘these parts’ until Mother’s Day (my traditional planting day), but that hasn’t stopped me from planning and dreaming.  It is going to be a particularly tough year to make the yard look nice since we had a couple really bad storms this year that destroyed much of the garden – particularly large shrubs and trees.

painted terracotta pot

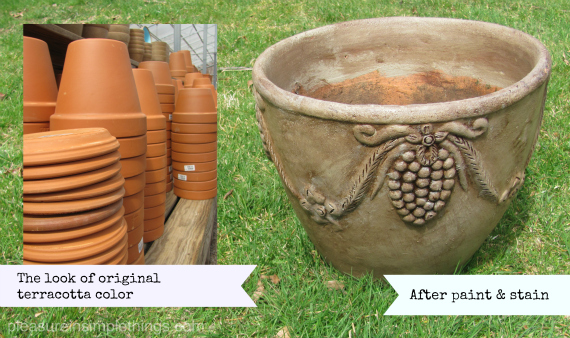
The beautiful results of my terracotta pot transformation using house paint and gel stain.

Because of this, there is so much more I want  need than my budget will allow.  One thing I was determined to replace this year was the ugly terracotta pots that we use to plant some of the herbs.  I say ‘ugly’ because I really dislike that new terracotta orange (you know how I feel about orange) look.  For me, they are an eyesore.  I thought they may ‘accidently’ break in the garage before planting season this year, but I want to use my garden budget to buy more living things, not to replace pots.

terracotta pot transformation

So, I decided to see what I could do to transform the terracotta pots I already have into something I could enjoy looking at!  I found it was a really easy fix and I wanted to share the process with you in case there are others out there that are cringing over the look of their terracotta!

Certainly there are plenty of methods to ‘weather’ terracotta or to create moss, etc.  I did not do that.  I went on a ‘hunt’ around the house to find things I could  use for the transformation without making a purchase.

upgrading a terracota pot

And, I found I needed very little.  Some leftover house paint, stain, and a rag did the trick!

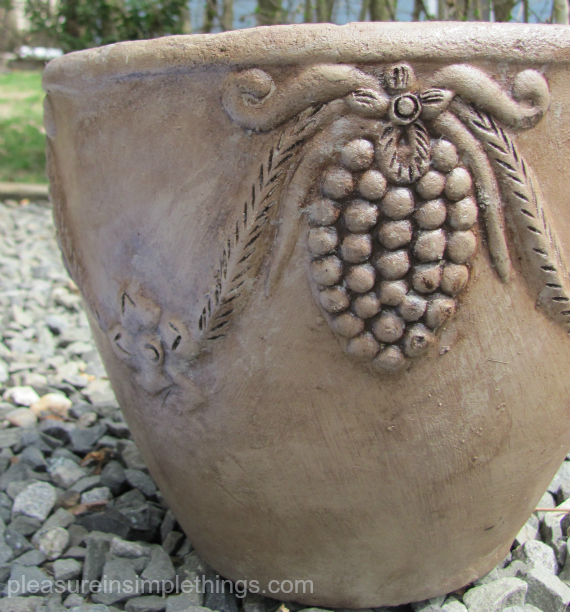
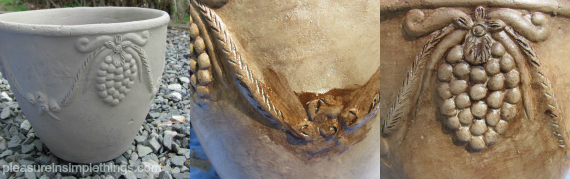
First, I simply painted the (bright terracotta) pot with some house paint (it happened to be Benjamin Moore Kingsport Gray).  This color will coordinate nicely with the exterior of my house which is sided in cedar and stained with ‘driftwood’ (of course my house is painted a color with a ‘beachy’ name…what did you expect lol).

After that dried (I left it overnight), I used some gel stain (Minwax in Hickory that I had left in the basement) on a rag to give some dimension to the look.  I rubbed some on, and using the rag, rubbed it off…pretty easy, right?  My pot had a design on it and I made sure to get a lot of stain on the design part so that I could have it settle into the crevices.  Although my pot had a bright, new look, it was a few years old which made it even better for this process since any cracks or scratches looked great when the stain settled in.  You can do this same process repeatedly if you want more color or depth.  After I was done, I dabbed a little of the paint onto the highest part of the design…just as a highlight.

Fresh herbs

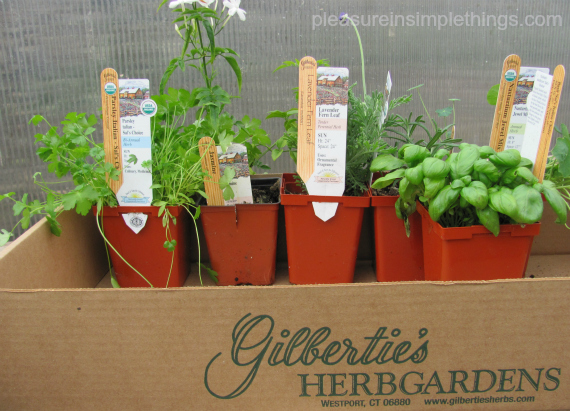
My first purchase of the season…some herbs from Gilbertie’s.

What an easy way to give terracotta pots a little more interest without making any purchases!  If you don’t have these items in your house, you can do a simple whitewash.  Everyone has some white paint left somewhere…just thin it down a little bit and paint it over your pot to get rid of the new orange look.  These pots may be the least expensive, but they don’t have to look that way!  You can easily transform them with some leftover paint and/or stain.  Have fun with it!  I can’t wait to add some plants to my new creation :)

Have a wonderful weekend!

Remember to take pleasure in simple things, Jackie

Sharing at Crafts a la ModeCraftionary, and  The Well Crafted Home.

1 comment

terrarium love

March 22, 2013

terrarium elements

Today, Friday field trip is a visit to my friend’s house.  Her name is Phyllis, and we are getting together for what she affectionately refers to as “a playdate.”  On this occasion, we are making terrariums.  We had recently picked up some terrarium plants and supplies at Terrain and we were very anxious to start creating!  I am sure we will have future field trips to Phyllis’s home since it is amazing!  I have so much inspiration I could share with you…her decor, her gardens, her handcrafted jewelry…well, everything!  But, for today, I will limit my sharing to our terrarium creations.

terrarium

When I got to Phyllis’s house we started right in…covering her large kitchen island with newspaper and taking out all our various supplies.  In addition, her entire dining room table was covered with assorted containers and possible decorative terrarium items.  She showed me the terrarium she had already completed.  Wow!  It is so beautiful…a little watering can!…and a hanging plant!  Isn’t it great?

Completed Terrarium


close up Terrarium


close up Terrarium view

Because Phyllis already knew all the terrarium basics, I didn’t have to worry about doing alot of research.  She explained about the rocks for drainage on the bottom (I think I would have figured that out) and a layer of activated charcoal (I would not have figured that out) before the layer of soil.  So, after a quick lesson on how to proceed, I needed to decide exactly what I wanted to put into the terrarium.

plant for terrarium

I figured I had two ways to go.  I could do an Easter/spring theme and use eggs and nests OR I could do my standard (coastal/beach) theme.  I decided to go with a ‘beachy’ theme and got some possible items assembled.  The interesting thing about putting a terrarium together is that you don’t really need as many plants or decorative items as you may think.  Less is really more.  So, I decided my main decorative item would be a sand castle.

terrarium elements

From there, I would use some rocks, shells, sea glass, and moss that reminded me of the beach.  For the plant?  Phyllis and I had both fell in love with a plant called Breynia Snow Bush that we found at Terrain and that would serve as the highlighted plant in my creation.

terrarium elements

And…this is what I came up with…what do you think?  I love it!  Isn’t the little colored gravel so great?  I think it is sold as fish tank decor.  I had some old glass ‘bubbles’ that were used many years ago with floating candles that lent themselves perfectly to the ‘beachy’ terrarium.

photo of coastal theme terrarium

Adorable, don’t you think?

closeup beach terrarium

You are probably wondering what Phyllis was working on…wait until you see!  Phyllis and I had both been intrigued by the ‘pussy willow teepees’ we saw in some of the terrariums at Terrain…like the one on this bunny arrangement.  So, Phyllis decided to create one in a pretty metal container she had on hand.

bunny terrarium

This beautiful arrangement is what she came up with!  So gorgeous!

pussywillow tent planting

She created the “teepee” from stalks of pussy willow.  She attached them on top by putting an elastic band around a piece of moss she harvested from her yard.  So beautiful…and with the pussy willow and the addition of some real quail eggs from Terrain, the perfect Easter arrangement!  You can see in this closeup that the elastic is not even visible once it is put into the moss.

making a pussywillow tent

Playdate successful!

Consider ‘shopping’ your basement and garage for possible terrarium containers and decorative items…Terrain has some really cool terrarium items if you want to purchase some or supplement what you can find around your house.  Miniatures from train sets or Christmas villages can also be used.  The sand castle I used was actually a repurposed photo holder – I just trimmed off the wire stand.  Just remember to use soil appropriate to the plants you select.

I hope you enjoyed my Friday field trip to create terrariums.  Special thanks to my partner in crime!  I forgot to mention the homemade golden pea soup I had for lunch (so yummy!) or the eggplant and famous key lime pie (heaven!) from The Pantry in Fairfield…ahhh..the perks of the playdate!  Thank you so much for stopping by!

Have a fabulous weekend, Jackie

I am sharing at Little Red House, Serenity Saturday, The Inspiration Gallery, Craftionary, Common Ground, Give Me the Goods Monday, and The Well Crafted Home.

16 comments

a trip to marvin gardens

March 15, 2013

garden sign markers

Today’s Friday field trip is to Marvin Gardens in Wilton, Connecticut.

If you are a decorator or designer in Fairfield County, you probably already know about this gem of a place.  It houses an amazing array of all things decorative.  Inspiration lurks in every nook and cranny; indoors and out.

wire cage

antique

As it turned out, I probably didn’t time my visit the best for photo taking purposes, since the shop was in the middle of a move – moving the entire inventory to a new space a few hundred feet down the road.  The nice part about the timing of my visit was that a huge moving sale was in progress (through April 1st) and some items were reduced as much as 50%.  Very bad temptation…especially at this time of year when so many items were just crying out to be put in the garden or used as a container to plant something in!

collage of garden items

bird whistle

Today I will share a few of the items that inspired me…I will need to make another visit when the move is complete so I can share some photos of the new space.

old aqua box

mice

collage of colorful items

old bottles

Wonderful items, don’t you think?

marvin gardens sign

Truly a treasure hunt!

ceramic pots

A great place to find a unique piece for home or garden.

buddah head

Hope you enjoyed your visit to Marvin Gardens in Wilton, Connecticut.

marvin gardens sign

Thanks for visiting.  Have a wonderful weekend!

Remember to take pleasure in simple things, Jackie

(P.S.  It’s a yellow property…weren’t you remembering Marvin Gardens from Monopoly?…it’s yellow, right next to the “go to jail” square).

I am sharing at the Vintage-Love Party at Blue Egg Brown Nest.

no comments

st. patrick’s day tea

March 12, 2013

shamrocks in a teacup

I saw some adorable little shamrock teacups and saucers in The Christmas Tree Shop (a bargain store here in New England) about a month ago and and all I could think of was planting shamrocks in the cup!  And, I had the perfect Irish friend to give it to.  So, I purchased one and waited for some shamrocks to be available for sale…which they always are as St. Patrick’s Day comes close.

shamrocks in a teacup

I was so excited when I saw a shamrock plant in one of the bargain stores…yes!

planting shamrocks

planting shamrocks for St. Pat's

I simply planted the shamrocks into the teacup…my one shamrock plant was big enough to use for two cups…I used the sweet little shamrock teacup and…

shamrocks in a teacup

A photo of shamrocks planted in a sweet little teacup for St. Patrick’s Day.

planted some in one of my Jadite cups to add a little St. Patrick’s Day spirit to my own home :)

shamrocks in Jadite

Get yourself some shamrocks and plant them in a container that makes you smile!  I can’t send you a shamrock-filled teacup, so, as a gift to you, here is a St. Patrick’s Day blessing you can pin or send to a friend :)  Happy St. Patrick’s Day!

An Irish Blessing for St. Pat's

Have a happy and safe St. Patrick’s Day week!

St. Patrick's Day teabag

Thanks so much for visiting, Jackie

P.S. Please ‘like’ my facebook page by clicking here or the facebook icon at the top of the page so I can share more ideas/inspiration during the week that don’t fit in my posts :)

I am sharing at Coastal CharmTimewashed, Shabby Creek CottageCrafts a la Mode, CrationaryThe Shabby Nest, Little Red House, and Craftberry Bush.

13 comments

a day at the philadelphia flower show

March 8, 2013

spring flowers

For Friday field trip this week, I am sharing some of my day in Philadelphia last Saturday…so; technically…I guess it is a Saturday field trip!

My weekend was planned around the fact that the largest and oldest flower show in the world was taking place at the Philadelphia Convention Center.  The theme for the 2013 show was “Brilliant!” and was a homage to all things British.

I had never been to a flower show – never mind the largest – so I was excited!

Since I was visiting my daughter for the weekend, I decided to plan my flower show visit during the time she was working at the hospital.

I got an early start and headed over to the Free Library for a couple hours before the flower show started at 11:00.  I was very lucky that the programming for “One Book, One Philadelphia” happened to coincide with my visit.  The selection for the year is The Buddha in the Attic.  I really enjoyed the book so it was easy to spend time at the library checking out the exhibits related to this year’s selection.

The Free Library in Philadelphia

A photo of the Free Library in Philadelphia.

As 11:00 approached, I reluctantly left the library (I didn’t have enough time to see the rare book collection) and headed over to the Convention Center.  Wow!  What a crowd had formed waiting for the 11:00 start.  While I waited, I was intrigued by this sculpture in the lobby:

Philadelphia convention center sculpture

Cool, right?

When I got into the flower show, I checked the schedule and decided to attend some presentations in the seminar rooms before making my way into the main show area.  Living outside New York City and having attended various shows at the Javits, I was pretty right on with what I expected to find inside the show as far as crowd, etc. ($4.50 for an iced tea!)  But, I had no experience on attending garden shows and I was a little taken aback by the darkened room and theatrical lighting.  I thought to myself I think I made a mistake with this.   But, I soon found out there was ‘something for everyone’ as I made my way around the show area.  Although the theatrical type displays did not appeal to me, I found some areas that were more in tune with the natural elements I admire.

photo of table with radishes

Natural style at Philadelphia flower show

My favorite part of the show was probably the Gardener’s Studio.  This was a presentation area and every hour, on the hour, I rushed back; anxious to see the next presentation.

jonathan wright from chanticleer

Jonathan Wright from Chanticleer – a public garden outside Philadelphia – demonstrates how to create indoor arrangements by using branches from the winter garden.

It was impossible to get photos of the flower exhibits because of the sheer mass of people and because of the crazy lighting.  I did take a few photos, but not of the typical things everyone else seemed to take.  If you want to learn more about the show, you can check the Philadelphia Flower Show website or see some of the many photos on line.  Better still, plan a visit next year because you really have to be there in person to truly appreciate it…besides, everyone should attend the Philadelphia Flower Show at least once in their lifetime!

Sculptures at Philadelphia Flower Show

A photo of some curious egg-shaped sculptures at the Philadelphia Flower Show – one from hoses and one from tires.

In addition to all the flower displays, the retail area was really fun.  Some of the retailers rivaled the flower displays in their creativity and beauty.  I fell in love with Chive, a Canadian company that sells a wide array of vessels for flowers.  They carry some really unique pieces…all beautiful.  Here is an example of one:

flower vase from Chive

One of the many unique flower vessels available from the Canadian company, Chive.

Aren’t these flatware holders adorable?  Cutlery Couture offered a wide selection:

Cutlery Couture

One of the many styles of cutlery holders offered at the Cutlery Couture booth at the Philadelphia Flower Show.

Some really unique jewelry pieces were available at Elements:

Elements at Philadelphia Flower Show

A selection of the offerings of Elements at the Philadelphia Flower Show.

I had to stop and admire the fresh flowers from The Hawaii Tropical Flower Council.  They were even hand crafting orchid leis to order!  Beautiful!

Hawaiian Flowers at Philadelphia Flower Show

This wonderful item is the work of artist Michelle Masters – a creator of topiary art and fine art originals:

Michelle Masters

A sample of the topiary art by Michelle Masters at the Philadelphia Flower Show.

If I hadn’t had a ticket for the afternoon tea, I may still be wondering around the marketplace area!  The tea was a lovely way to meet some new people and admire the fresh roses that were everywhere.

Garden Tea at the PHiladelphia Garden Show

After the tea, it was time to meet my daughter so I said ‘cheerio’ to the Philadelphia Flower Show, but not before making a vow to return next year.  Wait!  We had one last stop before we left Center City for the day.  We can never be in Center City and not visit the West Elm Philly store!

West Elm PHiladelphia

west elm philadelphia

NOW we can say good-bye to Center City for the day…a day well spent :)  Especially the part I got to spend with my daughter :)

Thanks so much for visiting.  Have a wonderful weekend, Jackie

1 comment

discovering orchids at terrain

February 1, 2013

orchids

It is no secret, whether I am in Connecticut or Pennsylvania, one of my favorite stores to visit is Terrain.  If you are a frequent visitor to pleasure in simple things, you have shared quite a few visits with me to the Connecticut store since its opening in Westport, Connecticut last spring.

Terrain

Friday field trip this week is to Terrain to check out a demonstration on planting orchids.  Not knowing very much about orchids, I was intrigued watching Mary Ann from Terrain demonstrate how easy an orchid can be planted and also to learn that their care is not that difficult.  This particular weekend, Matthew, the Terrain landscape designer from the Pennsylvania store, was also on hand.  It was great to have the opportunity to speak with him.  He is a great resource for design questions – pertaining to landscapes or to interiors.


I watched Mary Ann carefully remove an orchid from its pot, removing as much of the moss as she could.  She trimmed away any rotten or blackened roots (with the really pretty scissors they sell at Terrain!)  This particular orchid was put into a container Mary Ann had crafted from birch bark and made to hang.

planting orchids

orchid

In nature, these plants thrive in strong light (but not direct late afternoon sun); high humidity; air flow around roots; regular periods of drying, alternating with drenching rains; and in temperatures between 50 degrees and 85 degrees.  So, the closer you replicate nature, the more success you will have in growing orchids.

orchid

At Terrain, the orchids are watered infrequently, but misted on a regular basis.  In the summer orchids need to be watered weekly, but in the winter, closer to once a month.

orchid

Did you know in nature, orchids are epiphytes?  That means they grow on other objects, clinging to rough bark or even stone.  Here, Mary Ann has created an orchid planting very much embracing the way an orchid would grow in nature.  After covering the roots of the plant in moss, she tied it to a piece of a white birch log.  Terrain actually sells pieces of white birch logs so that if you wanted to create one of these plantings yourself, you could do so.  A screw eye, picked up at Home Depot, is easy to attach to the top of the birch log for hanging.  Or, you could have Mary Ann create one for you!  Either way, it makes for a beautiful hanging.

orchid

I had fun admiring many other beautiful orchids in varying colors and varieties throughout the store.

orchids

orchids

orchids

orchid

I think this deeply hued hanging orchid would make a wonderfully romantic Valentine’s Day gift!

orchid

I have a new appreciation for orchids after my visit to Terrain…I also feel a little less intimidated about trying to repot some plants myself!  This field trip definitely made me yearn for spring though!!  How many more days!?

I hope you enjoyed our Friday field trip to Terrain to discover orchids…maybe it inspired you to create a planting of your own?   Or, to give one as a gift?

Thanks for stopping by and have a wonderful weekend, Jackie

no comments

planting succulents in a pumpkin

October 23, 2012

Succulents planted in a pumpkin

seasonal succulents

I have taken a real interest in succulents recently.   There are probably two big reasons for this.  One is that I saw a photo of a succulent garden in a huge conch shell.  I love shells, so the photo immediately caught my interest and got me excited to try and plant some succulents in shells.  Second, a new Home Depot nearby carries a huge selection of succulents.

I actually had a really early love for succulents.  The first plant I ever personally owned as a kid was a cactus plant I bought in Arizona when I visited Phoenix with my grandparents.  My first magazine subscription wasn’t Teen Beat, but rather Arizona Highways because I adored the pages filled with photos of various desert plants across the backdrop of gorgeous sunsets! Although the varieties of succulents available here in New England aren’t the same as out West, Home Depot does have quite a large selection.

I read as much as I could find on the subject of succulent container gardens and also watched some videos on the subject.  The cool thing about succulents is that they can be planted in virtually any type of container.  I decided since it is October, I would try a pumpkin as my first container garden.  Also, because I love the way white pumpkins mix with succulents.

Planting is pretty simple.  The big difference from planting any other type of plant is that succulents require a fast draining soil.  Instructions on creating an appropriate soil are easy to find, but it is actually more cost effective to just buy a prepared soil at Home Depot.

Most succulent container gardens use a top dressing – most often rocks.  I would love to use sea glass in a future garden, but for the pumpkin I decide to use some reindeer moss and also decorate with some Spanish moss.  I will probably use the sea glass idea for a terrarium when the pumpkin starts breaking down and I need to move the plants to a new container.

photo of succulents in a pumpkin

A photo of succulents planted in a white pumpkin.

Don’t they look great in the white pumpkin?  Small white pumpkins planted with succulents would look great at individual place settings at the Thanksgiving table!

I hope you enjoyed succulent gardening in a white pumpkin!

Thanks so much for visiting, Jackie  

7 comments

make the most of grocery store flowers

September 7, 2012

friday field trip

Today’s field trip is to the local Stop ‘n Shop to visit the floral department.  I want to show you how easy it is to utilize the florist at your local grocery store.  Why spend a lot at a traditional florist when you can buy flowers for giving at the grocery store for a more reasonable price.  An added perk is that many grocery stores, like Stop ‘n Shop, are open 24 hours!  You can pretty much buy a gift at any time of the day or night that fits into your schedule.

Use these five tips to make grocery store flowers work for you.

1.  STICK WITH THE SAME COLOR OR VARIETY OF FLOWER.  Instead of buying a bouquet that contains a mixture of colors and varieties of flowers, pick one color or one type of flower and stick with it.  You will get much better visual impact for your budget.

2.  CONSIDER A POTTED PLANT.  Very often, potted plants in season are less expensive than cut flowers and look much better/healthier.  Plus, the recipient has the added benefit of enjoying a permanent plant rather than a fleeting bouquet.  Some grocery stores even sell potted herbs – a nice departure from a traditional flower if the recipient happens to be a foodie!  Containers sold in the floral section are very reasonably priced and can be a great alternative to wrapping.

A potted plant is paired with a cute container that was priced at onlyl $4 in the Stop ‘n Shop floral department.

3.  USE YOUR OWN FLOURISHES.  I always use my own ribbon and tissue when preparing grocery store flowers for giving, rather than relying on the limited selection available at the grocery store.  The gift not only looks prettier, but using your own touches helps give your gift a personal flair.

I used two potted plants and a basket from the floral department for a cost of less than $20 (and less than the price of a dozen roses). I added my own tissue paper and ribbon to complete the look and add my own personal touch.

4.  MAKE THE MOST OF SPECIALS.  If roses are $25 and  a special on tulips makes them a quarter of the price…how much nicer to make a combined bouquet of four bunches of tulips!  A potted orchid on sale may be less than a bouquet and more appropriate for the recipient.  Be sure to check all the specials.

Shopping for cut flowers, two bunches of sunflowers on special were less than an assorted bouquet and provide much better visual appeal.

5.  SHOP FOR ADD-ONS.  With all the items available at the grocery store, there are many options available to you to add a little something to your gift, should the occasion or budget warrant it. What a great added feature of doing your flower shopping at the grocery store!   A gift of engagement flowers can include a wedding magazine or some chocolates…flowers to welcome a new baby can include a bib or pacifier…just hop over to the appropriate aisle.  At this time of year, a trip to the produce aisle can mean the purchase of a pumpkin to serve as a great seasonal container for your flowers.  Perfect to house Halloween or Thanksgiving flowers for giving. (I love the white ones!)  Grocery stores also sell gift certificates, so you can also easily tuck in a certificate for a cup of coffee or the latest music.

Whether you are shopping for yourself, or for a gift, remember these five tips when shopping for flowers in the grocery store.

Hope you enjoyed these tips for making the grocery store florist work for you.  Why not pick out some flowers for your own home?

All the photos in this post were taken in the floral department at Stop ‘n Shop.  Thanks for visiting, Jackie

1 comment

squash blossoms…farm to table

September 2, 2012

An easy do-it-yourself pictorial.

For the first time this year, I picked my own squash blossoms when I visited Lyman Orchards in Middlefield, CT.  I happened to overhear someone asking directions to the appropriate field to pick them.  I immediately got excited about the prospect of picking some myself.  I have had fried squash blossoms in restaurants and really enjoyed them – even though I am not a big fried food lover.  I decided to take the opportunity to try and cook some up myself.

I originally posted these photos on my facebook page, but have had many requests to put them on a blog post for those that don’t use facebook.  So, here is how I prepared the squash blossoms…it was very easy and they were very delicious!


Easy!  Hope you enjoyed these photos on preparing squash blossoms…farm to table!

Thanks for visiting!  Enjoy your holiday weekend, Jackie

no comments

discovering a sunflower maze

August 31, 2012

Navigating through 350,000 sunflowers.

I have been to many corn mazes in my lifetime, but had never heard of a sunflower maze until last week. I certainly was intrigued by the idea of it. Imagine a field full of sunflowers…it just sounded so Provence. Not caring so much about the maze, but more about the sunflowers, I decided to make the trip to Middlefield, CT to check it out. It was my first trip to the 1,100 acre Lyman Orchards farm.

A photo of a sunflower at the Lyman Orchards sunflower maze in Middlefield, CT.

I had imagined a field of yellow. But, as I approached the field, I discovered that there were many varieties and colors of sunflowers that made up the maze. My favorites were not the yellows at all, but some of the varieties in the darker hues. They were all beautiful. It didn’t even bother me when I got so terribly lost in the maze… I was too busy taking in all the varieties of sunflowers and trying my darndest to avoid all the bees. (I felt lucky to only sustain one bite.)

A photo from the sunflower maze. The flowers are ‘sterile’ meaning there is no pollen…this discourages the bees from hanging around for very long.

I have included a very short piece of video at the end of the post that I took with my son’s GoPro camera, hoping to capture a little of the experience for you…needless to say, a very rookie job…what can

I say…it was my first attempt! It is very tough to take video without a viewfinder!

A photo of one of my favorite sunflowers at the sunflower maze. Lyman Orchards is the 12th oldest family-owned business in the U.S., operating since 1741 and currently run by the eighth generation!


My first visit to a sunflower maze was a wonderful experience. Please enjoy the photos of this truly lovely place.

Thanks for visiting, Jackie

2 comments

« Previous Entries     Next Entries »