Subscribe to Pleasure in Simple Things via RSS ReaderFollow Pleasure in Simple Things on InstagramFollow @InSimpleThings on TwitterLike Pleasure In Simple Things on FacebookFollow Pleasure In Simple Things on PinterestEmail Jackie

interest to plantings with diy teepees

May 16, 2014

pleasure in simple things diy garden teepees

Garden ‘teepees’ are a quick and easy way to add some great visual interested to your plantings.

pleasure in simple things garden teepee

For Friday field trip today, I am visiting with my friend Phyllis (thanks Phyllis!) to demonstrate this easy tutorial.

You may remember Phyllis from when I hijacked her magnificent yard for a charity garden tour or, from when I shared a terrarium making session at her home.

pleasure in simple things garden teepees

Today, we are creating garden teepees to add to outdoor pots.

pleasure in simple things garden teepees

To create the teepees, simply arrange branches in a teepee shape, holding them in place, while pushing into the soil.  Attach the top of the branches together using a small piece of green floral wire.  Place a piece of moss over the green wire and attach it using another small length of the wire.

pleasure in simple things garden teepees

*Moss can be purchased at a garden store and is preferred over the moss found in the yard or the forest to avoid undiscovered insect eggs, etc.

pleasure in simple things pussy willow garden teepees

pleasure in simple things making garden teepees

Looks like we have some ‘students’ interested in our tutorial from the other side of the screen door!


A garden teepee is such a great way to add some visual interest to plantings with very little effort and minimal supplies!

Have fun with it!

Thank you so much for stopping by!

Have a wonderful weekend and remember to take pleasure in simple things, Jackie

Sharing at Craftberry Bush, Crafts a la Mode, and Mona’s Picturesque.

5 comments

april showers bring may flowers

May 2, 2014

White's Flower Farm

Who visits a flower nursery on a cold and rainy day?  Apparently, I do!

pansies in the rain

Although I usually plan my visits for the summertime, I recently decided to make a trip to White Flower Farm on an April day.

garden wagons

I expected a different seasonal view, but certainly did not expect a day that turned out so cold that I dreamed of wearing mittens!

White's Flower Farm

You, my friends, are a wee bit luckier than I; since you can visit White Flower Farm from the comfort of your own home on today’s Friday field trip…no mittens required!

flower collage

White Flower Farm, both a working nursery and a private residence, is located in Litchfield, Connecticut and is an awesome place!  If you are an avid gardener, you may be familiar with the nursery, even if you live outside the area, since they do a huge mail order business.  I ordered from them long before I decided to make my first location trip.

White's Flower Farm

The visit turned out to be an inspiring one as I discovered the beauty in the preseason garden.  My typical visit is in July when the trees are filled with leaves and all the perennials are in bloom.  This quiet, somber day gave a special quietness and sense of promise to the gardens.  And, the trees looked so majestic in their bare state!

White's Flower Farm

Unfortunately, I was forced to take ‘rest stops’ in the heated gift shop to thaw out my frigid fingers!  Of course I would not have dropped in; if not for the cold hands! ;)

gift shop at White's Flower Farm

gift shop at White's Flower Farm

Landscape at White's Flower Farm

Garden Bench

Collage of photos from WHite's Flower Farm

White's Flower Farm

I hope you enjoyed sharing some of White Flower Farm in Litchfield, Connecticut for today’s Friday field trip…definitely worth a trip if you are in the area!  By the way, White Flower Farm takes its name from their first perennial border, the all-white garden (and my favorite) called the Moon Garden because the white flowers gleam even by moonlight!  Have a fantastic weekend!

And, thank you so very much for stopping by!  Remember to take pleasure in simple things, Jackie

Sharing at Craftberry Bush, Mona’s Picturesque, Fridays Unfolded, and Crafts a la Mode.

3 comments

may day flowers

April 25, 2014

may day flowers

For Friday field trip this week, we are stepping back in time to honor an old tradition that celebrates the start of spring.   Up until the end of the 20th century, part of the May Day tradition included leaving flowers anonymously on neighbor’s doorsteps on May 1st as a signal to the start of spring.

may day tradition

Last year I had some fun making hanging flower containers with driftwood, shells, and repurposed glass tubes.  This year, I am creating some gifts of floral spheres that are easy to create using flower oasis and grocery store flowers.

oasis ballI am starting by cutting a block of oasis material into a four inch square.  (Oasis is available at any dollar store, craft store, or flower shop.)

The material is very easy to cut with a serrated knife, but can be messy – be sure to cover your work surface with newspaper before starting this process.

After cutting a square cube, sculpt the material into a sphere shape using your knife.

Once the shape is created, let the material soak up water by submerging it in a container of room temperature tap water.

Next, add flowers.  Pins or fasteners will not be required to attach the flowers if flowers with stiff stems are chosen – like the ones I have used here.  Just leave some length on the stems so they can be poked into the material.

Place the flower heads in close enough to each other to prevent seeing glimpses of the surface (to avoid needing any additional filler flowers).

A 4″ cube can easily be filled with a small bouquet from the grocery store florist…or flowers from your garden – if you are lucky enough to be in a part of the country that makes this possible!

may day purple flower

Now you have created a beautiful sphere shaped flower arrangement that can be displayed in any small container that accommodates the size of the sphere.  I have used a sugar bowl and a small flower pot.

No fear, if you want to continue the May Day tradition of hanging your arrangement, this is easy to accomplish.  Before adding the flowers, attach some twine around the sphere and you can easily hang your May Day arrangement.

may day flowers in a sugar bowl

Take note that hanging is possible because of the small size of the sphere.  Because the added water adds weight to the sphere, this would not work with a larger size sphere – the twine would cut through the material.  And be sure to use twine – moisture from the water would stain a ribbon.

preparing circular oasis

I much prefer the sphere displayed in a container, but if you need to follow the tradition to the letter, your arrangement can be hung on a nearby doorknob. ;)

circle of hanging flowers

Happy May Day!

may day yellow flowers

Thank you so much for stopping by.  Have a wonderful weekend!

Remember to take pleasure in simple things, Jackie

Sharing with Craftberry Bush, The Shabby Nest, and Common Ground.

1 comment

outside the color palette?

April 4, 2014

pansies

For Friday field trip today, I am adding the first accessory to my newly decorated painted guest room.

pansy planting supplies

I hadn’t really planned to redo any rooms upstairs.  Honest.  But, one of the bedrooms desperately needed painting and that (of course) started the whole ball rolling!  That, my friends, is not the surprising part since it doesn’t usually take much to get me going in the redecorating direction!  The surprising part?  My new room color isn’t part of my usual color palette!

The color palette I created for my downstairs rooms from a photo I took of an oyster shell.  I color matched my paint colors to the colors I took from the photo.

The color palette I created for my downstairs rooms from a photo I took of an oyster shell. I color matched my paint colors to the colors I took from the photo.

I agonized over paint swatches for a good month – finally deciding on a color called ‘shortbread’ from the Martha Stewart Living paint line at Home Depot.

As a yellow/gold tone – it was a departure from my usual coastal colors. Once the room was cleaned and painted (even though my free time should really have been devoted to tax preparation!) I decided to use my limited funds on a bed frame and bedding so the room could be utilized as a guest room right away.  The rest I can complete a little at a time when the mood (or funds) are right.

guest room collage
I chose a bed frame in a gray/brown (driftwood looking) color from Ikea and proceeded to stalk all the home stores for bedding.  I decided on a gray textured spread at Home Goods and picked out some contrasting pillows – limiting myself to just two.  I also picked up a sheet set in a color that looked surprisingly similar to the color of the shortbread paint.  Basics completed!  Ready for guests!

pansy spoon

Now, for my first official accessory for the new room, I am planting some pansies in a beautiful gold tone chippy planter that I found at Anthropologie.  The pot cost me $8 and I picked up some pansies at Home Depot – my first accessory cost under $15 and I love it!

pansies in anthro pot

spring time pansies

You know – now that I really look at that room – the shortbread paint could easily be called marsh grass or coastal twilight…don’t you think?  ;)

Thanks for stopping by!  Have a wonderful weekend!

Remember to take pleasure in simple things, Jackie

Sharing at Little Red House, Craftberry Bush, Coastal Charm, and Mona’s Picturesque.

no comments

growing grass in an eggshell

March 18, 2014

growing grass in eggshells

The best place to plant Easter grass?  In an eggshell of course!

Planting grass in preparation of Easter has become a tradition in my house.  Containers of many types and varieties have been hijacked over the years for the annual planting, but eggshells remain the favorite vessel of choice!

It is easy to get beautiful results with just a little preparation.   First, decide how many eggs you want to use as planters.  Buy the number of extra-large white eggs you wish to plant.  Obviously, extra-large eggs give you the most room to plant, but you can use any size.  I prefer to use white eggs since I dye them in various colors before I plant in them.

To prepare the egg, use a sharp pointed knife to pierce the pointy end of the egg – this works best with a quick, sharp jab to make a hole.  Once the shell is broken, use your fingers to carefully remove some of the shell to make room for the planting.   (If you prefer, you can turn the egg horizontally, making a hole in the side and planting the grass the long way in the egg.)

growing grass in eggshells for Easter

Empty the contents of the egg.  You can also carefully remove the thin white membrane inside the shell (optional).  Treat the shell gently.  Next, dye the egg as you would any Easter egg.  It is easy to match any décor based on the way the egg is dyed/decorated.  Put the egg in the dye very gently – filling the inside of the egg with the dye so it will sink down and completely submerge into the dye.  (You can dye the eggs before you empty them if you find it easier…I don’t – in case I should ruin one in the emptying process, I haven’t wasted the time dyeing it!)

There is no need to go out and purchase a dye kit…dye is easily created at home with food color.  I like to use paste food color, because it comes in a wide variety of colors and is very vibrant, but liquid food coloring works just as well.  This is the dye I used:

Recipe for Easter egg dye

Once the eggs are dyed and dry, you can start the planting process.  You will need potting soil, grass seed, and a spoon.  If you need to purchase grass seed, go to Home Depot and purchase the smallest bag you can find.  Pick the fast growing seed that is sold for repairing existing lawns – it really does grow fast!

Spoon potting soil carefully into each prepared egg.  I put the eggs in the original carton for the growing process…it is an easy way to keep them in position and it makes for an easy clean up.  Next, spoon grass seed to cover the dirt surface in each egg.  Then, spoon a little more potting soil on top.

grass seed and potting soil

For your first watering, use about 4 teaspoons of water in each egg.  This will give your soil the initial moistness it requires.  For every day forward, add one teaspoon of water each day and keep the carton(s) in the sunniest spot in the house you can find.

grass in eggshells day 1

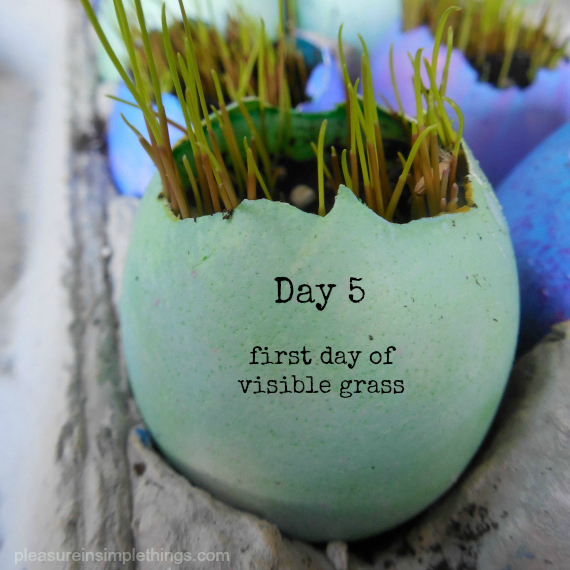
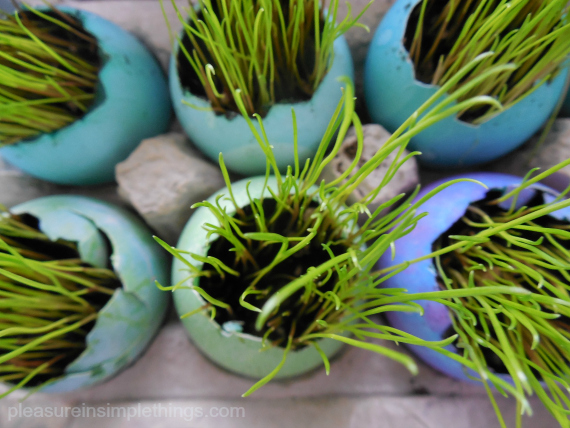
It is amazing how fast the grass will grow once it is sprouted.  The day grass begins to show, it will gain quite a bit of length.  The photos I am showing here were taken the first and second day the grass started to show.  The grass will be visible in less than a week, so plan accordingly.

day 6 grass in eggshells

Like any grass outside, this grass can be trimmed – just use scissors.

The same planting process can be used for any container…just be sure to protect any surfaces that are not waterproof…I line containers with a plastic sandwich bag if needed.

And that is it!  Very satisfying results in under a week!  What am I planning for these cuties?  I will share that with you in an upcoming post.  Meanwhile…give it a try!

Thank you so much for stopping by!

Remember to take pleasure in simple things, Jackie

Sharing at Craftberry BushCrafts a la ModeCoastal Charm and  We Call it Junkin.

15 comments

top 5 from philly flower show 2014

March 14, 2014

Philly Flower Show 2014

The Philadelphia Flower Show had an amazing theme this year…ARTiculture!

I was so thrilled to have the opportunity to attend the longest-running and largest indoor flower show!

With so much to see, the show was overwhelming. What makes the show special is in the way each attendee has a unique visit – each person sees the show from their own perspective…in this way, the show is a very personal experience.

As a way to share this personal experience with you on Friday field trip this week, I am sharing my personal top 5 from the Philadelphia Flower Show 2014.

THEME. I loved the art theme this year! ARTiculture! Working in collaboration with Philadelphia museums and the local art world made the Flower Show theme the best in years! The art influences were everywhere…but this display, in my estimation, integrated the theme perfectly!

Philly  Flower Show Display

Philly Flower Show canvas

Even food was treated as art in this amazing display:

food at Philly Flower Show

DEMONSTRATION. The lectures and demonstrations offered at the Flower Show are always a high point for me…learning anything new is always fun and I enjoy watching the variety of demonstrations offered on the show schedule.

This year, while attending an evening sponsored by Philadelphia Magazine, I met the talented artist Denise Fike. Denise provided guests with their own fashion portraits…what a fun demonstration and a cool way to incorporate the theme of the show!

Artist Denise Fike at Philly Flower Show

FRIENDS. One great aspect of an annual show is to visit people you have met year after year. I had three in particular that I really enjoyed catching up with in the retail section of the show.

One was Michelle Masters…she creates this

beautiful topiary art…

Michele Masters topiary art

I was happy to have the opportunity to stock up on my notecards and to purchase a few great gifts. ;)

Michele Masters

I also had the chance to spend some time with Jill Schwartz. As owner of Elements, she creates some really awesome jewelry…you may have seen some of her unique pieces in Anthropologie.

Elements by Jill Schwartz

Jill Schwartz necklace

If you are a flower lover and have not seen the products from Chive you are definitely missing something great! It is so inspiring to see all their products ‘up close and personal’ at the flower show each year and to say ‘hi’ to the friendly staff. I love using their products for big events and small parties…they have wonderful pieces to use as favors and as centerpieces.

Chive Flower vases

SCULPTURE. Each year, I am intrigued by some type of sculpture at the show. Of course, everyone attending was mesmerized by the entrance of the show, where masses of flowers were put together and displayed in a ‘frame.’ I found a couple more I enjoyed.

The paper flower sculptures in the hallways leading to the main rooms were awesome and gave any of us dappling in paper flower construction a whole new level of inspiration!

paper sculpture

paper sculpture

paper sculpture

paper sculpture

As a typography lover, I enjoyed this sculpture in the Convention Center hallway.

Typography sculpture

GARDEN INSPIRATION. Admittedly, much of my day was spent oohing and aahing the amazing varieties of flowers on display. It’s great to be inspired to find something to incorporate into my own garden. This year, that inspiration was the witch hazel. As a winter bloomer, I know it would be a lovely way to add some color to the snow next year! My own state (Connecticut) is the witch hazel capital and was the first to harvest and market it for its medicinal purposes…surprisingly, I have not already included it in my garden! This is how it looks in bloom.

witch hazel

That is my little glimpse into the 2014 Philadelphia Flower Show. Hope you enjoyed this week’s Friday field trip!

Thank you for stopping by. Have a wonderful weekend, Jackie

Sharing at Mona’s Picturesque, Crafts a la Mode, and The Tablescaper.

9 comments

a valentine delivery

February 14, 2014

flowers in a teapot

This year is my favorite Valentine’s Day.

For Friday field trip today I am sharing the reason why.

I don’t have any big dinner plans…I didn’t receive a romantic gift…

I was given the opportunity to create and deliver fresh flower arrangements to residents of senior living facilities in my hometown.

Flowers for nursing home

The arrangements were created by some of the members of my garden club.  With some basic flower choices from a local wholesaler and some miscellaneous containers collected by members, arrangements were lovingly put together one night this week.

The gals got together – clippers and gloves in hand – enjoying conversation and indulging in refreshments homemade by some of the members.

There is such a joy in giving Valentines to people that may not otherwise receive them, and although I did not personally know any of the residents receiving the gifts of flowers, strong connections to all the nursing facilities visited made the impact of the gesture very real to me.

Nursing home on Valentine's Day

If you belong to a garden club, consider adding this activity to your calendar for next year  :)…if you don’t belong to a garden club, think about inviting a group of friends over next February for a special Valentine activity.  Cute containers can be collected all year at yard sales or from flower arrangements you receive.  (Just remember to keep the arrangements small since there is usually limited space in resident rooms.  Also, call the residence in advance to find out about any special needs.)

quote about senior citizens

Thank you for stopping by.  Have a wonderful evening.  Here is my Valentine gift to you…the best  ‘set the mood’ songs of all time!  Enjoy!

Here in the Northeast we are again getting blanketed with snow.  Luckily, the Valentine’s Day arrangements have all been safely delivered. :)

Remember to take pleasure in simple things, Jackie

1 comment

goodbye garden

October 11, 2013

planting flowers in a white pumpkin

There is no denying that fall is Connecticut in beautiful.  But, to make way for the beauty of the changing leaves, the flowers vanish.

fall collage

This is the time of year when I have to take in my favorite bird bath to protect it from being broken by the first frost…For Friday field trip today, I thought we would go outside and take a look in the garden to see what survived the start of autumn…

lavendar

There is plenty of euphorbia…it seems to like this time of year…among it, one lone piece of lavender…

end of summer flowers

Not much else…some mums of course…and, a monster black-eyed susan vine.  I decided to create something with the few flowers I had left…to capture one last look at my garden…so I arranged them in one of my white pumpkins to bring into the house.

mums in a pumpkin

This is easy to do…if you want to create one, just cut off the top of a pumpkin, hollow out the inside, and add floral foam to arrange the flowers.  (You might remember last year I planted succulents.)

flowers in a pumpkin

I like my little reminder of what is left of summer in my garden.

fall quote

Thank you so much for stopping by.

Remember to take pleasure in simple things, Jackie

no comments

pine straw bale planting

October 4, 2013

pine straw bale

How many times have you seen hay bales and corn stalks used to decorate the outside of a home at this time of year?  Pretty standard, right?  When I saw a workshop scheduled at Terrain for planting pine straw bales, I was intrigued…what exactly would be done with the bales?

pansies for pine straw bale planting

It turned out that Terrain designer Angela actually planted right inside the bale!  I thought it was so cool that I wanted to share this week on Friday field trip.

flower for pine bale planting

A really great idea that can be tailored to any color scheme or taste.  Start with a pine straw bale and some plants that you like or that will coordinate with the outside colors of your house…

mums for pine bale planting

Using scissors or something sharp, cut out spots to plant inside the bales – adding soil as your planting medium.

pine straw bale planting

Looking down on a finished pine straw bale planting created by designer Angela at Terrain in Westport, Connecticut.

pine straw bale planting

After Angela planted the selection of plants she had chosen, she added some green moss around the plants and a few white pumpkins (I wonder if that was for my benefit lol!) to complete the look.

pine straw bale planting

Great idea, right?

pine straw bale planting

Just be sure to place your pine straw bale in it’s spot before you start planting…Angela had hers on a cart so she didn’t have to worry about lifting it after it was completed.  It looks great from every angle!  I love the contrast between the plants and the pine straw.

pine straw bale planting

I hope this will inspire you to try creating one of your own bale plantings…something a little different for your seasonal decor…thanks Angela!

pine straw bale planting

If you don’t have a Terrain near you, you can easily find pine straw bales at Home Depot.

pine straw bale planting

Thanks for stopping by!

Have a great weekend and remember to take pleasure in simple things, Jackie

Sharing at Craftberry Bush and The Tablescaper.

1 comment

monthly book giveaway for october!

October 1, 2013

backyard foraging

I am finding it hard to believe it is already October!  This means it is time to give away September’s book selection and to announce the giveaway for October!

Congratulations to Katherine over at the blog Creating Through Life for winning the September book giveaway!  Katherine will receive a signed copy of Cook Like a Rock Star by Anne Burrell.  You are going to love this book Katherine!  

Now for October’s giveaway selection!  This month’s book is a unique selection that goes along with the ‘outdoorsy’ woodland vibe I have been exploring lately…remember my holiday inspiration?

This book is about foraging in your backyard!  It is a really interesting selection…you will be amazed at the 65 familiar plants you didn’t know you could eat!  The book is called Backyard Foraging and I am giving away a copy signed by the author, Ellen Zachos.  Ms. Zachos, author of many books on gardening, leads foraging walks and teaches at the New York Botanical Garden, where she received her certification in Commercial Horticulture and Ethnobotany.

Leave a comment here or on facebook to win this month’s giveaway.  Good luck!

backyard foraging

Isn’t this a perfect selection as a tie-in to my inspiration board?

2013 woodland inspiration

Happy October!  Thank you so much for stopping by, Jackie  Instagram users, read on…

For you Instagram lovers, this month’s challenge is to share any white pumpkin sightings using hashtag #pleasuregram.

October Instagram Challenge

7 comments

« Previous Entries     Next Entries »