Subscribe to Pleasure in Simple Things via RSS ReaderFollow Pleasure in Simple Things on InstagramFollow @InSimpleThings on TwitterLike Pleasure In Simple Things on FacebookFollow Pleasure In Simple Things on PinterestEmail Jackie

embracing the season

August 27, 2013

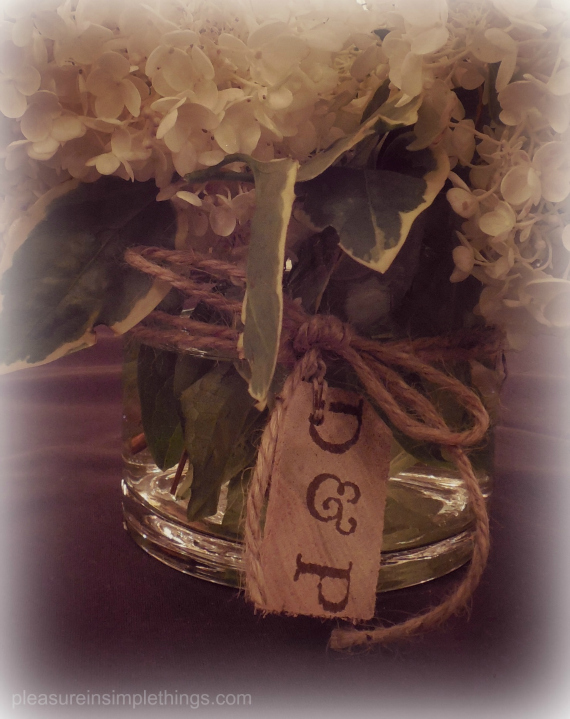
hydrangea centerpiece

The best flowers for decorating are the ones that embrace the season.  Here in New England, hydrangeas are a favorite.  While putting together some arrangements for a wedding rehearsal dinner, I knew this seasonal flower was the best choice.  Wanting to personalize the arrangement in some way, I decided to add the future bride and groom’s initials by creating monogrammed tie-ons crafted from natural elements.

stamping a monogram

I used some cocoa colored stamp pad ink and stamps to stamp on pieces of wood.  If you aren’t into cutting and sanding wood, you can easily find something similar at a craft store or on Etsy.

rubber stamping a monogram tie-on

rubber stamping a monogram tie-on

picking hydrangeas

An easy and wonderful way to help the spacing stay consistent when stamping is to simply use an elastic to hold the two letters and ampersand stamps together while applying the monogram.

Once your tie-ons are completed, you can save them to add to your completed centerpieces.  Harvest (or purchase) the seasonal favorites you plan on using. If you are truly embracing the season, it is best to use something that is presently in bloom…such a great way to evoke feelings of gardens and the season. :)

Hydrangeas are really great all on their own.  These were being placed on a chocolate colored table cloth so I just added a couple curly sticks as accents and tied twine around clear vases.  Perfect!

hydrangea centerpiece

rehearsal dinner hydrangeas

In appreciating every last bit of summer, try to find some of your own ways to embrace the season…bringing some of your garden (or a friend’s garden…thanks Phyllis!) indoors is certainly one great way!

hydrangea rehearsal dinner centerpiece

Enjoy your week.  Remember to take pleasure in simple things, Jackie

Sharing at Mona’s Picturesque and Craftberry Bush.

no comments

cotton candy grapes

August 23, 2013

photo of cotton candy grapes

To continue this week’s food trend theme, today we are taking a look at cotton candy grapes!  When I heard about cotton candy flavored grapes, I was a little skeptical.  Available since 2011, I hadn’t seen any in my little part of the world…until now.  For Friday field trip this week, I made a trip to Stew Leonard’s in Norwalk, Connecticut to pick up some of these grapes and perform a little taste test.

Without any genetic engineering or artificial flavors (as reported by NPR), apparently the flavor of these grapes is obtained by cross-breeding different varieties of grapes.  They look just like any other green seedless grape…

Can a grape taste like cotton candy?  You know what?  They do!  I think the flavor is something of a vanilla note.  The combination of that and a sugar content that is 12% higher than a regular table grape gives the fruit a sugar spun flavor reminiscent of cotton  candy.  It really is amazing.  I keep wondering if I would think they tasted like cotton candy if I didn’t know they were called cotton candy grapes…I think I would!

cotton candy grape skewer

Here I combined cotton candy grapes with pieces of angel food cake dipped in white chocolate and pink sugar.

A pound of the grapes at Stew Leonard’s here in Connecticut sell for $4.99.  From what I have read in Time and NPR, these grapes are grown in California, although no indication of this is present on the Stew Leonard’s packaging.

cotton candy martini garnish

A cotton candy grape rolled in sugar and chilled makes a great garnish for a cotton candy martini!

The grapes taste wonderful all on their own, but of course I did a little experimenting and want to show you some of my favorite ways to use the cotton candy grape!  You can use them in any way you would normally use a grape.  I am sure they would add a nice sweetness as a component in chicken salad or a nice accompaniment with wine and cheese.  But for me, I most enjoyed them as a part of something sweet (especially white chocolate)!  Take a look!

cotton candy grape dessert

An elegant but easy dessert with cotton candy grapes. The grapes are added to white chocolate instant pudding poured into an angel food dessert shell and drizzled with white chocolate.

cotton candy grape skewers

Cotton candy grapes taste wonderful on their own, but here I combined them with mini marshmallows on skewers for a fun dessert.

cotton candy grape salad

A great ‘salad’ for a sweet tooth. Combine cotton candy grapes with this sweet dressing and serve ice cold. For 1 lb. of grapes, combine 2 cups sour cream and 1 cup brown sugar and mix with grapes.

I hope you can find some cotton candy grapes near you and give them a try!  If you already have, I would love to hear your comments!  Have you tried any other food trends this summer?

Have a wonderful weekend and remember to take pleasure in simple things, Jackie

Sharing at The Tablescaper.

3 comments

food trend ramen burger

August 20, 2013

photo of a ramen burger

Always intrigued by new trends, I decided to make my son a ramen burger this week.  I am not a big burger eater and I knew he would be game to try a new creation.  The ramen burger seems to be getting a lot of attention.  Have you heard about it?  It is a burger that uses ramen as its bun.

recipe for a ramen burger

Here is my take on it:

I started with 1 lb. of ground beef and a package of ramen.  Since ramen has an Asian feel, I decided to add some Asian spices to the beef. 

Originally, I thought I would add the spice packet for the ramen noodles to the beef, but decided against it.  Instead, I added a couple splashes of teriyaki sauce, ½ tsp. ground ginger, some ground pepper, and half of a crushed clove of garlic.

To make the ramen bun, I first cooked the noodles according to directions, but discarded the spice packet.  Once the noodles were cooked, I rinsed them to cool them off and then drained the liquid.  I mixed in one egg and divided the mixture into two…this would make up the two parts of the bun.  I shaped each half into as close to a bun shape as I could and put them on a plate and into the refrigerator for a half hour…it made it a little easier to keep them in shape. 

how to create a ramen bun

I heated up a skillet with a little oil and fried up the two halves…it kind of reminded me of making hash browns.  Once they had a nice brown color on each side, I set my ‘bun’ pieces aside.

ramen bun

Using half of the ground beef (I made two burgers from the 1 lb. package);  I cooked a burger on my outdoor grill. (I added cheddar cheese, because my son happens to prefer cheese burgers.) 

Once the burger was cooked the way I wanted it, I put it on the ramen ‘bun’ and garnished it with chopped scallions, a splash of soy sauce, and a sprinkling of sesame seeds.

According to my son, it was a winner. :)

the trendy ramen burger

I don’t know if the ramen burger will become a lasting trend, but I feel confident in creating one…my version anyway!  

Stop back on Friday when we will continue the food trend theme by seeking out (and finding!) one of the hottest (and most unusual?) food items! 

Thank you so much for stopping by!  Remember to take pleasure in simple things, Jackie

Sharing at Craftberry Bush.

no comments

summer napkin fun

August 6, 2013

DIY watermelon motif napkins

It is that time of year…the time when we all wonder how the summer could be flying by so fast…and a time to try and pack as much summer fun into the remaining days as possible!

Today, I want to show you some DIY ways that I am making my summer entertaining more fun.  With meals that can include lobster, corn on the cob, and watermelon; summer fun can be messy!  I love to use dish towels as an inexpensive and practical napkin for summer meals.  IKEA is a great spot to pick up some dish towels (for less than $1. a piece!) that can easily be embellished to fit a summer party theme.

In a previous post, I made wrapping paper using an anchor shaped sponge.  Now, I am using it to add an anchor motif to a set of dish towels that I will use as napkins for a summer meal.  These are easy to create by simply dipping a patterned sponge into acrylic paint and applying to a dish towel.  Print the pattern a couple of times on a piece of scrap paper before painting the fabric…this removes some of the paint from the sponge and creates more of a ‘worn’ look to the anchor when it is painted; rather than a solid pattern of paint.

DIY anchor motif napkins

Be sure to put a piece of cardboard under the spot where you paint your design to protect your work table.  After letting the paint dry for 24 hours, use a hot iron or your dryer to set the paint.  You may want to use a paint specifically for fabric…I use acrylic paint that I already have – it has always worked well for me.  I find washing, drying, and ironing the fabric before painting it gives the best results.

DIY anchor motif napkins

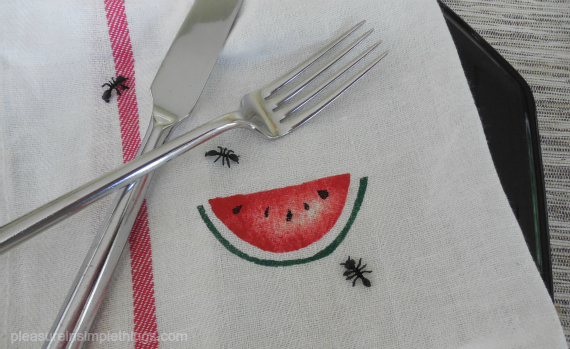
Another way to add a motif to a dish towel is by stenciling.  I always make my own stencil from a piece of cardboard or baking parchment paper.  One of my favorite designs for summer is a watermelon…I love the graphic quality and the colors.  Another great summer napkin!

DIY watermelon motif napkins

I can never resist adding a playful scattering of plastic ants when I am creating a watermelon designed item. :)

DIY watermelon motif napkins

For something a little more formal than a dish towel, a linen napkin with a napkin ring is a great summer entertaining choice.  Like the dish towels, these napkins were purchased at IKEA.  I created a napkin ring by using a piece of rope and some Plasti Dip.  In the same way that I used Plasti Dip to create a set of seafood forks, I used it on some rope to create a really great napkin ring!  You can purchase a jump rope from the dollar store or use any scrap piece of rope you have hanging around the garage to make your napkin rings.  After tying a knot in each napkin ring, I just dipped it in some Plasti Dip that I had tinted pink.  I love the way pale pink looks with linen and Plasti Dip is easy to tint any color…I dipped each napkin ring into the Plasti Dip three times (waiting between coats as listed on the instructions) to achieve this look.

DIY Plasti Dip napkin rings

I decided to coordinate the napkins by adding some painted pink polka dots along the hem.

Dotted linen napkin & Plast Dip napkin ring

After looking around the house to find something to create the size polka dot I wanted, I decided a carrot was perfect!  I mixed the color pink paint I wanted and used a freshly sliced carrot to paint the polka dots along the hem of each napkin.

Painting polka dots on napkins

I hope you enjoyed these summer napkins ideas and are inspired to create some fun summer napkins of your own!

DIY napkins from dishtowels

 Thanks so much for stopping by!  Remember to take pleasure in simple things, Jackie

Sharing at City Farmhouse and Craftberry Bush.

5 comments

summer chillin’

July 26, 2013

Lil' Pop Shop Chocolate Salted Caramel Brownie

I adore frozen treats…Popsicles, freeze pops, snow cones…I love them all! A simple pleasure is definitely an icy pop on a hot summer day! Today’s Friday field trip is to Lil’ Pop Shop…a ‘cool’ store in Philadelphia that creates ice pops from natural ingredients.

The shop also has a food truck, and because I have a dream of creating and running a food truck myself someday, I always enjoying checking out food trucks that sell food I would be proud to serve myself. The Lil’ Pop Shop in Philadelphia has one of these trucks. Hand-crafted in small batches using seasonal ingredients, the ice pops are sold in the shop and from the truck that travels the Philly streets.

chocolate brownie ice pop

A Chocolate Salted Caramel Brownie ice pop from Lil’ Pop Shop in Philadelphia.

Lil’ Pop Shop owner Jeanne Chang, trained as a pastry chef at the Culinary Institute of America, comes up with inventive ice pop flavor combinations that truly appeal to me.

Some of the flavors?

To name a few… Red Hot Mango & Chile Pepper, Earl Grey with Vanilla Bean & Black Pepper, Chocolate with Salted Caramel Brownie, Raspberry Lemonade, Pineapple Basil, Vietnamese Ice Coffee, Green Tea with Mochi, and Goat Cheese with Black Raspberries & Honey.

On my last visit, Creamy Sweet & Salty Summer Corn was just added as a seasonal selection.

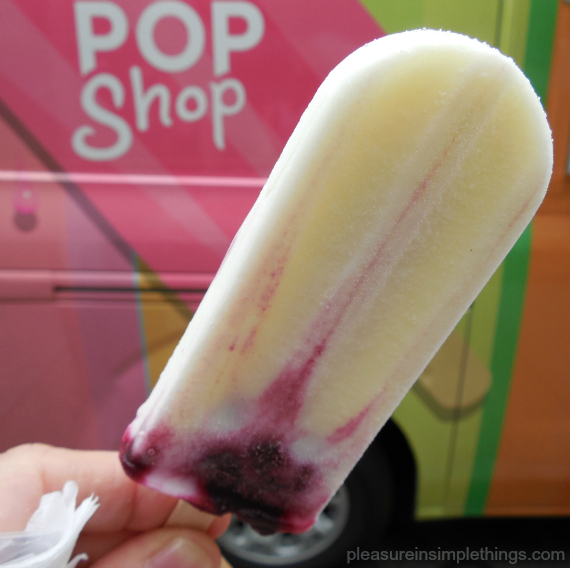
raspberry ice pop

Goat Cheese, Black Raspberry & Honey Ice Pop from Lil’ Pop

Shop in Philadelphia.

Would you like to try making your own unique flavored ice pops? You can start with this recipe, courtesy of Jeanne Chang at the Lil’ Pop Shop:

Avocado Coconut Pops

  • ½ cup coconut milk
  • ¾ cup water
  • ½ cup sugar
  • 2 small, ripe avocados
  • 2 Tablespoons lemon juice
  • Pinch of salt

Bring water and sugar to a boil in small saucepan until sugar is dissolved. Cool to room temperature. Cut and remove pits from avocados. Combine sugar-water mixture, coconut milk, lemon juice, salt and avocados in blender or food processor and puree until smooth.

Use mixture in your preferred molds. Freeze until solid. To unmold pops, dip the mold into warm water for a few seconds. Each recipe makes 8 to 10 pops, depending on your mold.

Lil' Pop Shop Food Truck in Philly

Try creating some unique flavor combinations of your own this summer! Don’t be restricted by traditional flavors…I am planning on experimenting with some farmer’s market purchases! Do you know what Popsicle lists as their best-selling flavor? Cherry. Sounds pretty boring to me. ;)

Thanks for visiting! Have a wonderful weekend!

Remember to take pleasure in simple things, Jackie

Sharing at The Tablescaper.

1 comment

pastry bites two ways

July 23, 2013

lemon raspberry pastry bites

I love bite-sized desserts.  People feel less guilty about eating a wonderful dessert when it is small. After all, there are less calories in a lot of little desserts, right?  Plus, an individual size is so pretty and easy to serve.

I am going to show you how easy it is to make these pastry bites two ways…lemon raspberry and cannoli.  Both use the same individual sized pastry shell.

Because the individual shells for these desserts can be made ahead on the morning you will be using them, it is a great dessert for serving a crowd. 

 lemon raspberry bites

For lemon raspberry pastry bites, the shells are filled with lemon curd and topped with a raspberry.  Lemon curd is really tart and gives a great big zing to this little bite.

There is some really great quality lemon curd that you can buy premade…often it is less expensive than buying the ingredients to make it yourself.  Trader Joe’s has a good one (since you only use 1 tsp. per bite, you can make 90 pieces with the one 10.5 oz. jar). If you would rather make it yourself, Ina Garten’s recipe is my favorite.

Just before serving time, carefully fill each shell with lemon curd, top with a raspberry, garnish with a little piece of mint, and dust with confectioner’s sugar.

 cannoli pastry bites

Cannoli pastry bites are filled with cannoli cream.  I love cannoli cream, but I am not a big fan of cannoli shells.  The reason could be because I am not a big fan of fried foods.  In any case, I much prefer cannoli cream with puff pastry and that is the why I decided to create a dessert with that combination. 

Use your favorite cannoli filling recipe.  Mine is by Alex Guaranschelli.  Click here for the recipe. 

Fill the shells just before serving.  Garnish with mini chocolate chips and drizzle with melted chocolate if desired.  Dust with confectioner’s sugar. 

If you use Alex’s recipe, it makes a lot.  Because you only need 1 tsp. for each pastry bite, you will have plenty left over. You can reduce the recipe, or use the extra, as I do, for deconstructed cannolis as a special treat for your family or guests.  I get the broken cannoli shells from an Italian bakery and serve the delicious cannoli filling with a garnish of mini chocolate chips…a sweet version of a chip & dip. :)

deconstructed cannolis

“Deconstructed’ cannolis are a great way to use leftover cannoli filling. Serve a bowl of cannoli cream with broken cannoli shells. Garnish with some mini chocolate chips. A sweet & stylish ‘chip & dip!’

Making the Shells

To make individual shells, use pastry sheets purchased at the grocery store.  I have used phyllo dough many times in my life…I can’t even count the number of times I have made baklava…but it is a little tricky if you haven’t worked with it.  I am going to give you instructions using the store bought sheets…I did a test before I put this post together and you can get a great result using the store bought sheets.  They are called puff pastry, pastry dough sheets and are located in the freezer section of your grocery store.  The box is 17.65 oz. and contains two sheets of pastry dough. 

The key to making a successful shell is in the cutting.  The dough needs to be really, really cold when you cut the shape so that the edges don’t seal.  Sealing the edges would prevent the pastry dough from rising.  This is the reason you should not wait for the dough to defrost, cut it as soon as you are able.  For the same reason, do not add an egg wash or brush with milk…if any of the wash gets onto the sides of the shell, the edges will seal. 

making individual pastry shells

You will need two different sized cookie cutters…I used one that measures 1 3/8” in diameter and one that is 2 3/8“ diameter.  I bought a set of graduated cookie cutters in a flower shape at Home Goods…5 cutters in various sizes came in the package for a price of $2.99.

Using the larger cutter, cut the shape from the dough.  Put it onto a parchment lined cookie sheet.  Using the smaller cutter, cut a center in the first shape, but do not cut all the way through…pierce the dough, but do not make a cut.  This will create the hole for your filling.  Each sheet will make 12 pieces if you use a similar sized cookie cutter as mine, so the box of two sheets will make 24.

Bake on parchment paper at 400 degrees for 10 to 13 minutes. 

individual pastry shell

After the shells are completely cool, use the point of a knife to remove the inner shape.  You can push it down if you are having trouble removing it.  After you have done this to each shell, they can be saved for later to fill.

lemon raspberry pastry bite

You can have your filling ready ahead of time and can make the shells in the morning.  All you need to do is to assemble when ready to serve!  Now that you know how to make the individual pastry shells, you can come up with your own versions using your favorite fillings!  Enjoy!

Thank you so much for visiting!  Remember to take pleasure in simple things, Jackie

Sharing at The Shabby Nest and Craftberry Bush.

1 comment

a special garden tour

July 19, 2013

garden tour photo

When I asked my friends Phyllis & John to agree to have their home included on a garden tour; they were hesitant.  In my mind, they were the perfect couple to ask…their yard was certainly my favorite.. Geez, I would like to retire to their yard!  They live on a golf course, have a beautiful built-in pool, a vegetable and herb garden, a potting shed, and gorgeous flowers and plants everywhere…what more could you want? 

potting shed on the garden tour

Anyway, once I explained that the tour was a scholarship benefit, they readily agreed to participate.  Today for Friday field trip, we are visiting the breathtaking grounds surrounding their 1852 home in Fairfield County, Connecticut on the day of the garden tour.  

view overlooking golf course

It was very hard to edit this post since there are so many facets to this yard, designed and planted solely by the homeowners.  Such a fun yard to explore…Phyllis has created beautiful vignettes in every nook and cranny.   

vegetable garden on garden tour

John’s ‘baby’ is the vegetable garden.  A retired giant pumpkin planter (yup…he once grew a prize winner that weighed 625 lbs!), he now concentrates on vegetables and herbs.  In addition to the planting, he built the stone walls and fences that so beautifully surround the space.  Yes, that is an outhouse in the back of the garden…original to the property.  John also crafted the handsome birdhouse that stands in the front section of the property.

vegetable garden on the garden tour

Friday field trip garden tour

Friday field trip garden tour

Friday field trip garden tour

What do you serve for refreshments on a garden tour?  I really wanted to create a menu that was true to the house…concentrating on fresh vegetables, herbs, and flowers.  I spent quite a bit of time on it and finally decided on rosemary sea salt shortbreads, rosewater meringues, fresh tomatoes with basil and marinated mozzarella, watermelon with fresh ricotta drizzled with extra virgin olive oil and finished with salt, pepper and mint, and lemon raspberry tartlets.  Beverages served were cucumber water with nasturtium and pansy ice cubes and home made iced tea lightly sweetened with simple syrup infused with lemon and mint.

Friday field trip garden tour food

Friday field trip garden tour

Friday field trip garden tour pool

Friday field trip garden tour

Friday field trip garden tour

I hope you enjoyed our Friday field trip garden tour!  Thank you John and Phyllis…your yard is truly a labor of love and it shows!  Thanks also to the beautiful and talented gals – Emma and Sara.;)

If you haven’t already, please ‘like’ my facebook page to see additional photos.  You can also follow me on Instagram and Pinterest.

Friday field trip garden tour front door

Have a wonderful weekend and remember to take pleasure in simple things, Jackie

Sharing at Mona’s Picturesque, Little Red House, and Craftberry Bush.

6 comments

you scream, i scream

July 12, 2013

ice cream

We have been making a lot of homemade ice cream at my house this year with our old hand crank ice cream maker…the last batch was my favorite…Turkish cherries and dark chocolate in a country vanilla base.  Yum!  So, I haven’t really been motivated to visit my favorite ice cream shop.  But, this week I did end up going for ice cream, just not to my usual spot.

Ice cream in Newtown

One of my friends had never visited The Creamery at Ferris Acres Farm in Newtown, so I took it upon myself to introduce her to The Creamery and I am sharing the visit with you on today’s Friday field trip .

cow

Ferris Acres is the last working diary farm in Fairfield County and it certainly is a beautiful location to enjoy some good quality ice cream.   Something about a farm and cows just seems to make the ice cream taste all that much better.  And, flavors?  Yeah, they got ’em…the flavors in these photos are not even the complete list of offerings…

Ice cream flavors at Ferris Farm in Newtown

I really enjoy a creative name for an ice cream flavor…it’s almost as good as a great nail polish color name or paint color name.  They have a few good ones, don’t you think?  I had a scoop of coconut chocolate chunk…not one of the more creative names on the list, but a delicious ice cream!

ferris farm ice cream flavors

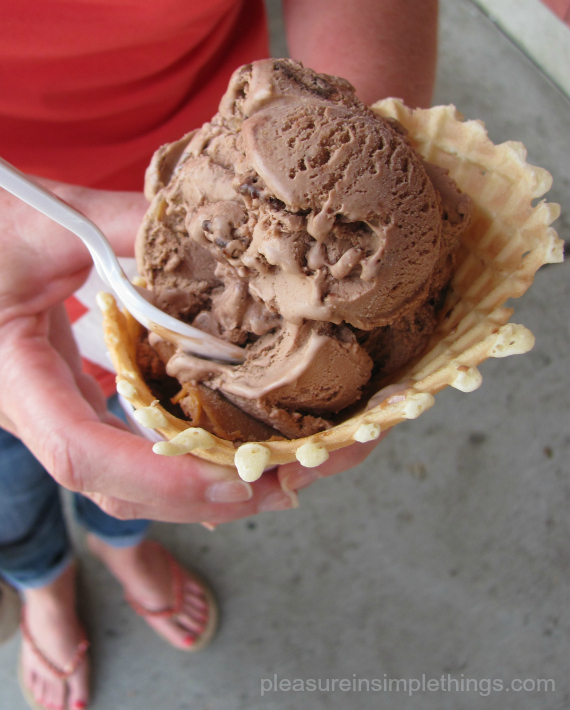
I also had a scoop of Salty Cow…delicious!

ferris farm ice cream

As you can see, my friend certainly made her first visit count…waffle cone and all!  I have a strong feeling she will be back for a visit!

Ferris Farm in Newtown, CT


eating ice cream in Newtown

How could I resist snapping a photo of this happy customer..yes, life is good with an ice cream cone in hand on a hot day!

ice cream at Ferris Farm

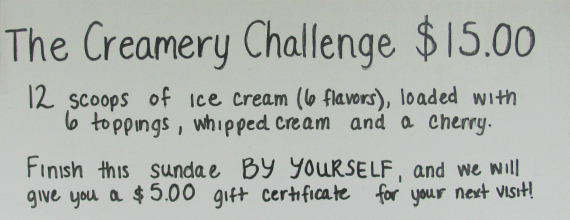
Can’t imagine why this customer didn’t convince his parents to take the “The Creamery Challenge!”

Ferris Farm Ice cream challenge

Hope you enjoyed our visit to Ferris Acres Creamery in Newtown, Connecticut…if you find yourself in the neighborhood, be sure to stop by Sugar Street!  Yes, that is the name of the street!

Ferris Farm sign

Have a really great weekend and remember to take pleasure in simple things, Jackie

Sharing at The Tablescaper.

7 comments

seafood swag

July 2, 2013

diy seafood forks

You may already know that I am a big Plasti Dip fan from my wooden spoon tutorial.  Today, I am going to show you how I used Plasti Dip to give an old set of seafood forks new life by putting a colorful plastic coating on the handles. 

'before' seafood forks for Plasti DipI was lucky enough to be the recipient of an old set of seafood forks from my friend Terry…thanks again T ;)  If you don’t have a friend like mine to give you good stuff to recycle, you can head to a thrift store.  The forks don’t need to match since the color you choose for the Plasti Dip will tie the set together.

I wanted my seafood fork set for eating shellfish on the beach and decided on royal blue for my Plasti Dip color.  Following the directions on the ‘Make Your Own Color Kit’, I used blue and a little bit of black to mix the color I wanted. 

eating shellfish at the beach

DIY seafood forks

Plasti Dip is very easy to use.  You can follow my spoon tutorial if you need some instruction.  In the same way that I dipped the wooden spoons, I dipped each seafood fork into the Plasti Dip.  Easy! 

revamped seafood forks

After allowing for drying time, my forks are ready to use!

seafood fork DIY

Now I have a colorful supply of seafood forks that I love!  Mussels anyone?

shellfish on the sand

Thanks so much for visiting!

Remember to take pleasure in simple things, Jackie  Be sure to ‘like’ my facebook page and follow on Instagram to share more summer photos!

Sharing at Coastal Charm.

6 comments

beachy bridal shower

June 28, 2013

beach themed decorations

A visit to a bridal shower is today’s Friday field trip.  I am sharing some of the decorations I created for a beach themed bridal shower, hoping it may provide inspiration for some of your own party planning.

beach theme invitations

The first impression for any party is created by the invitation.  So, for this party we needed something really ‘beachy.’  What better than a message in a bottle for an invite?!  I created the message on my home computer and printed out copies on a color printer.  The messages were rolled and inserted into glass bottles and mailed off in boxes the size of the bottles (with a little extra room to protect them with some bubble wrap).

Not only does the invitation create the mood, but gives guests the opportunity to wrap their gifts in the theme and also to dress the part!

beach themed bridal shower

Welcoming guests into the party also creates a great opportunity to set the mood.  I used a skim board chalkboard with the future couple’s initials at the entryway to welcome guests to the party.  And, don’t forget that summertime playlist…Beach Boys and Jimmy Buffett need to be included!

The labels for the takeaway favors were also created on a home computer and printed on label sheets using a color printer.  Inside each ‘beach pail’ were some realistic looking candy rocks, salt water taffy, and homemade decorated sugar cookies cut in the shapes of shells and fish.

bloody mary at a bridal shower

Beach themed wines or frozen drinks are great for a beach themed party, but for a bridal shower, including the future bride’s favorite drink is a must!  All the fixings for this guest of honor’s favorite were included at the drink bar.

beach themed bridal shower decorations

This shower was held at the future groom’s parent’s house.  ‘Beachy’ photos of the future groom as a child were collected and printed out in black and white on a home copier.  I ripped the photos rather than cutting them to create a ragged edge.  The photos were used in old jars and placed down the center of the tables.

beach themed bridal shower decorations

I used a burlap runner down each table and decorated with old jars, lanterns, twine, raffia, shells, sea glass, driftwood, and rocks to set the mood.

beach themed bridal shower decorations

Some of the jars were filled with sea glass and water to fill with daisies…always a great symbol of summer.

daisies at a beach themed bridal shower

The same decor was carried through to decorate the bathrooms and the area where everyone gathered to watch the future bride open gifts – where a large white washed anchor set the tone.

beach themed bridal shower

“Beachyness” was included in every detail.  The dessert bar included cupcakes topped with graham cracker crumb ‘sand’ and garnished with variegated chocolate shells, seahorses, and starfish that were made by the future groom’s mom.

beach themed bridal shower decorations

Those are some of the decorations…I didn’t have enough space to show you every detail, but feel free to send me an email if you are having a beach themed party of your own and I would be happy to give you some more ‘beachy’ ideas ;)  I hope you enjoyed today’s Friday field trip to check out the decorations at a beach themed bridal shower.

beach themed bridal shower decorations

Thank you so much for visiting.  Please be sure to click ‘like’ on my facebook page so you won’t miss any of my beach photos this summer.  Have a wonderful weekend!!

Sending saltwater kisses, Jackie

Sharing at The Shabby Nest, Craftberry Bush, and The Tablescaper.

6 comments

« Previous Entries     Next Entries »