Subscribe to Pleasure in Simple Things via RSS ReaderFollow Pleasure in Simple Things on InstagramFollow @InSimpleThings on TwitterLike Pleasure In Simple Things on FacebookFollow Pleasure In Simple Things on PinterestEmail Jackie

embracing the season

August 27, 2013

hydrangea centerpiece

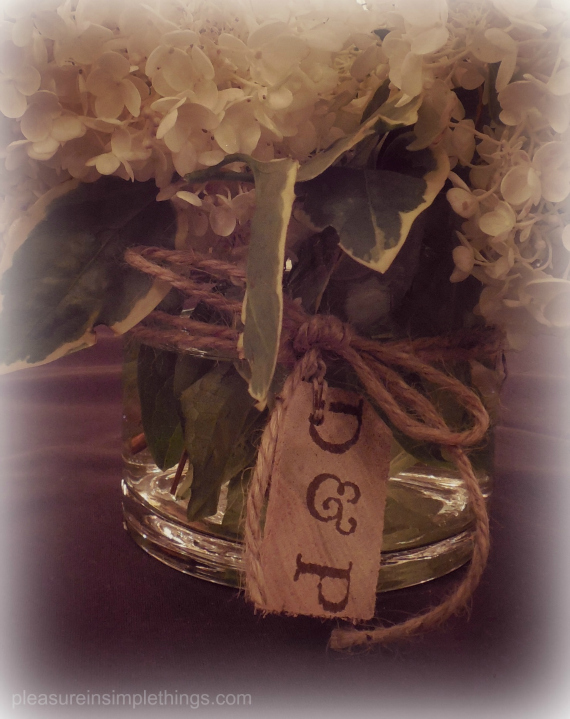
The best flowers for decorating are the ones that embrace the season.  Here in New England, hydrangeas are a favorite.  While putting together some arrangements for a wedding rehearsal dinner, I knew this seasonal flower was the best choice.  Wanting to personalize the arrangement in some way, I decided to add the future bride and groom’s initials by creating monogrammed tie-ons crafted from natural elements.

stamping a monogram

I used some cocoa colored stamp pad ink and stamps to stamp on pieces of wood.  If you aren’t into cutting and sanding wood, you can easily find something similar at a craft store or on Etsy.

rubber stamping a monogram tie-on

rubber stamping a monogram tie-on

picking hydrangeas

An easy and wonderful way to help the spacing stay consistent when stamping is to simply use an elastic to hold the two letters and ampersand stamps together while applying the monogram.

Once your tie-ons are completed, you can save them to add to your completed centerpieces.  Harvest (or purchase) the seasonal favorites you plan on using. If you are truly embracing the season, it is best to use something that is presently in bloom…such a great way to evoke feelings of gardens and the season. :)

Hydrangeas are really great all on their own.  These were being placed on a chocolate colored table cloth so I just added a couple curly sticks as accents and tied twine around clear vases.  Perfect!

hydrangea centerpiece

rehearsal dinner hydrangeas

In appreciating every last bit of summer, try to find some of your own ways to embrace the season…bringing some of your garden (or a friend’s garden…thanks Phyllis!) indoors is certainly one great way!

hydrangea rehearsal dinner centerpiece

Enjoy your week.  Remember to take pleasure in simple things, Jackie

Sharing at Mona’s Picturesque and Craftberry Bush.

no comments

its always half full

August 13, 2013

diy beach sign

Talk about pleasure in simple things…I can‘t believe how excited I got recently about a piece of garbage that ended up in my yard! 

When pieces of a neighbor’s rickety fence started falling into my backyard, I got a little irritated…until…one day, I went out to cut the lawn and found the most beautiful piece of old fence out in the grass.  It was one of the pickets from the old fence and it looked like a wonderful old weathered piece of driftwood.

photo of the shore

Such a simple thing…but repurposing that piece of fence gave me so much pleasure :)

I put that lovely piece of fence into my freezer for a few days…I always figure if there are any bugs or insect eggs inside the wood, they would not be able to survive the freezer!  Hope that is a correct assumption! 

beach sign from a fence picket

When I was sufficiently satisfied the piece of fence was bug free, I wrote “beach” on it with a white Sharpie oil based paint pen.  I had planned on sanding it after that to make the writing look worn.  But, as it turned out, the pen soaked into the wood in spots and created something of a worn look all on its own.

I love my beach sign!

I think I was meant to learn a lesson from that old piece of fence.

John Wooden quote

Thanks so much for stopping by!  Remember to take pleasure in simple things, Jackie

1 comment

summer napkin fun

August 6, 2013

DIY watermelon motif napkins

It is that time of year…the time when we all wonder how the summer could be flying by so fast…and a time to try and pack as much summer fun into the remaining days as possible!

Today, I want to show you some DIY ways that I am making my summer entertaining more fun.  With meals that can include lobster, corn on the cob, and watermelon; summer fun can be messy!  I love to use dish towels as an inexpensive and practical napkin for summer meals.  IKEA is a great spot to pick up some dish towels (for less than $1. a piece!) that can easily be embellished to fit a summer party theme.

In a previous post, I made wrapping paper using an anchor shaped sponge.  Now, I am using it to add an anchor motif to a set of dish towels that I will use as napkins for a summer meal.  These are easy to create by simply dipping a patterned sponge into acrylic paint and applying to a dish towel.  Print the pattern a couple of times on a piece of scrap paper before painting the fabric…this removes some of the paint from the sponge and creates more of a ‘worn’ look to the anchor when it is painted; rather than a solid pattern of paint.

DIY anchor motif napkins

Be sure to put a piece of cardboard under the spot where you paint your design to protect your work table.  After letting the paint dry for 24 hours, use a hot iron or your dryer to set the paint.  You may want to use a paint specifically for fabric…I use acrylic paint that I already have – it has always worked well for me.  I find washing, drying, and ironing the fabric before painting it gives the best results.

DIY anchor motif napkins

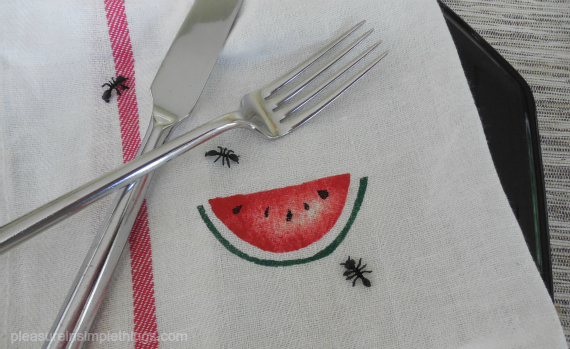
Another way to add a motif to a dish towel is by stenciling.  I always make my own stencil from a piece of cardboard or baking parchment paper.  One of my favorite designs for summer is a watermelon…I love the graphic quality and the colors.  Another great summer napkin!

DIY watermelon motif napkins

I can never resist adding a playful scattering of plastic ants when I am creating a watermelon designed item. :)

DIY watermelon motif napkins

For something a little more formal than a dish towel, a linen napkin with a napkin ring is a great summer entertaining choice.  Like the dish towels, these napkins were purchased at IKEA.  I created a napkin ring by using a piece of rope and some Plasti Dip.  In the same way that I used Plasti Dip to create a set of seafood forks, I used it on some rope to create a really great napkin ring!  You can purchase a jump rope from the dollar store or use any scrap piece of rope you have hanging around the garage to make your napkin rings.  After tying a knot in each napkin ring, I just dipped it in some Plasti Dip that I had tinted pink.  I love the way pale pink looks with linen and Plasti Dip is easy to tint any color…I dipped each napkin ring into the Plasti Dip three times (waiting between coats as listed on the instructions) to achieve this look.

DIY Plasti Dip napkin rings

I decided to coordinate the napkins by adding some painted pink polka dots along the hem.

Dotted linen napkin & Plast Dip napkin ring

After looking around the house to find something to create the size polka dot I wanted, I decided a carrot was perfect!  I mixed the color pink paint I wanted and used a freshly sliced carrot to paint the polka dots along the hem of each napkin.

Painting polka dots on napkins

I hope you enjoyed these summer napkins ideas and are inspired to create some fun summer napkins of your own!

DIY napkins from dishtowels

 Thanks so much for stopping by!  Remember to take pleasure in simple things, Jackie

Sharing at City Farmhouse and Craftberry Bush.

5 comments

diy nautical necklace

July 30, 2013

diy nautical necklace

I have never made any jewelry.  When I see some of the beautiful beads in the craft store, I am tempted to make something.  The thing is, it seems when you add the price of all the items needed to make a piece, it can be much less expensive to buy something already made!  Some day I plan on experimenting with jewelry making with my sea glass collection, but today I want to tell you about a necklace I created for less than $5!

A while back, I ripped a photo of a necklace I really liked from a magazine…it had a nautical feel to it since it was made from rope.  But, at $215., it was way beyond my accessories budget…actually, I don’t even have an accessories budget!  So, $215. more than my budget!

diy necklace collage

I was able to create the same look as the necklace in the magazine with a piece of rope from the marine store (less than $2.) and some Plasti Dip I had left over from my seafood fork project.  I got a little fancy and bought a bracelet clasp and some wire to use as an attachment and the total for supplies still came out under $5.

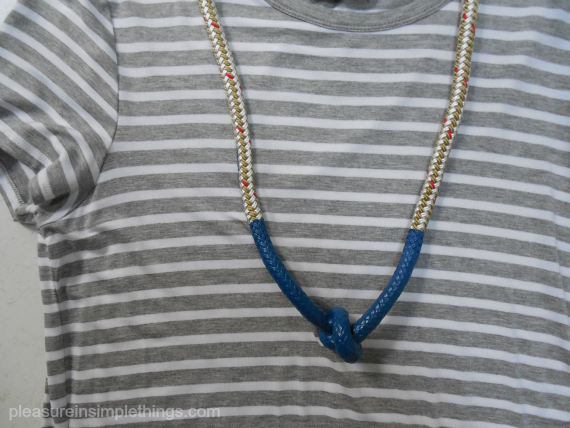
The best part is that I love the necklace!  I thought I would wear it with t-shirts, but I really like the way it looks with my gray and white striped long t-shirt dress…so perfect!  All I did was to knot the rope and dip it in Plasti Dip.  The necklace I saw had a red accent, but I decided to use blue since I had some blue Plasti Dip on hand.  I liked the look of two coats of Plasti Dip, but you can easily add more coats if you want the colored area to have a thicker look.

diy necklace

When you buy the rope at the marine store, it is best to get the exact length you want, because they will burn the edges for you to prevent it from unraveling.  There are plenty of different rope options to choose from and the cost is calculated per yard.  I thought the craft store would have some type of clamp to use as a fastener, but I couldn’t find one large enough to fit the diameter of the rope so I crafted a fastener out of a bracelet fastener.  Maybe a jewelry supply store would have something different or, another fastening option would be to tie or fuse the two ends together – slipping the necklace over your head.

So, that is a simple way to create a nautical feel necklace!  I think knotted napkin rings dipped in Plasti Dip would be another great variation on this project.  Plasti Dip can be tinted any color, so there are plenty of color options…have fun with it!

Thanks so much for stopping by.  Remember to take pleasure in simple things, Jackie

Sharing at Elizabeth & Co. and Silver Pennies.

1 comment

lovely apron upgrade

July 16, 2013

diy apron

diy apron

Today I wanted to share an easy way to upgrade a standard chef’s apron into something lovely. I was recently involved with organizing a charity garden event and I really wanted the hostesses to have coordinating aprons. The gardens were so amazing and we had some very tasty food prepared with a flower and herb theme…I needed aprons that were as lovely as the rest of the event.

Not wanting to spend much money, I decided to use a few embellishments to make a white chef’s apron contribute to our theme. If you know someone in the restaurant business, you may be able to score an apron or two at no cost. If not, you can purchase one at a restaurant supply store for $5 or $6.

The first thing I did was to add a flower photo onto the top of the apron front. This was easy to do with T-Shirt transfer paper. You can pick this up at any store that sells office supplies. I found my package at Target near the copy paper. I bought Avery brand Ink Jet T-Shirt Transfers. Six 8 1/2″ x 11″ sheets come in the container. Since I was printing a 5″ x 7″ photo, I was able to print two photos on one sheet. I chose a photo I had taken last spring of my lilly of the valley.

pretty napkin basket

I printed the page using a color printer and ironed the photos onto the aprons, carefully following the directions on the transfer package. I decided to add a little sparkle around the edges of the photo by applying some silver sparkle paint with a cotton swab.

pocket on diy apron

Then, I added a couple pockets by sewing on a rectangular shaped piece of fabric I found on the clearance table at the fabric store. First I sewed a hem on one of the long sides of the fabric – this would be the top of the pocket. Then, I attached the piece of fabric by sewing the two sides and the bottom

onto the apron. Sewing vertically down the middle of the pocket created the two pockets.

Rosemary sea salt shortbreads – one of the treats I made to serve at the Garden Tour.

And that was it! Using a photo transfer sheet and some scrap fabric that coordinated with my photo, I was able to upgrade my standard white apron into something garden party worthy!

diy apron

You can do the same for your next event!

Hope you enjoyed today’s post on upgrading an apron. I look forward to sharing more about the garden event in future posts.

Thanks for visiting! Remember to take pleasure in simple things, Jackie

Sharing at A Pinch of Joy and Timewashed.

3 comments

beachy shower gift

July 9, 2013

Mr. & Mrs. beach towels

Need a gift idea for a bridal shower?

On previous posts we shared creating a beach themed gift wrap, beach theme decorations, and a beach themed shell tote bag tie-on.Since I have gotten some emails asking what was actually inside the tote bag gift, today I am sharing a beach themed gift idea for a bridal shower.

This year, my go-to bridal shower gift was his and her beach towels.A nice beach towel is a necessity for all beach lovers and a natural gift choice for a summer shower!I chose some really large, bright striped, heavyweight matching beach towels and had them monogrammed ‘MR.’ and ‘MRS.’ So cute!A great item to pack for a honeymoon. :)

beachy gift idea

(I love monogrammed towels – I always had my kids’ towels monogrammed with their names to hang in the ‘kids’ bathroom; avoiding any question of towel ownership!Even a college student can appreciate a way to help safeguard a towel that may be left in a laundry or shower room.Note:Monogramming a small child’s name on a beach towel for use on a public beach is not recommended! )

beachy bridal shower gift

You can package the towels in a beach tote or basket.Try to include items special or unique to the couple…maybe something symbolic to where they met or a special interest.The couple receiving this gift tote were wine lovers… so a bottle of wine, acrylic wine glasses, and cocktail napkins were included in the tote.Of course, the bottle of wine tucked inside needed to fit the theme!Also, a holiday ornament inscribed with the town where the couple met was tucked into one of the glasses.

beachy bridal shower gift

A gift tag attached to the pull of the tote was made using an old beach photo of the groom’s mom that was photocopied onto a piece of cardstock.

DIY gift tag

Personalizing your gift for the couple is the fun part!If you don’t know the couple very well, you can usually get a good sense of their interests and color preferences by reviewing their gift registries.

I hope this bridal shower gift idea will inspire you to create a gift tote to give to a special couple in your life.

Thanks for visiting, Jackie

Sharing at The Shabby Nest and Craftberry Bush.

no comments

making candles in the sand

July 5, 2013

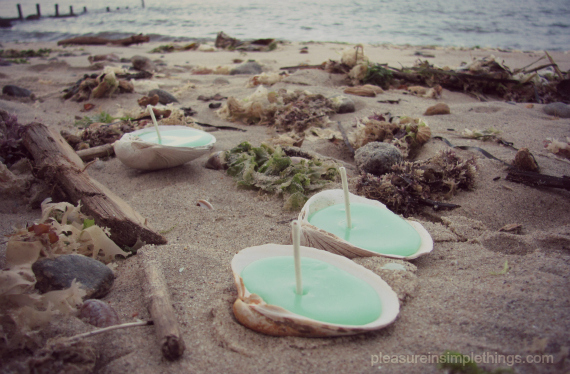
candles in scallop shells

For a long time I have wanted to make a sand candle like the ones I made as a kid.  Recently I came across a rock I painted back in junior high school and it got me thinking once again about making a sand candle.   So, today’s Friday field trip is a nostalgic trip back to my childhood to make some sand candles.

rock painted with owl

Back in junior high, our candle making was very basic – we melted candle wax in a tin can over a hot plate.  Rather than spoil the nostalgia, I decided to make my sand candle from memory and forgo any formal candle making research.

Candle makers probably use thermometers, scents, colors and other ‘fancy’ equipment for accuracy and safety.  My equipment is some wax and an old pan.  I did purchase a package of votive candle wicks from the craft store that I happen to notice when I stopped in to pick up a 1 lb. block of wax.  I think in junior high we just used twine dipped in wax.  So, I am going a little bit ‘high tech’ with this project. ;)

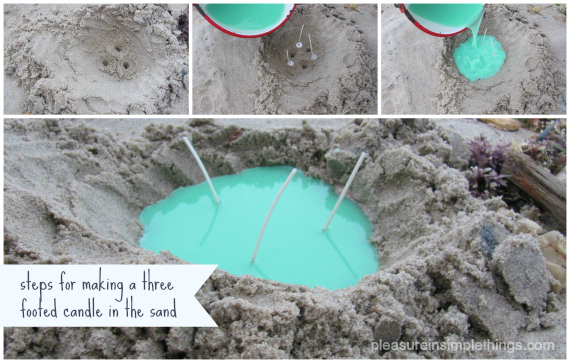
steps to making a footed candle in the sand

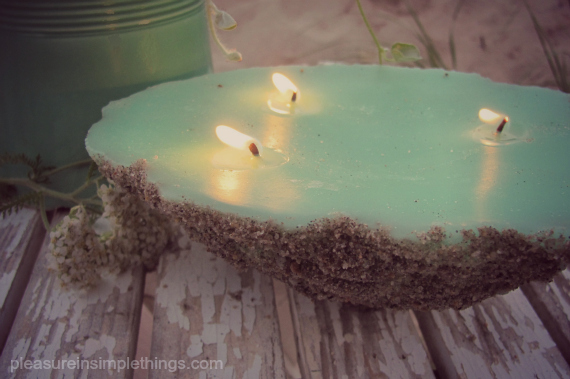
To make a sand candle, sand is used as the mold for the candle.  At low tide, the candle ‘mold’ is made in the sand.  I made an oval shape in the sand and then poked a stick into the bottom in three places to make three ‘legs’ for the candle to stand on.  It’s a very simple premise.  And then, before the tide comes up again and the wax has hardened, I dig the candle out of the sand.  Sand adheres to the hot wax, creating a sandy outside to the candle.

I really didn’t want to keep the wax its natural white color.  Thinking a light lavender color may be pretty against the sand, I checked to see if I had a lavender crayon to add a little tint…nope.  I chose a ‘sea green’ crayon from the colors I had and threw it into the pot with the wax.

making scallop shells in the sand

I used an old pot that I keep specifically for various craft projects –like tie dyeing, or other projects where I don’t want to ruin my good pans.  I melted the wax using a double boiler method, melting it slowly since I wasn’t sure about the safety of melting wax and wanted to be as cautious as possible.

candle made in the sand

Once the wax melted, I used a pot holder to carry the pot out to the mold in the sand.  After I poured in the wax I needed, I poured the remaining wax into shells I found on the beach after adding wicks from the bag I had purchased.

sea green shell candles and flowers

candle in a scallop shell

And, that is it!  The hardest part is timing the tide!  If you don’t have a beach, you can certainly use this method with a bucket of sand…and then you don’t have to worry about the high tide coming in and taking your candle out to sea! ;)  I was so excited about my nostalgic creations, the next day I couldn’t wait for it to get dark so I could light them!

candles in scallop shells

dusk at the beach with shell candles

Now that I got that out of my system, I wonder what other crafts from my past I can recreate…

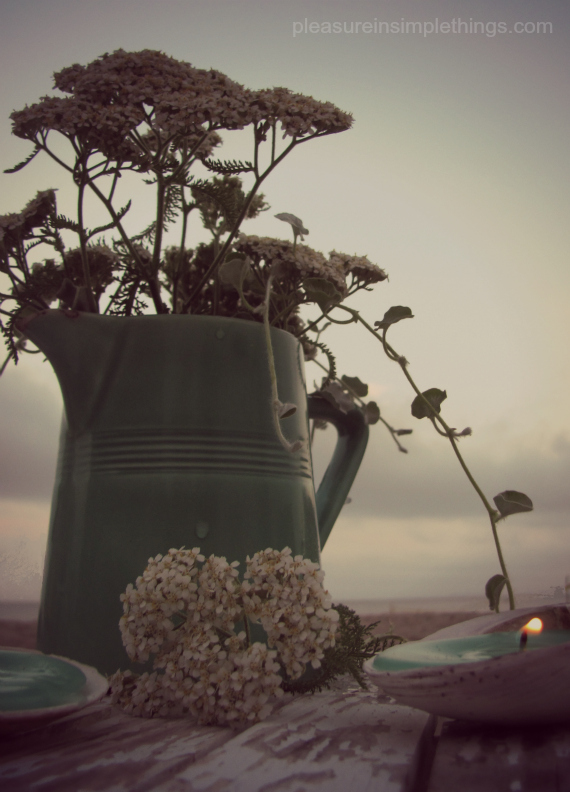
flowers at nightfall at the beach

Until next time…

Thanks for visiting.  Remember to take pleasure in simple things, Jackie

Sharing at The Shabby Nest.

4 comments

seafood swag

July 2, 2013

diy seafood forks

You may already know that I am a big Plasti Dip fan from my wooden spoon tutorial.  Today, I am going to show you how I used Plasti Dip to give an old set of seafood forks new life by putting a colorful plastic coating on the handles. 

'before' seafood forks for Plasti DipI was lucky enough to be the recipient of an old set of seafood forks from my friend Terry…thanks again T ;)  If you don’t have a friend like mine to give you good stuff to recycle, you can head to a thrift store.  The forks don’t need to match since the color you choose for the Plasti Dip will tie the set together.

I wanted my seafood fork set for eating shellfish on the beach and decided on royal blue for my Plasti Dip color.  Following the directions on the ‘Make Your Own Color Kit’, I used blue and a little bit of black to mix the color I wanted. 

eating shellfish at the beach

DIY seafood forks

Plasti Dip is very easy to use.  You can follow my spoon tutorial if you need some instruction.  In the same way that I dipped the wooden spoons, I dipped each seafood fork into the Plasti Dip.  Easy! 

revamped seafood forks

After allowing for drying time, my forks are ready to use!

seafood fork DIY

Now I have a colorful supply of seafood forks that I love!  Mussels anyone?

shellfish on the sand

Thanks so much for visiting!

Remember to take pleasure in simple things, Jackie  Be sure to ‘like’ my facebook page and follow on Instagram to share more summer photos!

Sharing at Coastal Charm.

6 comments

got nuts?

June 18, 2013

squirrel gift jar

For a friend’s birthday, I wanted to give her a little something acknowledging her squirrel obsession.

squirrel jar

squirrel jarInspired by many jars I have seen across the internet, I decided to find a plastic squirrel to affix to a jar to make a birthday gift.

To make something similar for a friend or as a party favor, decide on something to fit an obsession or theme and purchase a toy version at a craft or dollar store.

For myself I would have chosen a mermaid or something sea inspired ;)

Once I found the squirrel, I glued the figure onto a jar rescued from the recycling bin.  After the glue dried, I spray painted the jar top…figure and all.  I know the brown I chose isn’t a very summery choice, but I wanted to match the décor of the recipient.  Chalkboard paint would have been a fun option as well -“got nuts?” could have been written right on the lid with chalk.

top to squirrel jarThere are so many fun alternative ideas for this gift.  I know exactly what I would have made for my son if he were still small…I would have used an army man, painted the top with olive drab, and wrote “got ammo?”, filling the jar with water balloon ‘grenades.’    Or, I could have addressed his childhood train obsession and put a train on the lid top.  Of course, the contents would have to be bubble gum so I could write “got choo?”  A perfect choice for a train themed party favor!

Other ideas?  A shark on top with gummy fish…“got fish?”  A fish on top with gummy worms… “got worms?” A baseball player with sunflower seeds…”got seeds?” …come up with some using your favorite theme or obsession.

I decided to tie the “got nuts?” message onto the jar so it could be removed, but you can use whatever you prefer.  A chalkboard label on the side of the jar is a cute option.  Or, even etching cream … etch the words onto the side of the jar for an elegant look. 

easy to make squirrel jar

I filled the jar with peanuts and it is good to go.  A perfect ‘little something’ designed specifically for the recipient.

squirrel gift jar

Can’t understand a squirrel obsession?  Does this National Geographic photo I found on the web change your mind? 

squirrel

See more examples of squirrel cuteness I found across the web on my Facebook page by clicking here.

I hope you will use this tutorial as inspiration to come up with your own gift creation!  Thanks so much for visiting.

Remember to take pleasure in simple things, Jackie

Sharing at Better With Age and Craftberry Bush.

1 comment

diy patriotic spoons

June 11, 2013

patriotic spoons

We make a lot of hand churned ice cream in my family and the batches are huge…so, ultimately we eat a lot of ice cream also.  A really fun thing to do when serving ice-cream, particularly at the beach, is to decorate disposable spoons for the occasion.  This is a fun and easy way to add a festive spirit to your beach or yard get together. 

For our upcoming Fourth of July bash on the beach, spoons of the patriotic variety are in order! 

DIY patriotic spoons for Fourth of July

patriiotic spoon

I am providing some easy DIY directions for you to make patriotic spoons, but there are so many more ways you can personalize spoons with your own colors or themes just by using different colors, motifs, or letters…so be sure to experiment!

Here are the supplies my project required:

  • disposable wooden spoons*
  • permanent stamp pad ink in red and blue
  • a sponge cut into a thin rectangle, approximately ½” wide and at least 1” long
  • a pencil with an unused eraser
  • an X-Acto knife
  • natural twine
  • red & white baker’s twine
  • glue

I used the X-Acto knife to very carefully cut a star shape into the eraser of the pencil to use as a stamp. Then I cut a strip of sponge ½’ wide to use as my stripe stamp.

These two stamps will serve as the way to imprint the stars and stripes on the handles of my spoons.   

Using the stamp pad ink, I added the stripes and stars to the spoons using my stamps.  Using permanent ink ensures the ink doesn’t come off on hands or clothes should the spoon handles get wet.

star stamp for decorating spoons

stripe stamp

striped spoons

Striped disposable spoons are easy to make and give a festive flair to any get together!

For a fun addition, I added some twine “finger grips” to some of the spoons by simply wrapping twine around the spoon a few times – adding a dot of glue on the beginning and ending spot of the twine.

patriotic spoons

That’s it!  Easy, right?  And so cute!  They are hard to throw away! 

DIY patriotic spoons

Going back for seconds on the ice-cream?  Don’t want to lose a favorite spoon?  You can always wear your spoon as a necklace ; )just add some extra twine!  Problem solved.

patriotic spoons

Hope you enjoyed this easy tutorial on making patriotic spoons for your Fourth of July shindig!  You can easily make up some forks and knives also! 

*P.S.  I get my spoons at Garnish. 

Thanks so much for visiting!  Remember to take pleasure in simple things, Jackie

 Sharing at City Farmhouse,  The Shabby Nest, Finding Silver Pennies, and Craftberry Bush.

3 comments

« Previous Entries     Next Entries »