Subscribe to Pleasure in Simple Things via RSS ReaderFollow Pleasure in Simple Things on InstagramFollow @InSimpleThings on TwitterLike Pleasure In Simple Things on FacebookFollow Pleasure In Simple Things on PinterestEmail Jackie

diy snowman gift bag

February 25, 2014

diy snowman gift bag

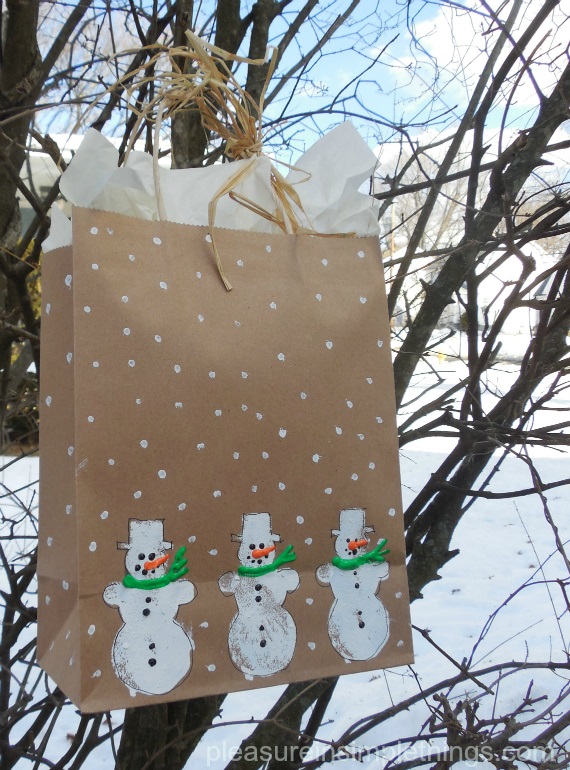
Today, I am creating an easy hand painted snowman gift bag.  I know snowmen are usually associated with Christmas decor, but based on the frequency of snowfall here in Connecticut this winter, a snowman certainly seems an appropriate motif for any project…so, it is with tongue in cheek that I use a snowman design for my gift bag.

If a snowman is strictly holiday for you, make up a batch of these gift bags to store away with your holiday wrappings for next Christmas…a fun activity to do with the children on the next snow day. ;)

snowman gift bag supplies

With just a few craft supplies, it is an easy item to create using a brown paper handled bag.  These bags are very inexpensive at the dollar store or paper supply store.

I like to use puff paint in squeeze bottles for the details on the snowman because it creates some dimension.  You can just as easily use paint and a paint brush.  If you don’t have a sponge shaped like a snowman, just cut your own from a household sponge…I happen to have a snowman shaped sponge, but I very often cut my own shapes from a sponge for my gift wrap designs.

This project is super easy…it just requires some drying time in between steps.

painting a diy gift bag

First, dip your sponge into some white paint, adding a thin coat on the entire sponge surface, and press onto the bag to add your snowmen.  Then, using a cotton swab, add the ‘snow.’  A cotton swab is the perfect tool for creating a snow storm!  (Opening the bag and standing it up will enable you to add additional ‘snow’ to the two sides of the bag.)

When this is dry, use the puff paint to add a scarf, buttons, eyes, mouth, and – of course – an orange carrot nose!  If preferred, paint and a brush or markers can be substituted for the puff paint to add the details to the snowmen.

When all the paint is dry, add an outline to the snowmen with a thin marker.

snowmen on diy gift bag

Repeat the same design on the other side of the bag, or, if preferred – just add ‘snow’ to the back of the bag.

And, that’s it!  Just add tissue paper and raffia to complete the look.  In addition, (for a little snow overkill) I plan to cut a snowflake from white felt to tie onto my package!

snowman giftbag tutorial

Hope you enjoyed this easy tutorial for making a snowman gift bag…a fun hand painted bag to add to your gift giving!

Here in Connecticut, we may just have to consider adding a snowman to our state flag!

Thank you so much for stopping by.

Remember to take pleasure in simple things, Jackie

no comments

diy button anchor wall hanging

February 21, 2014

diy button anchor wall hanging

For today’s Friday field trip, I am turning an item from the past into something unexpected that can be permanently displayed and fondly admired.

While my children were growing up, our family vacations always involved water – even when we were away from our own beach, we were tent camping on a lake or visiting the ocean at a state park. 

diy anchor wall hanging

Shortly after my children were born… I don’t think my oldest was even a year old… I splurged and bought a couple of good quality staple items to be used for our family’s water time…a mesh bag to tote toys (there were always plenty) and a large cotton beach blanket – both purchased from L.L.Bean.  Every family trip to an ocean, lake, or pool was accompanied by the large mesh bag filled with water toys and the brightly colored cotton beach blanket.   

Over the years, the mesh bag disappeared as the mountain of plastic toys was replaced with sand chairs and Baggo.  But, the blanket always remained…that is, until this past summer…when I noticed (to my horror), that someone had decided this old beach blanket, now a shredded mess, should be put out of its misery.  I found it tossed in an outdoor garbage can! 

discarded beach blanket

What did I do?  I immediately took it OUT of the trash, of course – determined to save it and preserve all the memories associated with this sacred beach blanket.  I gave it a good washing and decided I would come up with some way to use some part of it to keep forever.  After all, this blanket was like part of the family!  I can’t even begin to explain all the wonderful moments that happened on and around this blanket!

So, I came up with a wall hanging that serves the battered old blanket perfectly and evokes memories of happy times with my children every time I see it!

If you want to create something similar, here are the steps I used:

preparing a diy wall hanging

  1. Stretch fabric (blanket) onto an embroidery hoop sized appropriately for the design you have chosen.
  2. Sew buttons onto the fabric in a desired pattern.  (First, work up your design on a flat surface to determine the buttons you want to use and the size of the design.  I was inspired to use the anchor by a photo of a tote bag I saw in Marie Claire.)
  3. Trim the fabric edges and glue them to the back of the hoop edges.
  4. For a decorative edge, attach a thin piece of twine around the edge of the hoop using a glue gun.
  5. Tie on a piece of twine for hanging.  (This is a decorative option since the hoop can be hung without it.)
  6. Use a glue gun to add on a ribbon accent.

wall hanging close up

Have you found unexpected ways to display items with special meanings?  I would love to hear about them…I still have blanket left. ;) 

Thank you for stopping by.

Have a wonderful weekend, Jackie

Sharing at Craftberry Bush and Common Ground.

no comments

diy dishtowel pillow

February 11, 2014

diy dishtowel pillow

I am not much of a seamstress.  My only formal training was in 8th grade home economics class where I attempted to make a purple skirt.  The school colors were purple and gold and I wanted to make something worthy I could wear on purple and gold day…Go Hawks!…Sadly, I don’t think it was ever even worn.

I do know the basics of using a sewing machine and I can sew a (pretty close to) straight line.  As far as following a pattern – that is not something I picked up in 8th grade.   But, when I am determined to make something, it does get made. 

Pedal power dish towel

So when I saw the cutest bicycle dishtowel in Anthropologie and decided it needed to be a pillow, I knew it would become a pillow…

making a diy pillow

I was determined to keep the integrity of the towel – without cutting or damaging it in any way.  By simply using folds and straight sewing,  I was able to create the pillow I wanted.  Admittedly, the hardest part was pinning the trim into place! 

DIY dishtowel pillow

1. “Pedal power” dishtowel from Anthropologie   2. I added material to the length of the towel to use as part of the back when it was folded (I used four of the bicycle photos on the front of my pillow and two on the back).    3.& 4. I positioned and pinned trim on the left and right sides of the pillow between the front and back.   5. View of the back.    6. After the sides were sewed with the trim, I turned the pillow inside out. Then, I sewed the bottom edge, leaving some room to add polyfill. (I added almost an entire 12 oz. bag.) I completed the pillow by turning it right side out and stitching the opening closed by hand.

I am enjoying it so much more as a pillow than I ever would as a dishtowel!  A fun addition to a spare bedroom!

a bicycle pillow

dishtowel pillow

Wouldn’t this pillow make a great Valentine gift?  If you don’t want to take the time to make a pillow, just wrap up the towel with a homemade card that reads:  my heart races for you!  :)

Thanks for stopping by.   

Remember to take pleasure in simple things, Jackie

P.S.  If you are a bicycle lover, you may also enjoy this bicycle post. :)

Sharing at Shabby Nest, Craftberry Bush, and Coastal Charm.

4 comments

care in a package

February 4, 2014

Care Package supplies

Do you remember the best Valentine gift you ever got?  Mine was from the first man I ever loved – my Dad. 

It was a heart-shaped sugar cookie frosted in red.  I can’t remember what the white icing on top spelled out, but I do remember that my mom thought the message made the gift totally inappropriate for a dad to give his daughter.

Maybe it said “lover” or something similar…but it didn’t matter…any sense of inappropriateness went over his head – and mine.  I was just thrilled to get a Valentine…and, I was thrilled my Dad thought to give me one.

Even now, with my Dad gone over twenty five years, his cookie Valentine to me remains my favorite Valentine’s Day gift of all time.

Maybe it is because of the significance of that gift from my Dad that I always show my kids some love on Valentine’s Day.  It isn’t ever anything grand – a card…a favorite treat…something to show I am thinking of them with love – like my Dad did for me so long ago.

For a daughter in college, this is always a care package to arrive on the 14th. 

As I assemble my daughter’s Valentine, I am sharing three easy ways to give your care packages some special ‘care’ this Valentine’s Day…and help create a lasting memory.

Think personal, not expensive.  You don’t have to spend a lot of money to send some great gifts.

Any favorite baked items that can survive the trip serve as great gifts!   Whether you are sending a package to your child in college or to a special someone – you know which items you bake that the recipient likes best – make their favorite!   Maybe there is a specific food item in your area that is not available in the area the recipient lives – a perfect item to include!

If your package is going to a college student, there are some things every college student appreciates.  Socks or underwear help delay the dreaded laundry run and are always appreciated – fun patterns for Valentine’s Day are available in all the stores.  Find a pattern that relates to the recipient of the gift.  Coffee or k-cups are always welcome for the apartment coffee maker and are sure to be available in the gift recipient’s favorite blend.  (I found that Target sells a two-pack so it is not necessary to buy a large box.)  Flash drives are used by all students and can be found shaped as items to reflect the recipient’s personality – I have found ones shaped as surf boards and sushi!  Fun!

Add humor.  Adding humor is always required when creating a care package.  Find something fun to tuck into the package.  After a long, hard day of studying (or work), anything that can bring on a little smile is a great addition.  For my package, I found some chip clips in the dollar store that were shaped like lips – so fun, so perfect for Valentine’s Day, and so practical!

lip clips

Chip clips shaped like lips, found in the dollar store, add some humor to a Valentine’s Day care package.

Create some packaging flair.  Decorating your package – both inside and out – makes it special for the recipient.

For my package, I painted a 69 cent unassembled brown box with messy pink stripes.  Then I found a decorative packing tape – packaging tape now comes in many different colors and patterns and adds so much more flair than using something traditional!  For a sports fan, this can be school colors or colors of a favorite team…be creative…the large selection at the hardware or craft store is sure to spark your imagination.   I chose a pink polka dot packaging tape to seal my daughter’s care package.

adding flair to a care package

Messages can be written on both the inside and/or outside of the box to make it personal.  When my son was in college,  it became a tradition that I would always write the address for a cool new website on the inside flap of his care packages.  If the gift is for one of your children, write a favorite saying or song lyrics from a song you both enjoy…or write something you always say before bedtime. :)

My daughter is a nursing student and I once decorated the outside of a care package, to arrive before a big anatomy test, with body part stickers.  Hey, it must keep the delivery person amused!

Create flair with your packaging material as well.  For my Valentine’s Day care package, I purchased some inexpensive neon pink tissue paper and put it through my home shredder…so easy and inexpensive.  Try using old book pages, newspapers, sports or fashion magazines, etc.  There are so many options…and, so many ways to make the gift personal…the stock pages from the Wall Street Journal for a finance major recipient, for example.

paper shredding

Add flair to a care package by using a home shredder to create packing material. Use tissue paper, newspaper, old book pages, fashion or sports magazine pages, etc. to personalize the gift.

I won’t show you the gifts I included in the care package I created, since I don’t want to spoil the surprises!  ;)  Just remember that the gifts you select should be unique to your recipient…a sure way to make the package personal and memorable.  My kids have exceptional senses of humor, so anything related to an inside joke is always a perfect choice!

Have fun with it!  I would love to hear some ideas inspired by this post and also some memories about your favorite Valentine’s Day gift! 

Send me an email if you need some help with ideas for your personalized care package.

Thanks so much for stopping by.  Remember to take pleasure in simple things, Jackie

1 comment

sweet nothings

January 28, 2014

 Valentine teabag diy

Do you ever write personal notes?

A few well- placed words can make anyone smile.  And, when Valentine’s Day rolls around, a corny pun is definitely in order!

Valentine teabags

A note slipped into a lunch box or a jacket pocket can let someone you care about know you are thinking of them.

Valentines Day pun

You can type a message or use stamps to create one, but I prefer a hand written one – nothing beats it on Valentine’s Day!

Diy valentine teabags

Here, I am using tea bags as a spot to include a Valentine’s Day message.  I love to ‘personalize’ mine using paint chips.  An easy DIY – just sandwich two heart shaped pieces over the tag and add a message.

personalize teabags with paint chips

Where can you place an unexpected pun on Valentine’s Day?

Thanks for stopping by.

Remember to take pleasure in simple things, Jackie
Sharing at City Farmhouse and  Coastal Living. 

1 comment

diy menu board

January 14, 2014

diy menu board

Do you have a favorite plate that is chipped or cracked and yet you just can’t seem to throw it out…even though it isn’t used?  A great way to repurpose an imperfect piece is to create a menu board…giving the piece a new life without serving food on it!

supplies for a nautical menu board

The only supply required is Con-Tact brand adhesive chalkboard paper!  Creating a beautiful new menu board is as easy as cutting an appropriate sized piece of Con-Tact paper!  Since I wanted my creation to take on a nautical flare, I added some shells and twine to my supply list to add as embellishments.

menu board supplies

Because china has a slick surface, using Con-Tact paper works much quicker and easier than paint (eliminating the need for a primer).  Plus, the Con-Tact can be removed after use, if desired.

For my nautical menu board, I cut a piece of chalkboard Con-Tact paper to fit the inside section of the chosen plate.  After attaching it, I adding some twine and shell embellishments using a glue gun.  Viola!  How cute is that?

nautical menu board detail

Using a plate stand is a nice way to display the menu board…or even, hanging the menu board on the dining room or kitchen wall.  Such a great way to repurpose an old plate!

Maybe create one for a special Valentine’s Day meal?  :)  Have fun with it!

valentine menu board

Thank you so much for stopping by.

Remember to find pleasure in simple things, Jackie

Sharing with French Country Cottage, City Farmhouse and Coastal Charm.

no comments

cute as a button

January 7, 2014

button pushpin diy

Do you save all the extra buttons you get when you buy new clothes?  I do.  I sometimes even take buttons I like off a piece of worn clothing before I toss it.

buttons for diy

I have accumulated quite a collection of buttons that I can’t seem to part with and I have created many craft projects over the years to accommodate my growing collection.  (Christmas ornaments, jewelry, etc.)   Since organization is always a priority at this time of year, I am sharing an easy DIY that not only repurposes extra buttons, but also helps make bulletin boards look ‘cute as a button’ as they get reorganized in the new year.

diy decorative pushpins

making diy decorative pushpins

decprative pushpin from buttonSimply use a glue gun to add a bead of glue to the head of a plastic push pin and attach a button!  Cute, right?  I bet you have quite a few buttons that are not being used…

I often attach small shells to my push pins since I favor a beach theme, but buttons can easily adapt to any decor or color scheme.

Lining a bulletin board in pretty fabric and making some button push pins to coordinate makes a thoughtful and pretty gift…maybe as a Valentine?  Add some to a Valentine’s Day care package headed to a dorm room.

They can be packaged in a small tin or on a piece of decorated corrugated cardboard – cover the cardboard in fabric or scraps of wallpaper for a pretty presentation.

Decorated push pins also make a great teacher’s gift or a great gift for anyone that appreciates pretty details.

There are so many possibilities of color and style combinations…I hope I inspired you to try some!

diy decorative thumbtack

decorative pushpin diy

Thank you so much for stopping by.

Remember to take pleasure in simple things, Jackie

Sharing at Common Ground  Crafts a la mode and Coastal Charm.

2 comments

brown bag tree ornaments

December 17, 2013

paper bag treat ornaments

I enjoy making treat containers using brown paper.

You have seen some of my brown bag creations for holidays in the past.

For Christmas, it is easy to use the same premise to transform brown bags into tree ornaments.

borwn bag tree ornaments

Using holiday bags is a fun and festive way to recycle!  (Click here to see other items you can create from brown bags.)

Many stores imprint their bags with a holiday motif at this time of year – my favorites are the ones from Trader Joes…such fun patterns!  They also happen to tie in well with my woodland theme this year. :)

I simply sew two pieces of brown paper together – stopping to fill them with treats before sealing them completely.

paper bag ornaments

I use a sewing machine, but they can just as easily be sewed by hand.  (Colorful embroidery thread works well.)

If desired, shapes can be created to fit your theme – doves, angels, snowmen,bells, trees, etc. are all possibilities.

paper bag ornament

Try this festive way to repurpose brown bags.  If you prefer not to enclose edible items, batting or cotton balls can be used to ‘stuff’  the ornament.

I hope you are enjoying your holiday preparations…remember to take pleasure in simple things

Thanks so much for stopping by, Jackie

no comments

diy woodland tree garland

December 10, 2013

diy woodland tree garland

Have you noticed paper drinking straws now come in so many great colors and patterns?

I decided to take advantage of this to create garland for my woodland themed Christmas tree this year.

diy christmas tree garland

Using paper straws printed in a simulated birch bark pattern and some small collected pinecones, I created a DIY garland that was simple to make and perfect for my tree!

I simply cut the straws into sections and alternated them on strings with the little pinecones.  So easy!  A great late-night fireside activity. :)

Helpful tip:  I always use dental floss or fishing line to thread garland because both are very sturdy and hold up well when creating long strands.

diy woodland garland

My choice of straw fits in well with my woodland theme.  Now I just need my tree! 

Come up with a combination of materials to coordinate with your décor!  Straws come in so many varieties – both paper and plastic.  You can replace the pinecones I used with beads, candy, pom-poms, berries, popcorn, etc.  to create something appropriate for your décor.

diy woodland tree garland

Have fun with it!

Thanks so much for stopping by.

Remember to take pleasure in simple things, Jackie

no comments

diy advent calendar

December 3, 2013

diy advent calendar

This year, I am using jars for my Advent calendar.  I think my creation ties in well with my woodland holiday theme and jars are great for stashing surprises.

I started collecting baby food jars about a month ago.  Some of my coworkers thought it strange when I offered them baby food at lunch break, but geez…who wouldn’t want free organic fruits and vegetables as part of their lunch!  (Granted, they were in pureed form!)

diy advent calendar

After eating all the baby food and cleaning all the jars, I spray painted the outside of the jars with a cream colored spray paint.  I didn’t want any paint inside the jars since I planned on putting edible items inside them…I didn’t want to risk chipped paint in my woodland treats!

diy advent calendar

Paint will chip off glass, though this was not a big concern for me since my calendar was planned for a one-time use.  A clear coat can be applied if a more durable finish is desired.  I sprayed the tops in forest green and created labels by cutting shapes from chalkboard Contact paper.

As a decorative touch, I added some bells around the rims – also a great security device to discourage any premature jar openings!

diy advent calendar

What am I putting in the jars?  Some examples include spiced nuts; maple sugar candy leaves; candy rocks; marzipan mushrooms and acorns; and gummy bears, worms, snakes, frogs, and spiders.

diy advent calendar

The fun part is arranging the jars on the mantle among forest inspired items.

This is a great project that can be easily adapted to any theme and can be arranged creatively in any nook, shelf, or corner – stack them up or spread them around.

diy advent calendar

If you plan on making one of your own, I highly recommend buying plenty of banana mango baby food…it was my favorite. ;)

Thanks so much for stopping by, Jackie

1 comment

« Previous Entries     Next Entries »