Subscribe to Pleasure in Simple Things via RSS ReaderFollow Pleasure in Simple Things on InstagramFollow @InSimpleThings on TwitterLike Pleasure In Simple Things on FacebookFollow Pleasure In Simple Things on PinterestEmail Jackie

halloween treat boo box care package

October 17, 2014

a halloween care package ingredients for treats pleasure in simple things

Do you send Halloween care packages? For today’s Friday field trip, I am taking you into my kitchen to share a fun idea for your favorite college student or friend – a ‘boo box’ containing a kit to make pumpkin spice Rice Krispies treats! The box contains all the premeasured ingredients needed to create this favorite treat with my seasonal spin!

With all the ingredients to make pumpkin spice Rice Krispies treats measured out and ready to go, this kit is sure to be a hit! Once this package is received, a pan and a few tablespoons of butter is all that is required to make up a batch of tasty Halloween treats. Students can be very resourceful and will probably score the butter from the campus cafeteria …include a disposable foil pan in your kit if you think your student might not already have an appropriate pan.

a packaged marshmallow for a halloween care package pleasure in simple things

The ingredients are easily packaged right inside a cardboard mailing box. I line the inside of the box with bubble wrap before adding the bags of ingredients. Adding some extra Halloween fun to your mailing box is easy. Before packing up your kit, think about spray painting the entire inside of the mailing box black, gluing some spiders or creepy things inside, or adding some glow-in-the-dark paint! Some fake spider webs from the dollar store are also a nice touch!

care package for Halloween treats pleasure in simple things

Choosing a box that has a little extra space can provide the opportunity to include a few other Halloween surprises before mailing. (I noticed they make Solo cups in black or orange lol!) In my box I added some fun Halloween straws and some candy corn treat bags.

halloween fun pleasure in simple things

For my recipe, I used pumpkin spice Oreo cookies to add a seasonal taste to the treats. Oreos now come in so many flavors, it is easy to choose one that your recipient would enjoy. If you would rather not use the pumpkin spice flavored variety…maybe candy corn flavored cookies? If you prefer, you can substitute the cookie ingredient for a favorite candy of the recipient. (When the holidays approach, use this same recipe, switching up the cookie flavor to gingerbread or candy cane! )

halloween care package treat bags pleasure in simple things

As an option, add an additional ingredient bag(s) of chocolate chips for melting – a chocolate drizzle or zebra drizzle (regular and white chocolate) can be added to the top of the bars.

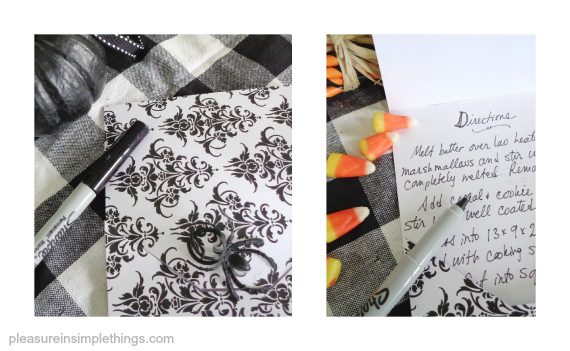
Be sure to include instructions and a personal note!

writing directions for a halloween care package pleasure in simple things

FOR YOUR BOX. Package the following ingredients, each in separate cellophane bags: 5 cups Rice Krispies cereal, 16 (crushed into crumbs) pumpkin spice flavored Oreos, and 10 oz. mini marshmallows. Note: you can choose to separate the cookie crumbs into 2 bags since some are for the bars and some are for garnish.

FOR YOUR WRITTEN DIRECTIONS FOR MAKING PUMPKIN SPICE TREATS. Melt 3 tablespoons of butter (not included in this package) over low heat. Add marshmallows and stir until completely melted. Remove from heat. Add cereal and 1 cup of cookie crumbs and stir to coat well. Press into 13 x 9 x 2 –inch pan coated with cooking spray or butter. Sprinkle remaining cookie crumbs on top. Cool. Cut into squares. ENJOY!

pumpkin spice rice krispie treat pleasure in simple things

Of course, you don’t need to send a ‘boo box’ to try the recipe! :)

Have a wonderful weekend! Remember to take pleasure in simple things, Jackie

Please note that I used Kellogg’s Rice Krispies and Nabisco Pumpkin Spice Oreos in this recipe.

Sharing with Finding Silver Pennies,  Craftberry Bush, Crafts a la Mode, and The Shabby Nest.

no comments

beach house dresser redo

October 14, 2014

 beach house dresser Annie Sloan antoinette chalk paint pleasure in simple things

Today I am sharing a summer beach house dresser redo. I am really proud of the finished piece because I think it captures the spirit of the owner’s personality while still keeping the nostalgic vibe of the house.

beach dresser before photos pleasure in simple things

The dresser is really, really old and had tons of paint on it! I probably spent more time stripping the top of this piece than the total time I spent stripping all the pieces I have worked on in my lifetime! Yes, I did think about abandoning the stripping – painting the entire piece would have been so much easier! But, I just couldn’t do it! This dresser has been in a family beach house at least three generations and I really thought the best way to pay homage to it was to have a little bit of the original wood intact.

collage of after photos beach house dresser pleasure in simple things

After all that stripping and sanding – I can’t even fathom how many coats of paint were applied to the dresser – the piece of wood that made up the top wasn’t even very nice! The piece seems to have been homemade and possibly constructed of scrap wood. It definitely has tons of character!

beach house dresser Annie Sloan antoinette chalk paint pleasure in simple things

I chose a dark stain for the top, hoping the finish would be a little more forgiving to the not so great quality of the wood. I chose Minwax Dark Walnut stain and added three coats of Minwax Satin Finish polyurethane.

top of beach dresser pleasure in simple things

Although the owner of the beach house loves color and would have enjoyed a bright colored dresser, the man of the house really didn’t want any color at all! I think I came up with a good compromise by staining the top of the piece and adding a little color and metallic to the drawer fronts. I know the owner well enough to know her style is definitely one that includes tons of color and plenty of glam!

For the drawer fronts, I mixed Annie Sloan Chalk Paint in Old White with Antoinette and a touch of Graphite to create a shade of pink that coordinated well with the dark walnut stained top.

ASCP dresser after pleasure in simple things

After adding a coat of Annie Sloan clear wax, I did a second coat using dark wax and finished it off with some touches of gilding wax. I added the gilding wax to the drawer pulls and top edge of the dresser.

after photo beach house dresser pleasure in simple things

I am thrilled with the way the dresser came out – hopefully to be enjoyed by many more generations!  I was asked to give new life to all the bedroom dressers in the house, so I am looking forward to additional inspiring pieces! Thanks for joining me for today’s makeover.

Remember to take pleasure in simple things, Jackie

Sharing at Finding Silver Pennies, Sand & Sisal, and Coastal Charm.

no comments

let’s give them pumpkin to talk about

October 3, 2014

candy corn white pumpkin pleasure in simple things

I am not big on Halloween decorations. As a rule, I don’t decorate with traditional Halloween colors because I love all things neutral. I gave you a taste of this last year when I shared with you some of my white Halloween decorations.

That doesn’t mean I don’t occasionally use other colors in my pumpkins…just to change things up a little. The velvet pumpkins I make each year have been created in most all colors.  Here is a recent batch from this year…

a cluster of green velvet pumpkins pleasure in simple things

But, for Friday field trip today, I am sharing a few pumpkins I created for my home that were inspired by Halloween candy…maybe it will spark some ideas for some pumpkins for your own home!

Even though I don’t normally decorate with black and orange, there is one Halloween color combination I do enjoy! I have used the iconic white, orange, and yellow colors of candy corn on everything and anything from treat bags to Jell-O! It is an instantly recognizable color combination that screams (pun intended) Halloween almost as much as a pumpkin!  Using orange and yellow paint, it is easy to create a mini ‘candy corn’ white pumpkin.

pumpkin fun with black and candy corn spoons pleasure in simple things

This year, the colors of candy corn also made it onto some disposable wooden spoons to make quick and easy fun dessert spoons.  I just added a little bit of paint and some dollar store spiders to create a whole lot of Halloween fun!

The other candy that inspired some pumpkin fun for me this year was black licorice. Inspired by this black treat, I created a few black pumpkins to use in vignettes throughout my home.

a black plasti dip pumpkin pleasure in simple things

My first, the one that really took on the look of licorice for me was painted with Plasti Dip. If you follow the blog, you know that I love Plasti Dip and use it in many different ways. (On wooden spoons or seafood forks to name two favorites!)  For my black ‘licorice’ pumpkin, I used the Plasti Dip in a spray can to create a shiny black finish…spooky!

 odd man out black plasti dip pumpkin pleasure in simple things

After creating that pumpkin, I started playing with some different textures in black.

a  black onyx sparkle pumpkin pleasure in simple things

For a glittering, sparkly pumpkin, I used Martha Stewart’s glitter in onyx…I think this little vignette using an Anthropologie planter and some black amaranthus creates a great Halloween feel.

While crafting some of my velvet pumpkins this year, I created some in black to add another texture to my collection of black pumpkins.

black velvet pumpkins pleasure in simple things

It is always so fun to try different ways to decorate pumpkins! I hope you enjoyed seeing a few of my candy inspired pumpkins for Halloween on Friday field trip today…I can’t wait for next week when I share some of this year’s neutral themed pumpkin designs!

fun with  pumpkins small black plastidip pumpkin pleasure in simple things

Thanks so much for stopping by! Have a fabulous weekend!

Remember to take pleasure in simple things, Jackie

Sharing at The Shabby NestCraftberry Bush, Crafts a la Mode, Nancherrow

4 comments

antique school desk redo & fall welcome

September 23, 2014

school desk after photo with hydrangeas pleasure in simple things

This year’s start to the school year was very sad for me – no one to send off to the first day of school! Luckily, I found a distraction! I renovated an old school desk. I found the perfect way to welcome the new school year and the new season!

autumn quote pleasure  in simple things

This old wooden one-piece school desk was in my friend’s basement and it was just crying out for some attention. I decided to try Miss Mustard Seed’s Milk Paint since I haven’t yet had the opportunity to do so. I used a color called grain sack – instantly my favorite in the line… it is a wonderful neutral. I was hoping to create a real chippy looking finish, but that wasn’t in the stars!

before and after photo old school desk pleasure in simple things

Mixing the paint myself, I thought if I skipped adding the bonding agent that helps the paint adhere to the surface, I would get tons of chipping… that didn’t happen. I guess the surface of my piece was too porous? Any experienced milk paint people willing to contemplate the lack of chippyness? I guess I need a little more experimentation with the paint to figure it out.

after photos school desk redo pleasure in simple things

 finished school desk with hydrangeas pleasure in simple things

So, without the chippyness, I decided to distress the finish. And, even though the piece didn’t chip, I love the way it came out. Of course, this old desk wouldn’t be complete without adding a chalkboard finish to the writing surface! After I finished waxing the rest of the piece, I used chalkboard spray paint on the desk’s writing surface – carefully masking off the finished sections of the piece.

 a desk redo with chalk board pleasure in simple things after photo

Can’t you just hear the school bell ringing? I can also hear the whisper of the new season in the air. The kiss of autumn has already started turning the hydrangeas a subtle color of pink.

autumn quote with hydrangrea pleasure in simple things

Happy fall, my friends.  Thanks so much for stopping by, Jackie

Sharing with Finding Silver PenniesLiz Marie Blog, Craftberry Bush, Miss Mustard Seed, Inspiring Hearts & Homes, and AKA Design.

3 comments

coastal table redo (before & after)

September 19, 2014

 coastal table redo chatham pleasure in simple things

We are not traveling very far for today’s field trip…I want to show you one of my all-time favorite furniture transformations. This revamped piece is called Chatham – the name of a wonderfully enchanting seaside town in Cape Cod, Massachusetts…this town, like the table – is one of my favorites!

before collage Chatham table pleasure in simple things

When a friend showed me this piece in her garage and offered me the opportunity to give it a little loving care, I jumped at the chance! It was just one of those pieces that immediately got me inspired!  I couldn’t wait to give the table a coastal look!

anthropologie compass knobs on revamped coastal table pleasure in simple things

I knew right away I wanted to strip the top so I could give it a driftwood look. And, I had a specific Anthropologie knob in mind right from the start! Actually, four knobs since the single drawer on this piece used four knobs.

using Citristrip on coastal table redo pleasure in simple things

I chose Annie Sloan Chalk Paint in Duck Egg for the main part of the piece.

Furniture redo in process pleasure in simplet things

Here are the steps I used for this transformation:

• Strip top using Citristrip stripping gel (a wonderful product recommended to me by Danielle over at Finding Silver Pennies).
• Paint (all but top) with two coats of Annie Sloan Chalk Paint in Duck Egg
• Apply a wash to top of piece (using a clean lint-free cloth) with Annie Sloan Chalk Paint in Old White (thinned heavily with water)
• Paint detail on drawer front and around legs (using same thinned mixture above, careful not to let it drip)
• Apply a coat of Annie Sloan Clear Wax
• Sand & lightly distress
• Apply a second coat of clear wax

a chatham coastal table redo after photo pleausre in simple things

a chatham coastal table redo pleasure in simple things

chatham table after pleasure in simple things

a chatham coastal table redo pleasure in simple things

As the finishing touch, I added a pretty blue watercolor patterned paper as a drawer liner. I am so happy with the way the piece came out. What do you think?

a coastal table redo chatham after pleasure in simple things

Thanks so much for stopping by! Enjoy the last weekend of summer and pleasure in simple things, Jackie

Sharing at Sand & Sisal, Coastal Charm,   Finding Silver Pennies and  Miss Mustard Seed.

4 comments

pink velvet pumpkins to celebrate health

September 16, 2014

 velvet pink pumpkins help celebrate october breast cancer awareness pleasure in simple things

I make velvet pumpkins at this time of year, as you may already know!  One of the fun parts about making the pumpkins is choosing the fabric. I love finding new and different velvets each year to make my velvet pumpkins – adding real pumpkin stems as a finishing detail.

 velvet pink pumpkin for breast cancer awareness pleasure in simple things

One velvet that I continue to use every year is a pink one. Since breast cancer awareness month is in October, what better way to celebrate it than with a pink velvet pumpkin!

pink pumpkins for breast cancer awareness pleasure in simple things

Every year I make some pink pumpkins to give to friends that have survived breast cancer that I may see during the month of October. (One year I had the opportunity to give a pink pumpkin to breast cancer survivor Hoda Kotb when I met her at a book signing!)

breast cancer awareness pink pumpkin diy

A pink pumpkin makes a thoughtful gift for a breast cancer survivor and displaying one is a wonderful reminder of breast cancer awareness month.

pink velvet pumpkins for breast cancer awareness pleasure in simple things

This year, for a friend celebrating 5 years cancer-free, I added a ‘5’ using a wooden tag stamped with the number 5.

a pink velvet pumpkin with 5 year cancer free tag pleasure in simple things

A pink velvet pumpkin is a subtle and beautiful reminder of breast cancer awareness month. If you would like to make your own velvet pumpkin for yourself or a friend, click here for my tutorial.

Thanks for stopping by, Jackie

P.S. The ribbon used on the ‘5’ pumpkin was inexpensive white seam binding tape I bought on clearance and dyed with strong coffee…some of my favorite ribbon!

Sharing with Nancherrow, Crafts a la ModeCraftberry Bush, AKA Design, and  Sand & Sisal.

7 comments

diy mirror to chalkboard

August 19, 2014

before and after mirror to chalkboard pleasure in simple things

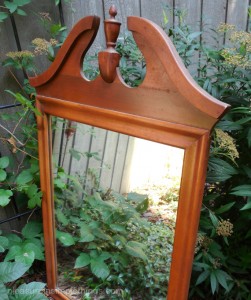
It has been a while since my last large chalkboard project when I used an old skim board to create a nautical themed chalkboard. I have wanted to make another large chalkboard for quite some time and when I saw this mirror, I knew it would be perfect to repurpose!

Mirror before renovation pleasure in simple thingsThe frame had such great detail at the top and it was in wonderful shape.

Today I am sharing the easy steps I used to create a chalkboard.

I took apart the mirror – separating it from the frame. I put a coat of shellac on the frame using a soft, clean cloth.

Then, I used Annie Sloan Chalkboard paint in French Linen with a Pure White wash (the same process I used for this Newport table). French Linen is one of my favorite Annie Sloan colors and I really love the way it looks with black… perfect for a chalkboard frame!

After using clear wax on the completed finish, I did a little distressing and then added a second coat of wax to the frame.

Mirror turned chalkboard detail pleasure in simple things

To create the chalkboard, I used chalkboard spray paint in very light coats (probably 5 or 6) right over the back side of the mirror. Why the back? I just figured it could always be used again as a mirror if I kept the mirror side intact.

Chalkboard spray paint works so well on smooth surfaces – the smoother, the better. For this reason, any picture frame or mirror repurposes really well as a chalkboard. These items are pretty easy to come by at yard sales or thrift shops. Or, maybe you are holding onto a frame you really like, but aren’t too crazy about the print in it…perfect to refinish as a chalkboard!

Mirror detail pleasure in simple things makeover

After the chalkboard paint was good and dry, I ‘seasoned’ the board by using a piece of chalk on its side to color in the entire surface and then wiped it off with a soft, clean rag.

Mirror turned chalkboard pleasure in simple things

After putting the mirror back into the frame, my project was complete! And, the mirror already had a hanger on the back so I didn’t need to add one. I love this kind of project – when I use all materials I have on hand…I didn’t need to purchase one supply to complete it!

completed chalkboard from a Mirror pleasure in simple things

I added a favorite ‘beachy’ quote by Ralph Waldo Emerson and my project is complete! Can’t you just see this elegant chalkboard in the entry way of a coastal home?

I hope this has inspired you to repurpose an old picture frame or mirror into a beautiful ‘new’ chalkboard!

Thank you for stopping by.

Remember to take pleasure in simple things, Jackie

Sharing with Finding Silver PenniesElizabeth and Co.Sand & Sisal and Coastal Charm.

4 comments

newport table (before & after)

August 15, 2014

pleasure sin simple things Annie Sloan coastal table

For Friday field trip today, I am sharing the before and after photos of a newly refurbished piece I named Newport.

When I first saw this table, I loved the way the sides came up and the detailed legs…isn’t it pretty? Of course, I wanted to ‘beachify’ it!

pleasure in simple things Newport table before

As I suspected, the finish gave me a little trouble. Looking at the color, I thought the finish may require a shellac coat before I painted it with Annie Sloan Chalk Paint. I tried to get by without one, but realized after the first coat of paint that I would need the shellac. No worries! I just put a coat of shellac right over the paint and continued with my business!

For this piece, I used French Linen, probably my very favorite Annie Sloan color. I just love the way a white wash looks over French Linen!

 pleasure in simple things after photo coastal table Annie Sloan french linen

Here were my steps in revamping this piece:
• Clean the piece
• Apply one coat of Annie Sloan Old White
• Apply (with a clean cloth) one coat of Zinsser shellac
• Apply two coats of Annie Sloan French Linen
• Add a white wash – a mixture of Annie Sloan Pure White and water (probably about 60   percent water) using a dry brush technique and then using a soft cloth to soften some areas
• Hand paint seahorses across the drawer fronts with Annie Sloan Graphite
• Apply one coat of Annie Sloan Clear Wax
• Lightly distress
• Apply an additional coat of Annie Sloan Clear Wax

I made sure that my brush strokes were visible as I applied the paint so that later they would show when I added the white wash to the piece.

pleasure in simple things Annie Sloan coastal table

I chose to keep the original hardware since I planned on painting a sea inspired design on the front and I didn’t want the hardware to distract from the design.

pleasure in simple things Annie Sloan french linen finish coastal table

I painted the seahorses freehand, but patterned them from a design I found online. After looking around the internet for something with a vintage feel, I found a great pattern on The Graphics Fairy and used it as a reference as I painted the images.

pleasure in simple things Annie Sloan coastal table seashores

I didn’t do a lot of distressing on this piece, but since I didn’t want the seashores to look newly painted, I gave them a sanding with some fine sandpaper until I got the worn look I wanted.

pleasure in simple things Annie Sloan coastal table

As a final detail, I added drawer liners cut from a sheet of paper I chose from the large selection at The Paper Source.

Newport is complete! What do you think?

pleasure in simple things coastal table Annie Sloan french linen NEWPORT

Thank you so much for stopping by for Friday field trip and sharing my table transformation!

Have a fabulous weekend, Jackie

Sharing at City FarmhouseJennifer RizzoFinding Silver PenniesMiss Mustard Seed, Craftberry Bush, and Shabby Nest.

5 comments

easy plastic bottle vase

August 12, 2014

diy plastic flower vase pleasure in simple things

Did you ever need a large quantity of centerpieces for your outdoor party tables? An easy DIY is to create vases from plastic bottles and add a few garden or meadow flowers!

The only materials you need are some bottles from your recycling bin…they don’t even need to match…some flowers or greens, and some leftover Annie Sloan Chalk Paint and wax.

diy plastic flower vase pleasure in simple things

Flowers are great to add to any occasion…or, even to no occasion at all!  My choice for vases gets a little more casual when I entertain outdoors, because I don’t like the thought of breaking any of my favorites at an outdoor party. So, when the entertaining gets more relaxed, so do the vases.

I like using old tea tins or oatmeal tins for flowers when entertaining outdoors, but sometimes rummaging through the recycling bin can be inspiration for a DIY vase!

diy upcycled flower vase pleasure in simple things

A plastic bottle can easily be upgraded to a fun flower vase to use for flower centerpieces at an outdoor party…no worries about breakage and so easy to make up large quantities!

upscale plastic bottle vase pleasure in simple things

I like the leaf detail imprinted in the plastic on this plastic tea bottle and I happened to have a case of empty ones in my recycling bin…perfect for my project!

Queen Anne's Lace in a diy vase pleasure in simple things

I simply painted the bottles with Annie Sloan Old White Chalk Paint! One of the great things about this paint is that you can virtually cover any surface! I added a coat of clear wax to protect it and it is good to go! Because I wanted my pattern to stand out, I did add a little dark wax in the patterned areas of the plastic. The amount of materials for one vase is very minimal. If you don’t have leftover paint, you can purchase a small sample size and have plenty to create some vases!

easy diy flower vase from a plastic bottle pleasure in simple things

Not bad for a plastic throwaway, right?! And, no worries about it breaking. I just added some wildflowers that were growing as ‘weeds’ and tied a piece of twine on the neck of the bottle and my centerpieces are complete! Fresh herbs are also a great option in place of flowers…there is so much mint, basil, and parsley in the garden at this time of year and they all make a great (and fragrant) addition to a vase.

Thanks for stopping by!

Remember to take pleasure in simple things, Jackie

Sharing at Sand & Sisal, Coastal Charm, and Crafts a la Mode.

no comments

oyster shell place cards

August 5, 2014

pleasure in simple things diy oyster shell place card

Today, I am sharing a diy on painting oyster shells to use as place cards.

Growing up in Connecticut, crafts using materials from the beach started at an early age. Making necklaces out of small golden shells was more common than the macaroni variety and, constructing items from rocks or driftwood… or any items found on the sand…occurred regularly.

Fishing trips with my dad when I was really young were more often about creating adventures and finding ‘treasures’ than actually fishing. Remember back when playing with the worms was more fun that catching the fish?!

My crafts got more involved as I got older. In my high school crafts class, I once made clay tiles that were imprinted from found shells. Painting the smooth rocks found on the shore was always a fun activity. As I got older, creating wreaths or mirrors from shells seemed more in order…my favorites always made from oyster or mussel shells. I even created the paint palette for my home using the delicate colors from the inside of an oyster shell.

oyster shell place card

So, for me, painting shells is nothing new. But, sometimes details are perfected over time. I feel this way about oyster shells. I love using them as place cards and today, I am sharing a feminine way to paint an oyster shell to use as a place card…perfect for a bridal shower or luncheon.

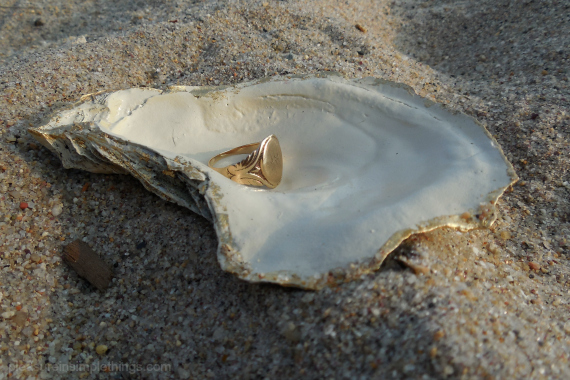
oyster shell ring holder pleasure in simple things

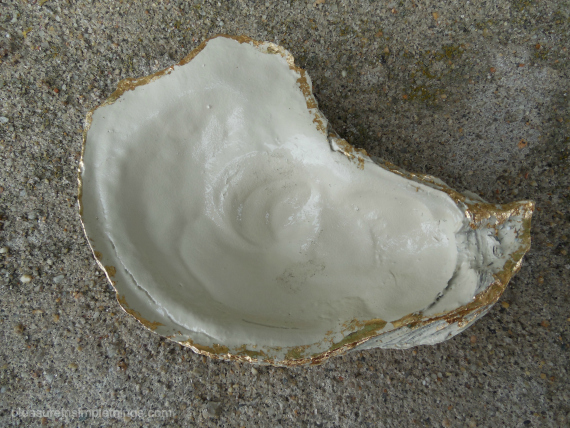
Everyone has their own cleaning system for shells. My method is to boil found shells in a pot on the stove first and then soak them in white vinegar. After rinsing them in cold water, I let them air dry.

There are so many ways to paint oyster shells and you can experiment to fit the occasion…I think the inside of an oyster shell is so beautiful and I often just paint the outside of the shell, leaving the inside natural…try Krylon blue ocean breeze as an outside color!

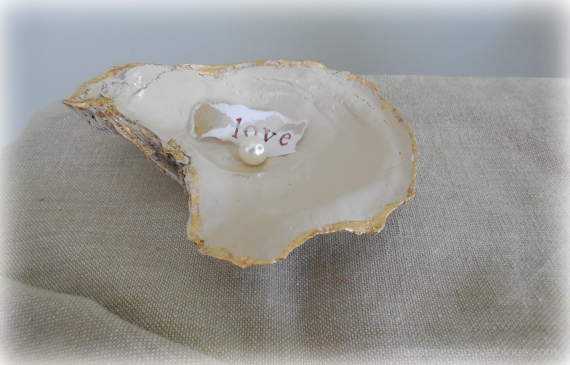
For this project, I spray painted (insides only) of the shells with two coats of an off white (using Rust-oleum gloss navajo white). Then, I used a little gold leaf around the edges in an irregular fashion to add a little sparkle and to create a more formal look. (If you don’t have any gold leaf, you can purchase a small gold leaf kit online or in a craft store that includes the gold leaf sheets, an adhesive, and a protective coat.)

pleasure  in simple things a diy shell place card

As a place card, just use a small piece of decorative paper to hand write or stamp a name or table number and lay inside the shell…easy! Add a ‘pearl’ or pretty piece of sea glass. So pretty and so coastal!

Because this shell can be used as a ring holder, it makes a wonderful gift for a newly engaged friend. It also makes a great soap dish or salt cellar. For a bridal shower, a handmade beaded bracelet could be a pretty favor to include in the shell. Or, add a small square soap or sea glass shaped soap pieces. :)

pleasure in simple things oyster cell ring holder

Thank you so much for stopping by!

Remember to take pleasure in simple things, Jackie

P.S. You may also enjoy monogrammed shell gift tie-on, beachy bridal shower, nautical gift wrap, shell candles, or beachy shower gift.
Sharing with Finding Silver Pennies, Craftberry Bush, Coastal Charm, and Sand & Sisal.

no comments

« Previous Entries     Next Entries »