Subscribe to Pleasure in Simple Things via RSS ReaderFollow Pleasure in Simple Things on InstagramFollow @InSimpleThings on TwitterLike Pleasure In Simple Things on FacebookFollow Pleasure In Simple Things on PinterestEmail Jackie

forest in a jar centerpiece

December 19, 2014

forest in a jar pleasure in simple things blog

Originally, holiday 2014 in my house was intended to have a sea glass theme using aqua as an accent color. But, as you know if you read my blog, I was so wrapped up in last year’s outdoor theme that I had to continue it for one more year…I just had too many ideas left to use! The sea glass theme is being pushed out to 2015…can’t wait!

easy to make  forest in a jar pleasure in simple things blog

You may also know, one of my fascinations this year has been with jars, bottles, (even salt shakers) …any type of glass container. I just can’t seem to get enough! Putting some favorite items in a jar can really elevate them to the status they deserve and it puts a smile on your face in the process!

DIY forest in a jar pleasure in simple things blog

Case in point – my favorite trees from Terrain this year. The trees are just so beautiful, I wanted to highlight them in some way. I decided to make a very simple forest in a jar! Rather than use the typical snow for the bottom of the jar, I used white beans. I love the simplicity of the design!

outdoor theme holiday decor pleasure in simple things blog

The jar? I bought it at Target. In fact, I bought quite a few. They come in 3 sizes and are very reasonably priced – ranging in price from $3.99 to $14.99.

easy forest in a jar pleasure in simple things blog

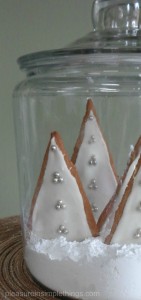
neutral tree cookies pleasure in simple things blogThen, I got so stuck on the forest in a jar idea, I made one out of cookies also! On this one I used sugar ‘snow.’ I made gingerbread cookies and let them sit around for a while so they got really rigid before I used them – better for standing!  The cookies can easily be decorated to match your decor!

Happy planting! What will you use to make your forest in a jar?

Thank you so much for stopping by.  I hope you enjoyed Friday field trip’s quick and easy way to create a holiday centerpiece!  Have a fabulous weekend and remember to take pleasure in simple things, Jackie

Sharing at House of HipstersThe Shabby Nest, Crafts a la Mode, and Craftberry Bush.


2 comments

diy feather ornaments

December 16, 2014

white feather glitter ornament pleasure in simple things blog

It is hard to believe Christmas is only a little over a week away! But, there is still some time to make some ornaments as gifts. I am sharing two easy DIY ideas on making feather ornaments. A woodland holiday theme needs to include feathers, nests, and birds – don’t you think?

One way is to put a feather or feathers into a clear hollow glass ornament. I did this in three different variations this year:

1.  I used a clear drying glue to add silver glass glitter to the outside bottom of the glass globe and added a spotted feather inside the globe.

dotted feather ornament pleasure in simple things blog

2.  I used a cotton swab to add dots of clear drying glue and glued white glass glitter to the dots. When dry, I added a white feather and a pinch of silver glitter inside the globe.

white dot and feather ornament pleausre in simple things blog

3.  I dipped two feathers into some silver glass glitter before placing them into the globe. To keep them positioned correctly, I used a glue gun to glue the tops of the feathers near the top of the ornament. This doesn’t show, because the place where the feathers are glued is covered when the metal piece for hanging the ornament is repositioned on the ornament top.

close ups of glitter feather ornaments pleasure in simple things blog

The second way isn’t using an actual feather, but rather… using heavyweight cardboard to create a feather design. Simply draw or trace a feather onto cardboard (I made mine black for purposes of demonstration – it is best to use the same color as your glitter so a different color will not show through). Cut out the feather shape using a craft knife and cut a hole for adding a string or ribbon. Use clear drying glue to cover the cardboard with glass glitter – one side at a time.

process of making a feather glitter ornament pleasure in simple things blog

Add a ribbon or string for hanging. I used black and white baker’s twine because I am giving my feather ornament as a gift, and the black and white color scheme best reflects the taste of the recipient.

packaged feather ornament pleasure in simple things blog

I decided to package it with a favorite Emily Dickinson quote. I used my computer printer to print the quote onto a clear label and used the label to seal the ornament in a clear cellophane bag. I think it makes a thoughtful gift.

emily dickinson quote pleasure in simple things blog

I hope these ideas have inspired you to create some ornaments using feathers.  Have fun with it!

Thanks for stopping by!  Remember to take pleasure in simple things, Jackie

Sharing at Elizabeth & Co., Sand & Sisal, and Coastal Charm.

no comments

salt shaker snow globes

December 12, 2014

Salt Shaker Snow Globes pleasure in simple things blog

With the current bottle and jar love I have going on for my holiday décor, this post should not surprise you!

Remember a few years ago when Anthropologie carried salt shakers with little trees in them?  Many crafters were inspired by this cute idea and I saw a number of versions created soon after the little beauties hit the Anthro stores.

Salt Shaker Snow Globes pleasure in simple things blog

I didn’t hop on that bandwagon and create a batch of salt shaker inspired items back then. That changed recently when I inherited quite an extensive salt shaker collection…(don’t ask – that interesting story is for another post!)

So, now in possession of so many salt shakers, I was prompted to create some salt shaker ‘snow globes’ and I am sharing some of my creations on Friday field trip today.  (Okay, so technically they are not snow globes since I haven’t added water.)

Salt Shaker Snow Globes pleasure in simple things blog

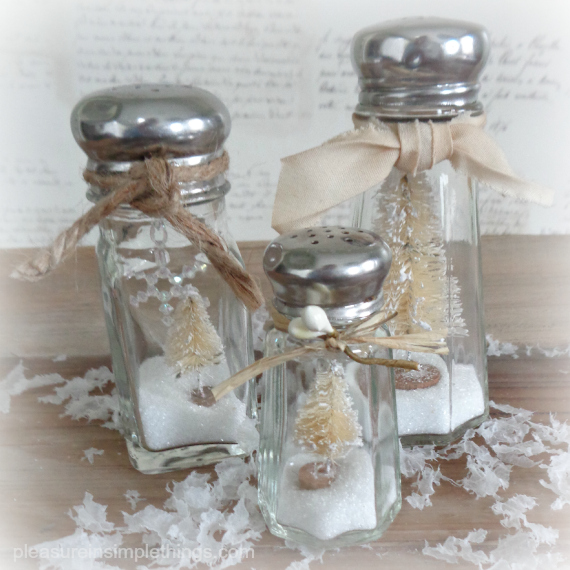
And, because of my preference for neutrals, I made my salt shaker snow globes with natural bottle brush trees.  I just added a little ‘snow’ and a tree to make a wonderful little favor or piece of holiday décor. (My recent inheritance gives me enough salt shakers to fill a mantle a couple of times over!)

Salt shakers are easily found at thrift stores or can be purchased very inexpensively at restaurant supply stores. Cute, aren’t they?

Salt Shaker Snow Globe with snowflake  pleasure in simple things blog

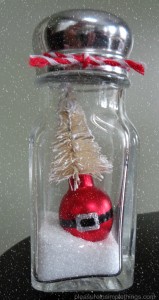
The best thing about them is that each creator can add a personal touch by choosing a favorite tree and ribbon or embellishment. For example, in one of my creations, I hung a little snowflake from a piece of thread. The variations are obviously endless!  Create something that matches your decor.  The stainless tops to the shakers can easily be spray painted with an oiled bronze or rusty look finish if that is your preference…or, spray in a glossy red or green!  You can also tie on a rusty jingle bell or other favorite item around the top of the shaker.  Or, glue a little ornament to the tree like I did with the Santa ornament my friend Phyllis gave me below. ;)  Group a bunch together and add some lights for a wonderful glow! :)

Salt Shaker Snow Globes and light pleasure in simple things blog

I hope I inspired you to create some salt shaker snow globes that coordinate with your individual taste and décor.  You don’t even have to ‘hold the salt’ – you can use it for the ‘snow!’

santa salt shaker snow globe pleasure in simple things blog

Thanks so much for stopping by. Remember to take pleasure in simple things, Jackie

Sharing at Thoughts from Alice, Finding Silver PenniesHouse of HipstersCoastal Charm, Crafts a la Mode, Shabby Nest, French Country Cottage, and Craftberry Bush.

10 comments

zip code pillow gift

December 9, 2014

adding a zip code to a pillow gift pleasure in simple things blog

I love using zip codes in gifts! Giving a gift with the zip code from a special place – a hometown, the location of a new home, a vacation or honeymoon spot, or a college town – is such a thoughtful way to recognize a favorite or significant place of the gift recipient.

You may remember the decorative zip code tray I made a while back. (Click here for instructions to make a zip code tray.) Today, I am sharing instructions on how to add a (no sew) zip code to a homemade pillow!

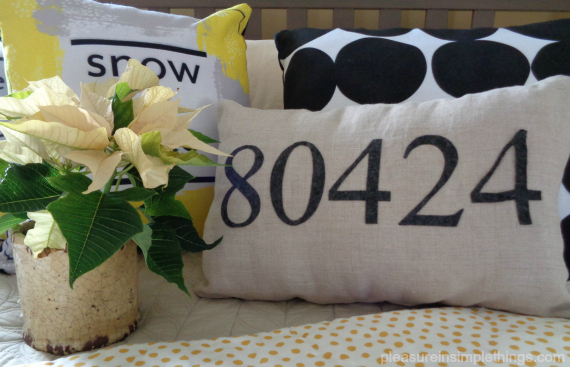
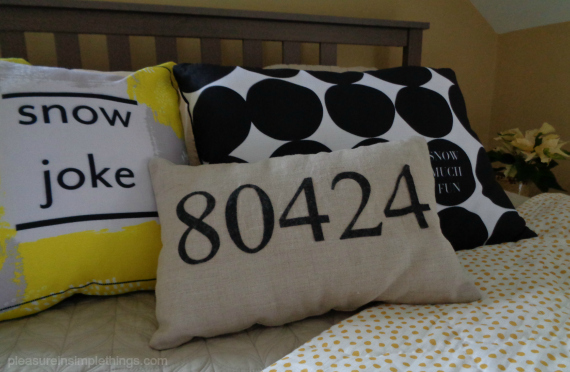
I made a pillow with the zip code for Breckenridge – one of my son’s favorite snowboarding places in Colorado – to add to a group of snow themed pillows I had made for his apartment.

pillows for snow boarders pleasure in simple things blog

I had planned on using an iron-on fabric adhesive to keep the zip code numbers in place and then to add decorative stitching around the edges of the numbers. As it turned out, the instructions on the adhesive I choose said “do not sew” on the instructions so, I ended up not including the decorative stitching to my design.

I chose linen for the pillow and gray felt for the zip code numbers. I used a product I purchased at a fabric store called HeatnBond Ultrahold to adhere the numbers.

zip code pillow on a bed pleasure in simple things blog

I decided on a 12” x 16” finish size for my pillow and cut the fabric appropriately. (If you decide to use a pillow form for your pillow, be sure to create a size that will accommodate it. If you are using polyfill to fill your pillow, you obviously do not need to be exact in your measurements.)

So, before proceeding to make the pillow, the desired zip code needed to be added to one of the pillow pieces. This was not hard to do, but took a little time and patience.

zip code pillow collage of instruction photos pleasure in simple things blog

First, I printed out numbers from my computer in a size and type style that looked appropriate for the finished pillow size. I cut out the five numbers from the computer paper.  (Cut only one paper number for a duplicate number.) I cut a piece of felt in an appropriate size to accommodate the five numbers I cut out. Following the instructions on the fabric adhesive, I used an iron to adhere the fabric adhesive to the BACK of the felt. Then, I flipped the numbers and traced them onto the paper of the adhesive. BE SURE to trace the numbers BACKWARDS (flipped on reverse side) so that they will come out the appropriate way when cut! I carefully cut out each number from the tracings. I removed the adhesive backing from the felt numbers and positioned them onto the right side of the linen piece I was using for the front of the pillow. Following the instructions on the adhesive, I ironed and bonded the numbers to the fabric.

Zip code complete! I then proceeded to finish sewing and stuffing the pillow. It is perfect for the snow themed holiday gift for my son…the perfect addition to a snowboarder’s apartment!  Now I am thinking I should make more – so many snowboarding states, so little time!  I also made one for a new home owner.  (For my own home I am thinking zip codes from favorite beach towns in neutral and sea glass hues!)

Love a themed gift! It’s snow much fun! ;) I can’t wait to coordinate the wrapping!

snow themed pillows pleasure in simple things blog

Note: The snow pun pillows in this post were ordered from Tiny Prints. Every year when I order my Christmas cards, I go a little crazy ordering other products I see on their site…this year; I couldn’t resist all the wonderful pillows that were available to personalize. If you want a zip code pillow and would rather not sew it yourself, you can easily personalize one using this website (click here for website)…or, even add a photo to a pillow. If I had a photo of my friend’s new home, I could have made a pillow with a photo of the home on the front! Next, I may order a pillow with a photo of my son snowboarding to add to his gift!  Another option to create a zip code pillow is to buy a pre-made pillow cover (Ikea has some nice ones) and follow the instructions I’ve provided to add a zip code.  I hope I have inspired you to create a themed gift for someone special!

Thanks for stopping by! Remember to take pleasure in simple things, Jackie

Sharing with Thoughts from Alice, Elizabeth & Co., House of Hipsters, and Sand & Sisal.

7 comments

diy book a day advent calendar

November 25, 2014

DIY making a book a day advent calendar pleasure in simple things blog

I love to read.

So, I guess it won’t come as a surprise to you when I tell you that books have always had a place as part of my holiday celebration.

In my home, reading holiday books is as much a part of preparing for Christmas as leaving cookies for Santa or trimming the tree.  Every November, the stack of holiday picture books packed away with the rest of the holiday trimmings, makes its way downstairs.

A great tradition I am sharing with you today is to create a more formal celebration of holiday books by making them into an Advent calendar. Wrap up 25 holiday books to stack by the fireplace or a cozy couch and have the children open one to read each evening during Advent.

using books for an advent calendar pleasure in simple things blog

stack of books advent calendar pleasure in simple things

The books don’t need to be about the holidays in the literal sense. You can choose stories of love, family, friendship, travel…or, even cooking –all appropriate themes relating to the holiday season.  There are so many great books – you don’t need to limit yourself to How the Grinch Stole Christmas or  ‘Twas the Night Before Christmas.  If you need some suggestions, here are a few titles we have enjoyed to get you started:

Santa Calls by William Joyce
Christmas in New York City by Roxie Munroe
The Finest Tree by John and Anne Hassett
Penquin and Pinecone: A Friendship Story by Salina Yoon
The Giving Tree by Shel Silverstein
The Tree that Came to Stay by Anna Quindlen
Love You Forever by Robert Munsch

diy book a day advent calendar pleasure in simple things blog

Be sure to include some titles with beautiful illustrations:

Old Turtle by Douglas Wood
Santa’s Favorite Story by Hisako Aoki and Ivan Gantscher
Simon and the Snowflakes by Gilles Tibo
The Snowman by Raymond Briggs
Polar Express by Chris Van Allsburg

Also, it is fun to include titles that promote activities:

I Spy Christmas by Walter Wick and Jean Marzollo
Snowmen by Peter Cole, Frankie Frankeny, Leslie Jonath
Recipe for Adventure Series by Giada deLaurentiis and Francesca Gambatesa
Kids in the Holiday Kitchen: Making, Baking, Giving by Jessica Strand

book advent calendar pleasure in simple things blog

When wrapping the books, you can choose a color theme to match your décor, holiday theme, or favorite color of the child(ren). I used kraft paper this year to wrap the books and added stickers I personalized with ‘book a day advent’ at Tiny Prints (click here for the website).  Their stickers are great – so many cute designs to choose from, they can be personalized as you wish, and a set is very inexpensive. I added numbers to my personalized stickers using rubber stamps and added one to each wrapped book.

When adding the numbers, be conscious that you can be strategic by coordinating number placement with book selection. Number an activity book for the weekend, time a relative’s visit with an appropriate theme/title, or read  ‘Twas The Night Before Christmas on the appropriate evening.

book a day advent diy calendar pleasure in simple things blog

You can use books you already own and/or library books for this activity…no need for it to be an expensive project!  Your local children’s librarian can help with your title selection if you need it.  And, if you own the books, when opening your gifts this year, use the discarded wrapping paper to wrap up the books for next year’s book calendar!

I hope you are inspired to create a book Advent calendar this year! Have fun with it!  I would love to hear your favorite titles!  The children will love this activity  – and, what better tradition than one that promotes a love for reading? :)

Thanks for stopping by. Remember to take pleasure in simple things, Jackie

Sharing with Finding Silver PenniesHouse of Hipsters, Thoughts from Alice, Crafts a la Mode, and Sand & Sisal.

8 comments

tiny houses diy advent calendar

November 18, 2014

advent calendar with birch log pleasure in simple things blog

I love Advent calendars!  Every year I end up making a least a couple!  I’m not one to make a hanging calendar…I much prefer the 3D variety.  The first one I am sharing with you this year uses a collection of simple paper houses.  (Last year I shared one made from baby food jars, remember?  Click here to see.)

advent calendar house plesure in simple things

I used white card stock to cut out a two piece house.  I had planned on using gray card stock for the roofs, to create a nice contrast against the white ‘snow,’ but since the copy center was out of gray, I ended up painting the white card stock gray for my roofs.  I used rubber stamps to add the numbers to the front of each house (and added a little glitter).  I then added glass glitter ‘snow’ to the roofs…

making an advent calendar with paper houses pleasure in simple things blog

You don’t need a mantel to display an Advent village…here is the village on a birch bark lined tray…

advent calendar houses on birch bark lined tray pleasure in simple things blog

Or – you can use any shelf, table, or little corner in your home to add these tiny houses.  To make them really magical, they need some snow and lights…don’t you think?

advent calendar village pleasure in simple things blog

I am keeping mine pretty simple…just the houses with some snow – and, to go with my woodland theme, I added a white birch log…

small house advent calendar pleasure in simple things blog

So easy and so pretty!  This is a wonderful project to create with children.  I have another Advent calendar in the works to share soon!

Thanks so much for stopping by!

Remember to take pleasure in simple things, Jackie

Sharing at Craftberry Bush,  Sand & Sisal, Thoughts From Alice, and Finding Silver Pennies.

4 comments

diy tree in a bottle xmas ornament

November 11, 2014

 tree in a bottle ornament pleasure in simple things

Yes, I have admitted I am going through a little bit of a bottle obsession phase of late…creating holiday décor with little bottles has been really fun! Today, I am sharing a really easy DIY ‘tree in bottle’ Christmas ornament.

supplies for making a tree in the bottle ornament plesure in simple things blog

Like these Thanksgiving place card holders I shared, I used miniature bottles to create these tree ornaments. I have added a little ‘snow,’ and a miniature tree inside the corked bottle to create the cutest ornament!

supplies for a DIY tree in a bottle ornament pleasure in simple things blog

The little bottles and trees are easy to find in a craft or dollar store. I chose a natural colored bottle brush tree for my creation since I have a passion for neutrals. For the ‘snow,’ use your favorite glitter, salt, or artificial snow.

DIY holiday ornament pleasure in simple things blog

To be able to hang the ornament, I screwed a tiny screw eye into the cork and added a length of brown and white baker’s twine. (The screw eyes are easy to find in the hardware section of your local Home Depot – you can buy a package and will have enough to make several ornaments.)

tree in a bottle ornament pleasure in simple things blog

That, my friends, is it! Easy, right? And, so cute!

pleasure in simple things blog tree in a bottle ornament

I hope you enjoyed today’s easy Christmas ornament DIY.

Thanks so much for stopping by and remember to take pleasure in simple things, Jackie

Sharing with The Shabby Nest, Sand & Sisal, and Thoughts from Alice.

no comments

for the love of hazelnuts ~ homemade spread

November 7, 2014

using pretty jars to package homemade chocolate hazelnut spread pleasure in simple things

When I was a kid, one of the best parts of Thanksgiving at my grandmother’s house was cracking and eating nuts! My grandmother would serve a basket of mixed nuts in the shell, providing a metal nutcracker so that we could open them ourselves. It took so much longer to open the nuts than to actually eat them, but then I guess that was what contributed to the fun – all that hard work!

My first exposure to hazelnuts was when they were in the Thanksgiving nut basket…of course, I had no idea they were called hazelnuts at the time. ..the same was true of pretty much all the nuts (including the silly looking Brazil nuts) in the assortment – except for the more familiar walnuts.

hazelnuts for chocolate hazelnut spread pleasure in simple things

As I got older, and was able to identify the individual nuts and their flavors, hazelnuts were one of my favorites! So, it is no wonder that I had an instant love for Nutella …chocolate and hazelnuts? With these two flavors, how can you go wrong?!

This year, I thought about trying to make my own hazelnut spread. Of course it would be much easier to buy it prepared, but I wanted to taste a fresh batch of homemade! When I realized there was a hazelnut spread recipe in the Mast Brothers cookbook, I knew I had to try it!  So, come into my kitchen for today’s Friday field trip to make some spread!

roasting hazelnuts for chocolate hazelnut spread pleasure in simple things

Roasting hazelnuts to use in homemade chocolate hazelnut spread.

I have included the recipe adapted from the Mast Brothers in this post and I will be giving away a copy of the Mast Brother’s cookbook as November’s giveaway selection. (If you leave a comment on this post, you are automatically entered to win!) Since I will be making several of the recipes in this wonderful chocolate cookbook to give as gifts this holiday season, I thought some of my friends may want to do the same! The Mast Brothers are chocolate masters, and I am hoping to use some of their expertise to create some of my own chocolate edibles this holiday.

chocolate hazelnut spread recipe pleasure in simple things

When I buy nuts in bulk for recipes – like pistachio, pine, or hazelnuts – I usually purchase them at Trader Joe’s since I have always found they carry a good quality product that is reasonably priced. So, when I needed recipe ingredients for my hazelnut spread, guess where I shopped?

I had fun making the spread and I am eager to test out some recipes using hazelnut spread. I packaged up my spread in jars and plan on giving them as Thanksgiving gifts. Maybe I will make copies of some of the recipes I find to include with the spread and add a tie-on tag.

packaging for home made chocolate hazelnut spread pleasure in simple things

Thanks for stopping by! I hope you will try making your own hazelnut spread…it has such a great, fresh flavor! If you should have any great recipes using hazelnut spread, I would love to hear about them!

cute packaging for homemade chocolate hazelnut spread pleasure in simple things

Remember to take pleasure in simple things, Jackie

(If you’d like to see my Friday field trip to Mast Brothers Chocolate, click here.)

2 comments

thanksgiving diy place card holders

November 4, 2014

DIY place card holder for your Thanksgiving table pleasure in simple things

So many things look so much cuter in miniature, don’t they? Today, I am showing you how to use a miniature bottle to create an easy DIY place card holder for your Thanksgiving table. Reminiscent of a fairy garden, these mushroom place card holders are refreshingly different than the standard turkey motif! A small piece of moss, a tiny faux mushroom, and some bendable wire are the only other supplies needed to create a little mushroom in a bottle…so small, and so adorable!

mushroom in a bottle place card holder pleasure in simple things

Small corked bottles are easy to find at a craft or dollar store. I found a great selection in the jewelry supply section of my local craft store. (They are also great for displaying small pieces of sea glass and hanging from a chain!)

making a Thanksgiving place card holder pleasure in simple things

Any little piece of moss will do inside the bottle…you may be able to find some outdoors. You won’t need much! Then, add your mushroom. If you have any trouble manipulating the mushroom into the bottle, try using a pair of tweezers.

DIY mushroom place card holder pleasure in simple thingsUse a small length of bendable wire – these come in many different finishes in the craft store – and shape a couple circles to use to position the place cards. Leave a little piece of the wire at the bottom to push into the cork stopper.

Now, just repeat the process for the number of place card holders you wish to make! They don’t all need to be the same exact size or shape.

Aren’t they adorable?

DIY thanksgiving place card holder pleasure in simple things

I hope you enjoyed this easy DIY for Thanksgiving place card holders. I can’t wait to share my Christmas version! I’ve been busy making holiday items using bottles and jar/containers…so much fun!

mushroom in a jar place card holder for Thanksgiving pleasure in simple things

Thanks for stopping by! Remember to take pleasure in simple things, Jackie

P.S. If you can’t give up on the turkey motif, you may also enjoy this cutie for your Thanksgiving table!

Sharing with Sand & Sisal, Elizabeth & Co., Coastal Charm, Finding Silver Pennies, Craftberry Bush, City Farmhouse, and Thoughts from Alice.

5 comments

anthro inspired holiday gift tag

October 21, 2014

finished holiday gift tag pleasure in simple things Anthro inspired

It is not even Halloween…why am I sharing a Christmas craft?  Well, we had a rainy weekend last weekend and I decided to make some gift tags for the holidays. Having some items prepared in advance definitely takes some of the pressure off come December! (Although, traditionally I have done my Christmas wrapping the day after Thanksgiving! I know – cringe worthy for any last minute types out there!)

supplies for holiday gift tag tutorial pleasure in simple things

Anthropologie always has such cute tie-ons as part of their holiday wrapping each year. This year, one of the designs reminded me of a hand painted Christmas card I had made many years ago. It had been an easy design using watercolors – I had done an abstract tree by just making a few horizontal lines on some watercolor paper. Anthro has done the same type of design as a holiday package tie-on, adding an embellishment that I think is so cool – a twig wrapped in green string as a tree trunk!

Their design inspired me to create some gift tags reminiscent of the design I had used on my cards so many Christmases ago. Today, I am sharing a tutorial.

make watercolor lines for xmas gift tag pleasure in simple things

If you don’t have watercolor experience, don’t be intimidated! And, you don’t need any fancy supplies. When I made those tree Christmas cards years ago, I used paint from a dollar store children’s watercolor set! That is all you need to create this card! You can pick up a kit (that includes a brush) at a dollar store or children’s craft section of a bargain store. Watercolor paper (don’t use regular paper) is available in craft or hobby stores. The amount you need will depend on the number of cards you intend to make.

Think about the shape of a tree and picture a triangle shape on the watercolor paper. For purposes of this tutorial, I made pencil marks to better guide you (my triangle is 3” high). If you need to make your own pencil marks, you will want to make them much lighter than this so they will not be visible on your finished card.

Using a brush dipped in water, brush the water onto the paper in the triangle shape. Don’t saturate the paper; just give it a light wash of water in the triangle shape.

finishing watercolor lines for holiday gift tag pleasure in simple things

Next, mixing water with the green paint, paint random horizontal lines across the paper using the triangle as your guide. Some of the lines may stay within your imagined/pencil triangle shape and some may be a little longer. Make one or two lines at a little bit of an angle rather than perfectly straight across. Once you are happy with the look, leave the tree to dry.

using a twig embellishment for holiday gift tag pleasure in simple things

Next, load a little bit of paint on the brush. Hold the brush over the tree and lightly tap the middle of the brush handle…this will give you some speckling on your paper. See the green dots on my card?

You may want to experiment and try a few trees to get a better feel for the paint and the paper before you create a final tree.
completing twig embellishment on holiday gift tag pleasure in simple things

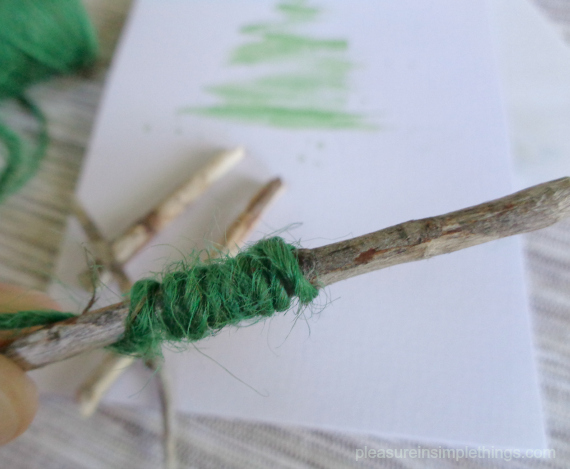
Next, find a thin twig to use as the trunk of your tree (mine is 4 ¼” high). Using green thread, string, yarn, or twine; wrap a length around the middle section of your twig – securing with dots of glue. Use a glue gun to attach the completed trunk onto the painted tree.

 attaching embellishment on holiday gift tag pleasure in simple things

Cut or rip (for deckled edge) the tag to desired size (mine is 5” x 6”).

If you want a little bling – add some optional glitter. I finished up my card by brushing on a little glitter paint in random spots using a cotton swab.

That’s it! You have a beautiful, hand painted gift tag for your holiday wrapping!

 finished Anthro inspired holiday gift tag on package pleasure in simple things

I am using my creations as flat gift tags, but they can easily be adapted to a folded card or a tie-on (by adding two small holes – one on each side of the twig, and using some green thread to tie onto a package) if that is your preference.

I don’t like writing names on my gifts…I always identify packages by the wrapping theme/color or by writing an identifying letter or initial somewhere on the package where not readily visible. If you would rather have names on your tags, simply add the words ‘to’ and ‘from’ with a thin permanent marker.

writing on gift tag pleasure in simple  things

If you make your tag into a folded card, include a few holiday words inside – like: Oh, what fun! Jingle all the way! Making it Merry!

Rather not make your own tree gift tags? You can always get some similar ones, gratis, at Anthropologie when you make holiday purchases!

Thanks so much for stopping by!  Remember to take pleasure in simple things, Jackie

Sharing with NancherrowCraftberry Bush, Crafts a la ModeLiz Marie, and Elizabeth & Co.

3 comments

« Previous Entries     Next Entries »