Subscribe to Pleasure in Simple Things via RSS ReaderFollow Pleasure in Simple Things on InstagramFollow @InSimpleThings on TwitterLike Pleasure In Simple Things on FacebookFollow Pleasure In Simple Things on PinterestEmail Jackie

putting it all together

December 22, 2015

packages for coastal christmas pleasure in simple things blog

I have started to wrap gifts and I am having some real fun – using beach totes, wicker baskets, and wooden trays to package and display gifts for my sea glass themed holiday!  I thought I would take a few quick minutes to show you how I am incorporating the things I have been making and sharing with you.

using feathers in wrapping pleasure in simple things blog

Remember the crab on the gift tag from this post?  He is looking good with my sea glass colored dotted wrapping paper. :)  And, the feather I made in this post is looking great with it as well!

relabeling bottles pleasure in simple things blog

The bottle labels I shared in this post are exactly what I needed to make the wine bottles for my table – as well as the ones I am giving as gifts – look right on theme!

coastal bottle wrapping pleasure in simple things blog

You can see that the sea glass tags I shared in this post look great as well!

feather wrapping pleasure in simple things blog

That is how I used some of my creations!  I so do love a good theme – and, it is so fun when everything starts coming together!  I have plenty more to do as I continue with my wrapping!  I will try and share more photos to Instagram and Facebook as I continue.  How are you doing with your wrapping?

sea glass christmas pleasure in simple things blog

Thanks for stopping by!  Remember to take pleasure in simple things, Jackie

no comments

a few more gift tags

December 15, 2015

making a crab gift tag pleasure in simple things blog

It is time to start wrapping gifts! I am way behind on my planned Thanksgiving weekend wrapping session!

I have all the supplies together. I made the sea glass gift tags and the painted metallic feathers to adorn my packages…But, wait…shouldn’t I have a couple sea creatures to add to the mix?

sparkly crab gift tag pleasure in simple things blog

I decided to make a couple more quick gift tags and they are super simple to create in no time flat!

For the crab, I used a teeny, tiny rubber stamp I found at the craft store. The size alone makes it super cute! I added it to card stock using an aqua colored ink stamp pad. To add the holiday sparkle, I just used a cotton swab to add a few dabs of aqua sparkle craft paint. Super easy and super cute!

crab gift tag supplies pleasure in simple things blog

The starfish gift tag took even less supplies to create than the crab gift tag. I used a light gray watercolor marker to draw a quick, free hand outline of a starfish. To this too, I added a few dabs of acrylic metallic craft paint to give it a little more bling!

starfish gift tag pleasure in simple things blog

Now I am content with my collection of gift tags for my sea glass holiday themed packages!

crab gift tag pleasure in simple things blog

Thanks for stopping by! Remember to take pleasure in simple things, Jackie

1 comment

sea glass diy gift tags

December 11, 2015

sea glass gift tags pleasure in simple things blog

For Friday field trip today, we are visiting ‘gift wrap central’ where I designed some gift tags to go along with my sea glass holiday theme.

diy sea glass gift tags pleasure in simple things blog

I decided the perfect detail for my gift tags was grommets. Not only are they currently a big fashion trend, but they add a nice ‘beachy’ vibe to my tags!

grommets on gift tags pleasure in simple things blog

Since I was designing these gift tags myself, I wanted to make them unique. That was part of the reason I decided to make them a little different shape than a typical gift tag. I decided on long rectangles – cutting card stock into 1“ x 4 1/4“ strips.

holiday gift tags diy sea glass pleasure in simple things blog

After I cut the tags, I added the grommet detail. If you decide to make these – don’t be intimidated by the grommets! They come in 2 pieces and are easily applied using a simple 2-piece metal tool and a hammer. The grommets and tool are inexpensive and are available at any craft store. Believe me; once you apply your first grommet, you will come up with tons of applications!

making sea glass gift tags pleasure in simple things blog

I used twine on my tags to stay consistent with my theme. Lastly, I used a big dab of strong glue, careful not to let the glue show, to attach a small piece of sea glass to each tag. Pretty easy, right?

final sea glass gift tags pleasure in simple things blog

I love the way these tags came out! It makes me eager to get wrapping!

Thanks for stopping by! Remember to take pleasure in simple things, Jackie

1 comment

message in a bottle ornament diy

December 4, 2015

message in the bottle diy by pleasure in simple things blog

My imagination is in overdrive this year for my ornament designs since I chose sea glass as my holiday theme and I love anything with a coastal theme! I have so many ornament ideas, but I am limiting myself to a few designs because there is so much to accomplish in preparation for the holidays and not enough time to do it all!

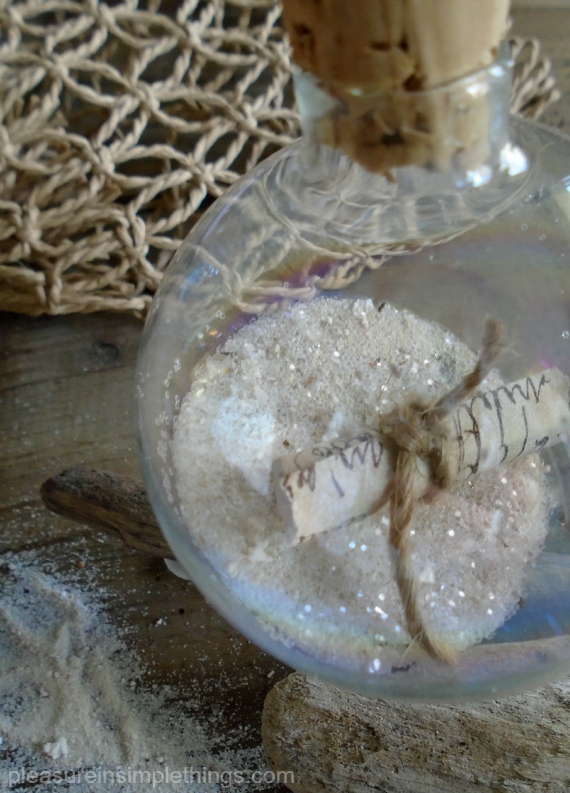
One ornament I knew I wanted to create was one that was inspired by a message in a bottle. Today, for Friday field trip, I am providing the instructions to make this easy to create ornament. I chose to use an iridescent, clear glass, hollow globe ornament instead of the obvious choice of a small bottle.

message in a bottle ornament supplies pleasure in simple things blog

Rather than write the ‘message’ myself, I opted to use a scrap of paper that already had writing on it, ripping the edges before rolling it up and tying it with a small scrap of twine.

I removed the top that came with the ornament and I poured some sand into the globe. Since it is the holidays, a little optional glitter is a nice addition to the sand! Next, I added the prepared message.

I replaced the top of the ornament with a cork. It is really simple to repurpose a cork since it is easy to trim with a knife to the size needed. After trimming the cork to the size I needed to fit snuggly in the top of the ornament, I screwed in a small screw eye and added a piece of twine for hanging. Any scrap of thin ribbon or rope will do in place of the twine.

making a message in the bottle ornament pleasure in simple things blog

That’s my ‘message in a bottle’ ornament! Easy, right?  This is a wonderful ornament to make as a gift for a newly married couple.  Use sand from their honeymoon for inside the ornament and write their wedding date or a love note on the ‘message!’

I hope I have inspired you to create your own message in a bottle ornament!

Thanks for stopping by! Have a wonderful weekend and remember to take pleasure in simple things, Jackie

no comments

photo drink labels for the holiday

November 24, 2015

holiday drink labels pleasure in simple things blog

I love a good theme. Part of what makes a great entertaining theme successful is consistency in the details. It also makes it fun for guests – because they are finding cool ways the theme has been brought into every detail. When it is the holidays, I like to take the details to the highest level!

personalized drink labels pleasure in simple things blog

I  want to share one of these details with you today – and, that is bottle labels! I don’t know about you, but in my house there is a certain contingency that drink from bottles – beer to be exact! Because my guys are so particular about their beers – microbreweries and such, I am not able to choose a beer that sticks with my theme. The wine drinkers can be a little more flexible – and for this year’s sea glass theme, I may just be able to sneak in a Sea Glass wine to stay on theme!

sea glass themed holiday with drink labels pleasure in simple things blog

Instead of trying to fight the selections, I will just modify the look of the drinks that are chosen with my own personally designed labels! This can be accomplished easily with a home printer, some labels, and some favorite photos!

making photo drink labels pleasure in simple things blog

Today, for those of you who may have some ‘issues’ with setting up forms on your home computer, I am showing you some labels that can be easily created using a website that specializes in photo gifts. There are plenty of them out there. I happen to think Pinhole Press puts out an exceptional quality product and the labels here were ordered from their website.

themed holiday drink labels pleasure in simple things blog

Using photos from my time at the beach and my own wording, I created both a beer bottle sized label and a wine sized label that I will use for the holidays. Now, no matter what bottle comes into the house, it will be right on theme! Aah!

themed drink labels pleasure in simple things blog

I created one design for beer bottles and one for wine bottles.  If you are challenged in the computer design/printing department, you can check out how easily you can create labels using Pinhole Press by clicking here.

I hope I have inspired you to create your own special labels!

Thanks for stopping by! Remember to take pleasure in simple things, Jackie

no comments

whale ornament diy

November 20, 2015

making a diy whale ornament pleasure in simple things blog

For Friday field trip today, I am sharing instructions on how I created my first ornament design for holiday 2015 to coordinate with my sea glass theme…a whale! And, I made him in a sea glass shade!

I started by drawing a whale outline on a thin piece of scrap cardboard. I used the cardboard as a template to cut out the shape of the whale from the clay. If you are not big on drawing, you can certainly find a pattern online to print out and trace.

diy whale ornament template pleasure in simple things blog

Once I had my template completed, I prepared the clay. Softening the clay in my hands, I formed it into a ball and rolled it out with a rolling pin, as I would for cookie dough, to a ¼” thickness. Then, using my template as a guide, I cut out the whale shape using a dull knife. I added a hole in the top of the ornament using a straw – this is where I would add my wire for hanging. Following the directions on the package of the clay, I baked the shape in the oven.

 template and clay pleasure in simple things blog

Whale Ornament Supplies Needed:
• Modeling clay, 1 -2 oz. per ornament – will vary depending on size of ornament (my whale is 4” x 1 ½”)  I used FIMO in the desired color for finished ornament
• Rolling pin
• 20 gauge black wire
• Cardboard template (optional) or cookie cutter
• Acrylic paint in black and white
• Thin paint brush

I was surprised how easy the clay was to use and how sturdy it was when it came out of the oven.  Once the ornament was completed, I used the black wire to form a ‘spout’ of water. Twenty gauge wire is easy to shape without any special tools! I made one end into a ‘spout’ and I wrapped the opposite end of the wire through the hole I had created with the straw.  My whale looked great already!

diy whale ornament pleasure in simple things blog

As an optional step, I decided to sand the edges some – just to make them look a little less angular. (For a vintage look, rub a little bit of Annie Sloan dark wax to the edges of the ornament.)

Now. all I needed to do was to add the whale’s eye. I did this with a little bit of acrylic paint and a thin paint brush – first a little dot in white, and then a smaller dot in black.

I completed my first ornament design for 2015!  I will be making a few more in sea glass shades before the tree goes up!  My whale may also get a little clear glass glitter for sparkle. :)

final whale ornament pleasure in simple things blog

Have I inspired you to make your own whale? Or, maybe a variation on the design? You can use the same process to create something to coordinate with your own holiday theme.

Thanks for stopping by! Have a wonderful weekend and remember to take pleasure in simple things, Jackie

no comments

christmas feathers

November 17, 2015

christmas feathers in sea glass colors pleasure in simple things blog

Last week wasn’t a very good week for my ‘to do’ list! The rainy days threw off my whole painting schedule. I was so disappointed because I had planned to paint furniture outside and I was eager to finish a very special piece I am currently working on. (More on that in a future post!)  In addition, my holiday preparations pretty much came to a screeching halt as I got distracted with some cooking, cleaning, and all around general errands!

uss feathers for Christmas pleasure in simple things blog

But, as I was washing all the windows in my house the other day, I started thinking about how I would add some feathers to my holiday décor. I love feathers and I really want to incorporate some into my sea glass theme for the holiday – especially since they remind me of seagulls.

making sea glass feathers pleasure in simple things blog

So, I did get a little distracted from my windows with some holiday thoughts and I had to paint some feathers that evening while I had a vision! I decided I would paint some in metallic gold and some in metallic sea glass colors. They came out great and I know I will use them later in my place settings and maybe, also, in some of my gift wrap.  And, by adding a gold thread to the feather, it turns into a beautiful holiday ornament!

seagull feathers in metallic pleasure in simple things blog

Painted feathers are so beautiful and can really be adapted to any décor and are super easy to make.   Just paint feathers using acrylic paint by applying it gently using cotton swabs.

I think these feathers will look great with my sea glass holiday décor. . .I hope I have inspired you to use some feathers in your décor!

Thanks for stopping by! Remember to take pleasure in simple things, Jackie

no comments

diy sea themed advent calendar

November 10, 2015

sea glass diy advent calendar pleasure in simple things

I haven’t gathered up all the supplies I will need for my sea glass themed Christmas décor just yet, but I have been working on a few things and today I am sharing this year’s advent calendar.

The design I came up with to coordinate with my sea glass themed holiday, although a simple one, produced really beautiful results!

shell for a diy advent calendar pleasure in simple things blog

I started with Halloween candy from the clearance rack of a discount store. You know, that 75% off stuff?!

pleasure in simple things diy beach themed advent calendar

I wrapped up pieces of candy (the little boxes work really well) – one for each day – in white paper. With some natural twine, I tied a little beach find to each package…a piece of sea glass, a rock, a piece of driftwood…

white sea glass advent calendar pleasure in simple things blog

Then, I added a number to each.  (I made the numbers by printing them onto clear labels using my home printer and adhering them to each package.)

Next, I arranged each wrapped ‘day’ onto a wooden tray. So simple, yet so beautiful! Tucking a string of battery operated mini lights into the arrangement will add a beautiful glow to the natural materials I collected on the sand.

pleasure in simple things sea glass advent calendar diy

The perfect advent calendar for my sea glass Christmas theme! What do you think?

diy advent calendar sea glass pleasure in simple things blog

If this coastal look doesn’t go with your holiday theme, there are certainly many ways to change up the wrapped candy to accommodate whatever your theme may be. Here is an example of a variation using birch bark stars on the boxes instead of beach items. See how easy the calendar can be changed up to go with an outdoors theme? Use paper and decorative items that best fit with your décor. Then, arrange the packages in a basket, a silver bowl, a clear jar, or lined up on your mantel – whatever works for your holiday theme!

birch bark stars advent calendar pleasure in simple things blog

I hope I have inspired you to create your own version of an advent calendar. Seas & greetings! ;)

Thanks for stopping by! Remember to take pleasure in simple things, Jackie

Sharing with Sand & Sisal, Thoughts from Alice, and Finding Silver Pennies.

no comments

before & after with napoleonic blue

October 27, 2015

Finished Annie Sloan blue dresser pleasure in simple things blog

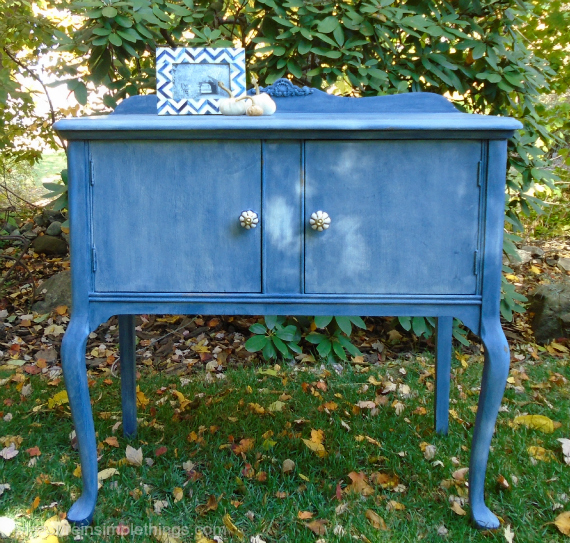
You know I love my neutrals! So you will understand why my last furniture redo took me out of my comfort zone. I painted it in Annie Sloan Napoleonic Blue! Yes, a deep blue! Why? When I saw the piece, I just thought it needed blue!

before and after using Napolenic Blue Annie Sloan pleasure in simple things blogI didn’t leave it straight blue though. I added a wash to tone it down a bit and add some texture.

I thought it was a lovely piece. I did some minor repairs to it and cleaned it up a bit. Then, I started by painting it in two coats of Annie Sloan Chalk Paint in Napoleonic Blue.

corner detail of chest redo pleasure in simple things blog

My next step was to add a wash of Country Grey. I chose Country Grey because I wanted a vintage look and I thought a white or beige would be too bright to give the look I was trying to achieve. I mixed water with the Country Grey in a disposable pan – probably a 60/40 mix; using 60% water. I brushed on the wash and quickly wiped it off with a piece of cheesecloth to get my desired texture.

after photo of chest redo in Annie Sloan Napoleonic Blue pleasure in simple things blog

After letting it sit a couple days, I added a coat of Annie Sloan clear wax. I let it cure for a few days and then did some light distressing before adding a second coat of clear wax.

I found some great knobs in Home Goods that coordinate perfectly with the piece and look the same as the knobs in a pricier store!

knob detail chest redo in Annie Sloan Napoleonic Blue pleasure in simple things blog

I think it is a wonderful transformation and a great result for my first time blue project!

Annie Sloan redo dresser in blue pleasure in simple things blog

Now I need to get rid of a couple pieces to make space for some new projects! I am excited to start my next project – a family heirloom for a friend that will serve as a lasting reminder of a special family member…can’t wait to start it!

Thanks for stopping by! Remember to take pleasure in simple things, Jackie

P.S.  If you would like to see instructions on how to make my velvet pumpkins like the ones pictured, click here for a tutorial!

1 comment

in the pink

October 16, 2015

a pink pumpkin place setting arrangement pleasure in simple things blog

For Friday field trip today, I am sharing a sweet little pink pumpkin arrangement.  You know I love putting flowers or plants in pumpkins!  Aren’t these cute for each place setting at a breast cancer charity event?

I used little baby boo pumpkins – you know, the little white ones?  I started by painting each pink.  I just used regular flat, latex house paint.  After they were dry, I cut the tops off and cleaned the inside.  I used a little soaked floral foam inside each pumpkin and stuck my pink zinnas in it.

pink pumpkin arrangements pleasure in simple things blog

Simple and adorable!

Try other colors based on the theme of your event or the decor in your home.  Or, maybe make some in fall colors for your Thanksgiving table!

pink baby boos pleasure in simple things blog

I hope I have inspired you to create a little pumpkin arrangement of your own!

Have a wonderful weekend!  Remember to take pleasure in simple things, Jackie

no comments

« Previous Entries     Next Entries »