Subscribe to Pleasure in Simple Things via RSS ReaderFollow Pleasure in Simple Things on InstagramFollow @InSimpleThings on TwitterLike Pleasure In Simple Things on FacebookFollow Pleasure In Simple Things on PinterestEmail Jackie

happy mother’s day

May 6, 2016

happy mothers day pleasure in simple things blog

It’s Mother’s Day weekend.  I was in a gift shop yesterday and I was amazed at those that buy something for their mom just to buy something.  That is so not in the spirit of Mother’s Day!  Mother’s Day is about recognizing a very special person. There is nothing wrong with buying a gift to give to that special person.  But, not knowing what your mom might like as a gift leads me to believe a better gift would be time spent with mom!

For Friday field trip today, I thought I would share three previous projects that might help you come up with a more personal gift for mom this Mother’s Day.

handkerchief diy pleasure in simple things blog

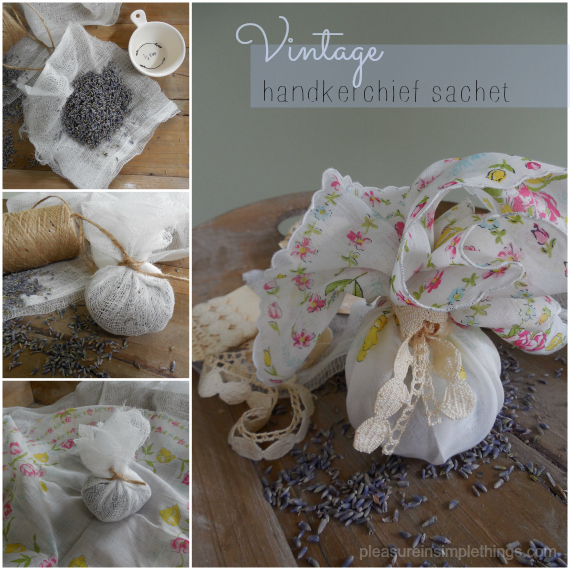
First, a cool sentimental gift.  Make a sachet using a family heirloom!  See the full post by clicking here.

Second, a fun recipe that can be served in a teacup.  A great way to spend time with Mom is to avoid the crowded restaurants, and serve up something homemade.  Click here for the recipe for this crème brulee.

teacup creme brulee mothers day pleasure in simple things blog

And, third…the old stand-by…flowers!  IF your mom is into flowers – after all, you should know!  But, skip the overpriced cliché roses and give a potted plant personalized to your mom’s taste.  It’s so much more fun to receive something that can be planted in the ground and enjoyed all season!

mothers day flowers pleasure in simple things blog

Have a wonderful Mother’s Day surrounded by those you love.  Thanks for stopping by.  Love you mom! :)

Remember to take pleasure in simple things, Jackie

2 comments

wine cork magnets diy

May 3, 2016

diy cork magnet pleasure in simple things blog

A quick and easy DIY today.  A great way to repurpose wine corks is to turn them into refrigerator magnets!

You have probably seen me do this before if you follow me on Facebook, but since there are so many special occasions coming up soon, I thought this easy project was worth mentioning again today.

starting a cork magnet pleasure in simple things blog

Do you sometimes save a cork from a special occasion bottle of wine?  Well, here is a practical use for it.  Instead of putting it in a jar, make a magnet!  You can even make a notation on the back of the cork with a fine point permanent marker to remember a particular occasion associated with the corresponding cork.

glueing magnet onto a wine cork pleasure in simple things blog

And, if you like all the magnets on your refrigerator to coordinate – which I am sure you do (!) – you should be able to salvage plenty!  Each cork makes two magnets.  Just cut each cork in half and use a glue gun to attach a strong magnet on the back of each.

diy cork magnet pleasure in simple things blog

I particularly liked the cork I pictured here because it had an initial on it.  I gave it to someone who had a name starting with the letter B!  Enjoy!

Thanks for stopping by.  Remember to take pleasure in simple things, Jackie

1 comment

may day surprises

April 26, 2016

flowers for May Day pleasure in simple things blog

I have done many different May Day surprises over the years. I love the element of surprise mixed with the beauty of fresh flowers – May Day combines these two elements perfectly!

Daffodils in a May Day Cone pleasure in simple things blog

This year, making my May Day arrangements, I decided I would only use the flowers I could harvest from my yard. This would have been an easy assignment in two more weeks or so, but when I went out into the yard today, I realized there are few flowers in bloom right now!

celebrating May Day with birch bark cone arrangements pleasure in simple things blog

I stuck to my challenge and used the only two flowers varieties I found in bloom. I arranged them in some plastic-lined, birch bark hanging cones I discovered for $2.75 each in the Terrain clearance room.

pleasure in simple things blog celebrates May Day

To add a little interest, I added some variegated Hosta leaves; picking the few that were just starting to poke through the ground! Even my Lillies of the Valley have yet to bloom!

I hope I have inspired you to create some May Day surprises of your own…what can you create from your yard?

May Day cones pleasure in simple things blogThank you for stopping by!

Remember to take pleasure in simple things, Jackie
1 comment

‘beachify’ your bottles

April 22, 2016

diy shells for wine bottles pleasure in simple things blog

The weather has finally turned here in Connecticut and I am loving every warm, sunny second of it!

For Friday field trip today, I am taking you into my wine cellar. (Not really, I don’t have a wine cellar – although I do keep a bottle of wine in my cellar!) But, I am showing you a bottle of wine!

shells for wine bottles pleasure in simple things blog

Warm weather not only makes me smile, but encourages me to find summer enhancements that also make me smile. A super simple one is to add a shell garland to your summer wine! A glue gun and a couple of shells (or beach glass) glued to a piece of twine create some easy summer décor! Just glue a shell – preferably found at the beach – onto each end of a length of twine and wrap it around a bottle!

shells on twine for wine bottles pleasure in simple things blog

These make great warm weather napkin rings as well!

If you are giving a bottle of wine as a gift, you can even roll a cute summer dishtowel (maybe a lobster or crab motif) around the bottle and tie it on with the shell enhanced twine!

beachify wine bottles pleasure in simple things blog

An easy way to add a feeling of summer and a smile! :)

Happy sunshine! Thank you for stopping by!

Remember to take pleasure in simple things, Jackie

no comments

party garland diy

April 19, 2016

diy garland for a birthday celebration pleasure in simple things blog

I am making a garland today that is a super easy DIY. Mine is for a birthday party, but the same design can easily be adapted for a Mother’s Day celebration or any other party.

easy diy garland birthday celebration fun pleasure in simple things blog

Supplies needed are card stock, chalkboard paint or chalkboard Con-Tact paper, and twine or ribbon.

diy birthday garland pleasure in simple things blog

First, I am covering some card stock in chalkboard Con-Tact paper. Chalkboard Con-Tact paper is a staple in my craft room, but if you don’t have any, chalkboard paint can be used instead. I cut circles from the covered paper – one for each letter I need for my finished garland. I have a 2 1/2” circle cutter that makes the circle cutting really easy, but scissors can be used after tracing the desired circle size onto the paper using a cup or small plate.

diy party garland pleasure in simple things blogNext, with a small hole punch, I placed two holes in each circle to hang the letters from twine. Because the holes are small, I don’t need to tie knots in the twine to keep the letters in place. If the holes you make are much larger than your ribbon or twine, you will need to add knots to keep the letters in position.

making diy birthday garland pleasure in simple things blog

Chalkboard is just one of the many finishes you can use for this project. Old wallpaper samples, gift wrap, brown bags, or any decorative paper that may coordinate with your party’s theme, also work wonderfully. Just use a spray adhesive to mount the desired paper onto card stock. Old book pages look awesome as well…just use rubber stamps or permanent marker to add the letters.

displaying diy birthday garland pleasure in simple things blog

I hope I have inspired you to make a festive party garland for your next celebration! A small version tied to skewers also works great as a cake topper!

Thank you for stopping by!

Remember to take pleasure in simple things, Jackie

no comments

recipe for love

April 12, 2016

a spoon from bridal shower activity pleasure in simple things blog

I recently went to a really fabulous bridal shower hosted by the future bride’s mom – with some help from the gals in the bridal party. Today, I am sharing one of the activities created for the event.

place setting with woooden spoon  pleasure in simple things blog

When I walked into the shower, I noticed wooden spoons tied in gold ribbon graced all the place settings. They certainly seemed appropriate for a bridal shower; particularly for this once, since both the future bride and future groom are great cooks!

bridal shower spoons for love activity pleasure in simple things blog

But, it wasn’t until a little later into the shower that the true purpose of the spoons was revealed. These spoons were meant to hold each guest’s ‘recipe for a happy marriage.’

spoons for love pleasure in simple things at a bridal shower

Fine point permanent markers were passed around to guests and each spent some time creating the perfect ‘recipe’ for the bride-to-be; recording it onto a spoon.

creating spoon bridal shower pleasure in simple things blog

What a sweet idea to collect the sentiments of all the guests!

bridal shower spoon pleasure in simple things blog

The groom’s mom’s message to the bride-to-be. :)

After the bride-to-be chose her three favorite spoons, the bridal party displayed them in a shadow box and awarded prizes to the authors of the three chosen sentiments. Priceless! (With a little more time, maybe the spoon handles could be dipped in metallic gold paint or gold-leafed as part of the permanent shadow box!)

shadow box from bridal shower activity pleasure in simple things blog

I hope you are inspired by this sweet ‘recipe for love.’

Please stop back on Friday when I will share some of the wonderful decor from this shower.  I can’t wait to reveal the fabulous venue!

Thanks for stopping by.  Remember to take pleasure in simple things, Jackie

1 comment

fabric herb tags with grommets

March 29, 2016

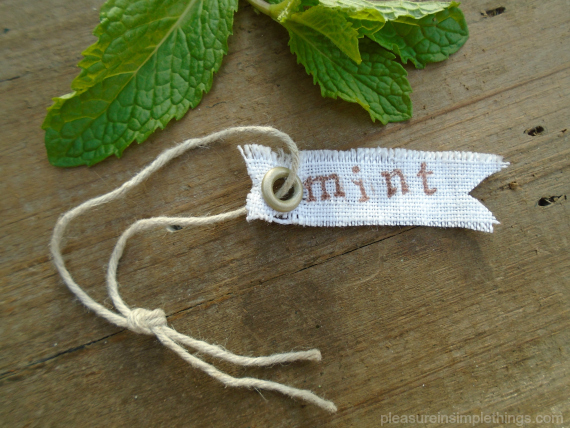
mint herb tag pleasure in simple things blog

You may remember I used grommets on some of my holiday gift tags this past Christmas. They create such a wonderful detail on a simple tag! Today, I am using grommets again on tags, but this time on fabric rather than paper.

fabric herb tags pleasure in simple things blog

Adorable tags can be created using scraps of fabric, letter stamps, and grommets. The tool for applying the grommets cost only a few dollars at your local craft or fabric store and is available in many sizes. Once you own this simple tool, you will find so many ways to use grommets! The only piece of equipment you will need, in addition to the grommets and the grommet tool, is a hammer.

I cut little flag shapes from my fabric scrap and rubber stamped onto them the names of my potted herbs. Adding the grommets creates the perfect little detail to add some twine for tying the tags onto the handles of my herb pots!

making fabric tags pleasure in simple things blog

As you can imagine, these tags have some wonderful applications! Using them as place cards and tying them onto napkins is a sweet way to use them. The ties can be made from natural twine or in a color to match a specific table décor. They make sweet gift tags to personalize a wrapped gift. Or, a number of them can be used to make a banner for a birthday cake. In planning a wedding, they can be utilized as escort cards.

fabric tag tied on herb pot pleasure in simple things blog

I hope I have inspired you to make up some fabric gift tags! How will you use them?

fabric tags with grommets pleasure in simple things blog

Thank you for stopping by! Remember to take pleasure in simple things, Jackie

P.S. To see how I used the grommet tool to create sea glass gift tags, click here.

2 comments

this year’s easter grass

March 25, 2016

pleasure in simple things easter grass

For today’s Friday field trip, I am sharing a couple of this year’s Easter grass plantings. You know how I love to plant grass for Easter! No empty container is safe from my grass seed!

planted easter grass and nest pleasure in simple things blog

This year, I am loving these mint colored tin containers I found in Terrain’s clearance room! I particularly like the ones with the black rim and handles – so cute!  And, they pair so well with my candy stones!

easter grass pleasure in simple things with chocolate rocks

As an added benefit of the (wheat) grass plantings – my daughter and I have been trimming it and adding it to our smoothies!

planted easter grass pleasure in simple things blog

I thank you so very much for stopping by and wish you a very special and blessed weekend.

pleasure in simple things blog happy easter

Remember to take pleasure in simple things, Jackie xo

no comments

bathroom vanity annie sloan redo

March 22, 2016

bunny pleasure in simple things blog

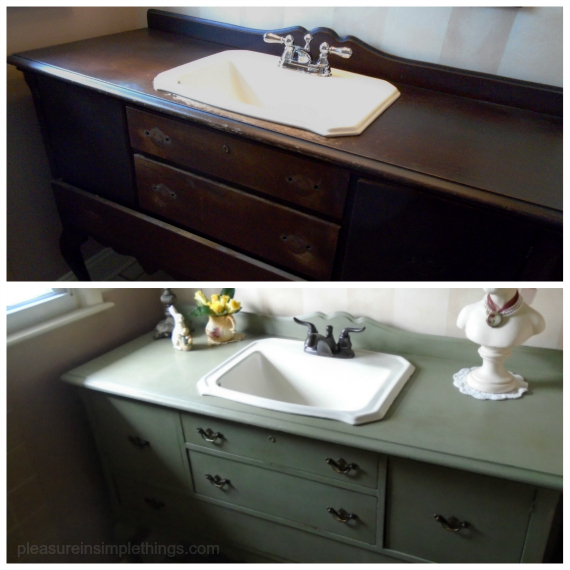
My friend Wendy recently decided she needed a change for her bathroom vanity and asked me if I would like to paint it. Of course, I jumped at the chance! She had looked at the Annie Sloan chalk paint colors and thought she would like Chateau Grey.

annie sloan bathroom vanity redo pleasure in simple things blog

Chateau Grey was one of the few colors I hadn’t yet used for a painting project and I was eager to paint with it. The green tones in the paint were perfect for the accessories Wendy had in her bathroom and I knew she made the perfect choice in paint color.

The vanity was wood and very dark. We both knew that the chalk paint would lighten up the entire look of the room.  The great part about painting the piece was that it would highlight some of the detail that really went unnoticed.

distressing detail on vanity pleasure in simple things blog

I started by painting the piece with two coats of Chateau Grey. Over that, I applied a wash of approximately 50/50 water and Annie Sloan Country Grey by painting, then wiping with a soft, clean cloth. I like adding a wash over a solid paint color because it gives more dimension to the paint.

detail annie sloan chateu grey redo pleasure in simple things blog

Next, I added a coat of clear wax. Then, I gave the piece a light distressing before adding some dark wax. After the piece was completed, I added an extra coat of clear wax to the top of the piece since it is in the bathroom and I wanted to give the top a little added protection.

annie sloan chateau grey redo pleasure in simple things blog

Wendy decided to keep the original hardware on the vanity and it looked great on the finished piece. She did change out the faucet in her sink.

a new faucet on vanity redo pleasure in simple things

The before faucet is pictured in the photo on the lower right. You can see the difference switching out the faucet made to the overall look of the vanity. The strawberry water? Well, that is one of the perks of doing a job for a friend!

The little decorating touches and glimpse of Easter Wendy added to the room made it just perfect!

finished Chateau grey bathroom vanity pleasure in simple things blog

The only thing better than helping a friend with a painting project? Helping a friend with a painting project that involves a family heirloom! That is the case with the next project I have almost completed and will be sharing soon!

yellow roses pleasure in simple things blog

Thanks so much for stopping by. Remember to take pleasure in simple things, Jackie
2 comments

diy journal

March 8, 2016

putting together a diy journal pleasure in simple things blog

You can make a great journal with a basic computer and some office supplies. Professional binding is not needed for great DIY journal results!

I made this hiking journal using regular copy paper. To add a little style, I printed the cover page on a slightly heavier stock I found in brown at a craft store.

journal project pleasure in simple things blog

To make empty journal pages, I just decided how many pages I wanted my final product to be. My journal was made by using standard 8 1/2” x 11” copy paper, used horizontally. When the journal is stapled and folded, it is a convenient size to carry on a hike!

journal cover pleasure in simple things blog

The beauty of making a journal yourself is that you can use any design or color you may want. I chose a compass design printed on the cover of mine to coordinate with a hiking theme. Set up the cover you’d like on your home computer, selecting landscape or your page orientation. If you set the layout into two columns, it is pretty easy to figure out how the page will look when it is folded. Once you have created and printed out a cover page the way you like it, you can use a copy machine to copy the page onto the colored stock.

twig pencils for a hiking journal pleasure in simple things blog

If you decide to include some print on your inside pages, it can get a little trickier – you will probably want to make up a sample book to be sure the pages are laid out properly and you may need double-sided copy on some or all of the pages. Once the pages are stacked the way you like, use a long-arm stapler to add two staples (the good side facing the outside of your journal). Then, just fold.

embelllished pencils diy pleasure in simple things blog

This same method is great for creating a DIY wedding program. For this, you can add a cord or ribbon to the binding.

I hope I have inspired you to create a DIY journal!

Thanks for stopping by! Remember to take pleasure in simple things, Jackie

no comments

« Previous Entries     Next Entries »