Subscribe to Pleasure in Simple Things via RSS ReaderFollow Pleasure in Simple Things on InstagramFollow @InSimpleThings on TwitterLike Pleasure In Simple Things on FacebookFollow Pleasure In Simple Things on PinterestEmail Jackie

diy nautical necklace

July 30, 2013

diy nautical necklace

I have never made any jewelry.  When I see some of the beautiful beads in the craft store, I am tempted to make something.  The thing is, it seems when you add the price of all the items needed to make a piece, it can be much less expensive to buy something already made!  Some day I plan on experimenting with jewelry making with my sea glass collection, but today I want to tell you about a necklace I created for less than $5!

A while back, I ripped a photo of a necklace I really liked from a magazine…it had a nautical feel to it since it was made from rope.  But, at $215., it was way beyond my accessories budget…actually, I don’t even have an accessories budget!  So, $215. more than my budget!

diy necklace collage

I was able to create the same look as the necklace in the magazine with a piece of rope from the marine store (less than $2.) and some Plasti Dip I had left over from my seafood fork project.  I got a little fancy and bought a bracelet clasp and some wire to use as an attachment and the total for supplies still came out under $5.

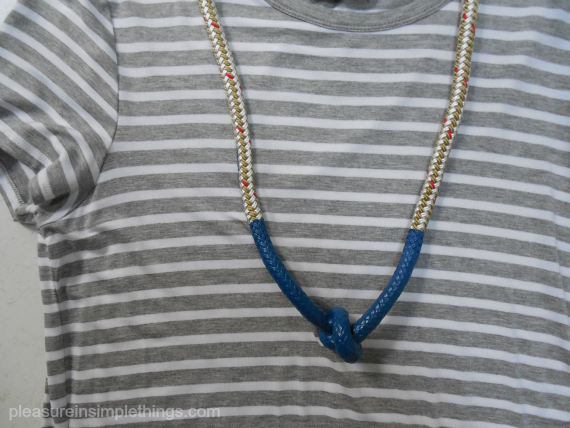
The best part is that I love the necklace!  I thought I would wear it with t-shirts, but I really like the way it looks with my gray and white striped long t-shirt dress…so perfect!  All I did was to knot the rope and dip it in Plasti Dip.  The necklace I saw had a red accent, but I decided to use blue since I had some blue Plasti Dip on hand.  I liked the look of two coats of Plasti Dip, but you can easily add more coats if you want the colored area to have a thicker look.

diy necklace

When you buy the rope at the marine store, it is best to get the exact length you want, because they will burn the edges for you to prevent it from unraveling.  There are plenty of different rope options to choose from and the cost is calculated per yard.  I thought the craft store would have some type of clamp to use as a fastener, but I couldn’t find one large enough to fit the diameter of the rope so I crafted a fastener out of a bracelet fastener.  Maybe a jewelry supply store would have something different or, another fastening option would be to tie or fuse the two ends together – slipping the necklace over your head.

So, that is a simple way to create a nautical feel necklace!  I think knotted napkin rings dipped in Plasti Dip would be another great variation on this project.  Plasti Dip can be tinted any color, so there are plenty of color options…have fun with it!

Thanks so much for stopping by.  Remember to take pleasure in simple things, Jackie

Sharing at Elizabeth & Co. and Silver Pennies.

1 comment

summer chillin’

July 26, 2013

Lil' Pop Shop Chocolate Salted Caramel Brownie

I adore frozen treats…Popsicles, freeze pops, snow cones…I love them all! A simple pleasure is definitely an icy pop on a hot summer day! Today’s Friday field trip is to Lil’ Pop Shop…a ‘cool’ store in Philadelphia that creates ice pops from natural ingredients.

The shop also has a food truck, and because I have a dream of creating and running a food truck myself someday, I always enjoying checking out food trucks that sell food I would be proud to serve myself. The Lil’ Pop Shop in Philadelphia has one of these trucks. Hand-crafted in small batches using seasonal ingredients, the ice pops are sold in the shop and from the truck that travels the Philly streets.

chocolate brownie ice pop

A Chocolate Salted Caramel Brownie ice pop from Lil’ Pop Shop in Philadelphia.

Lil’ Pop Shop owner Jeanne Chang, trained as a pastry chef at the Culinary Institute of America, comes up with inventive ice pop flavor combinations that truly appeal to me.

Some of the flavors?

To name a few… Red Hot Mango & Chile Pepper, Earl Grey with Vanilla Bean & Black Pepper, Chocolate with Salted Caramel Brownie, Raspberry Lemonade, Pineapple Basil, Vietnamese Ice Coffee, Green Tea with Mochi, and Goat Cheese with Black Raspberries & Honey.

On my last visit, Creamy Sweet & Salty Summer Corn was just added as a seasonal selection.

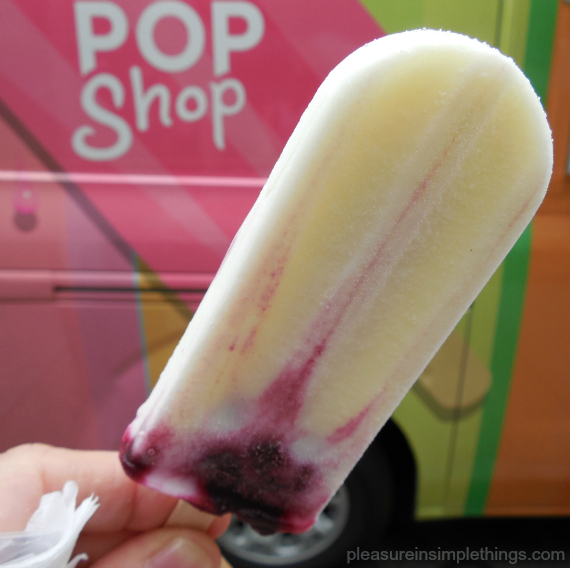
raspberry ice pop

Goat Cheese, Black Raspberry & Honey Ice Pop from Lil’ Pop

Shop in Philadelphia.

Would you like to try making your own unique flavored ice pops? You can start with this recipe, courtesy of Jeanne Chang at the Lil’ Pop Shop:

Avocado Coconut Pops

  • ½ cup coconut milk
  • ¾ cup water
  • ½ cup sugar
  • 2 small, ripe avocados
  • 2 Tablespoons lemon juice
  • Pinch of salt

Bring water and sugar to a boil in small saucepan until sugar is dissolved. Cool to room temperature. Cut and remove pits from avocados. Combine sugar-water mixture, coconut milk, lemon juice, salt and avocados in blender or food processor and puree until smooth.

Use mixture in your preferred molds. Freeze until solid. To unmold pops, dip the mold into warm water for a few seconds. Each recipe makes 8 to 10 pops, depending on your mold.

Lil' Pop Shop Food Truck in Philly

Try creating some unique flavor combinations of your own this summer! Don’t be restricted by traditional flavors…I am planning on experimenting with some farmer’s market purchases! Do you know what Popsicle lists as their best-selling flavor? Cherry. Sounds pretty boring to me. ;)

Thanks for visiting! Have a wonderful weekend!

Remember to take pleasure in simple things, Jackie

Sharing at The Tablescaper.

1 comment

pastry bites two ways

July 23, 2013

lemon raspberry pastry bites

I love bite-sized desserts.  People feel less guilty about eating a wonderful dessert when it is small. After all, there are less calories in a lot of little desserts, right?  Plus, an individual size is so pretty and easy to serve.

I am going to show you how easy it is to make these pastry bites two ways…lemon raspberry and cannoli.  Both use the same individual sized pastry shell.

Because the individual shells for these desserts can be made ahead on the morning you will be using them, it is a great dessert for serving a crowd. 

 lemon raspberry bites

For lemon raspberry pastry bites, the shells are filled with lemon curd and topped with a raspberry.  Lemon curd is really tart and gives a great big zing to this little bite.

There is some really great quality lemon curd that you can buy premade…often it is less expensive than buying the ingredients to make it yourself.  Trader Joe’s has a good one (since you only use 1 tsp. per bite, you can make 90 pieces with the one 10.5 oz. jar). If you would rather make it yourself, Ina Garten’s recipe is my favorite.

Just before serving time, carefully fill each shell with lemon curd, top with a raspberry, garnish with a little piece of mint, and dust with confectioner’s sugar.

 cannoli pastry bites

Cannoli pastry bites are filled with cannoli cream.  I love cannoli cream, but I am not a big fan of cannoli shells.  The reason could be because I am not a big fan of fried foods.  In any case, I much prefer cannoli cream with puff pastry and that is the why I decided to create a dessert with that combination. 

Use your favorite cannoli filling recipe.  Mine is by Alex Guaranschelli.  Click here for the recipe. 

Fill the shells just before serving.  Garnish with mini chocolate chips and drizzle with melted chocolate if desired.  Dust with confectioner’s sugar. 

If you use Alex’s recipe, it makes a lot.  Because you only need 1 tsp. for each pastry bite, you will have plenty left over. You can reduce the recipe, or use the extra, as I do, for deconstructed cannolis as a special treat for your family or guests.  I get the broken cannoli shells from an Italian bakery and serve the delicious cannoli filling with a garnish of mini chocolate chips…a sweet version of a chip & dip. :)

deconstructed cannolis

“Deconstructed’ cannolis are a great way to use leftover cannoli filling. Serve a bowl of cannoli cream with broken cannoli shells. Garnish with some mini chocolate chips. A sweet & stylish ‘chip & dip!’

Making the Shells

To make individual shells, use pastry sheets purchased at the grocery store.  I have used phyllo dough many times in my life…I can’t even count the number of times I have made baklava…but it is a little tricky if you haven’t worked with it.  I am going to give you instructions using the store bought sheets…I did a test before I put this post together and you can get a great result using the store bought sheets.  They are called puff pastry, pastry dough sheets and are located in the freezer section of your grocery store.  The box is 17.65 oz. and contains two sheets of pastry dough. 

The key to making a successful shell is in the cutting.  The dough needs to be really, really cold when you cut the shape so that the edges don’t seal.  Sealing the edges would prevent the pastry dough from rising.  This is the reason you should not wait for the dough to defrost, cut it as soon as you are able.  For the same reason, do not add an egg wash or brush with milk…if any of the wash gets onto the sides of the shell, the edges will seal. 

making individual pastry shells

You will need two different sized cookie cutters…I used one that measures 1 3/8” in diameter and one that is 2 3/8“ diameter.  I bought a set of graduated cookie cutters in a flower shape at Home Goods…5 cutters in various sizes came in the package for a price of $2.99.

Using the larger cutter, cut the shape from the dough.  Put it onto a parchment lined cookie sheet.  Using the smaller cutter, cut a center in the first shape, but do not cut all the way through…pierce the dough, but do not make a cut.  This will create the hole for your filling.  Each sheet will make 12 pieces if you use a similar sized cookie cutter as mine, so the box of two sheets will make 24.

Bake on parchment paper at 400 degrees for 10 to 13 minutes. 

individual pastry shell

After the shells are completely cool, use the point of a knife to remove the inner shape.  You can push it down if you are having trouble removing it.  After you have done this to each shell, they can be saved for later to fill.

lemon raspberry pastry bite

You can have your filling ready ahead of time and can make the shells in the morning.  All you need to do is to assemble when ready to serve!  Now that you know how to make the individual pastry shells, you can come up with your own versions using your favorite fillings!  Enjoy!

Thank you so much for visiting!  Remember to take pleasure in simple things, Jackie

Sharing at The Shabby Nest and Craftberry Bush.

1 comment

a special garden tour

July 19, 2013

garden tour photo

When I asked my friends Phyllis & John to agree to have their home included on a garden tour; they were hesitant.  In my mind, they were the perfect couple to ask…their yard was certainly my favorite.. Geez, I would like to retire to their yard!  They live on a golf course, have a beautiful built-in pool, a vegetable and herb garden, a potting shed, and gorgeous flowers and plants everywhere…what more could you want? 

potting shed on the garden tour

Anyway, once I explained that the tour was a scholarship benefit, they readily agreed to participate.  Today for Friday field trip, we are visiting the breathtaking grounds surrounding their 1852 home in Fairfield County, Connecticut on the day of the garden tour.  

view overlooking golf course

It was very hard to edit this post since there are so many facets to this yard, designed and planted solely by the homeowners.  Such a fun yard to explore…Phyllis has created beautiful vignettes in every nook and cranny.   

vegetable garden on garden tour

John’s ‘baby’ is the vegetable garden.  A retired giant pumpkin planter (yup…he once grew a prize winner that weighed 625 lbs!), he now concentrates on vegetables and herbs.  In addition to the planting, he built the stone walls and fences that so beautifully surround the space.  Yes, that is an outhouse in the back of the garden…original to the property.  John also crafted the handsome birdhouse that stands in the front section of the property.

vegetable garden on the garden tour

Friday field trip garden tour

Friday field trip garden tour

Friday field trip garden tour

What do you serve for refreshments on a garden tour?  I really wanted to create a menu that was true to the house…concentrating on fresh vegetables, herbs, and flowers.  I spent quite a bit of time on it and finally decided on rosemary sea salt shortbreads, rosewater meringues, fresh tomatoes with basil and marinated mozzarella, watermelon with fresh ricotta drizzled with extra virgin olive oil and finished with salt, pepper and mint, and lemon raspberry tartlets.  Beverages served were cucumber water with nasturtium and pansy ice cubes and home made iced tea lightly sweetened with simple syrup infused with lemon and mint.

Friday field trip garden tour food

Friday field trip garden tour

Friday field trip garden tour pool

Friday field trip garden tour

Friday field trip garden tour

I hope you enjoyed our Friday field trip garden tour!  Thank you John and Phyllis…your yard is truly a labor of love and it shows!  Thanks also to the beautiful and talented gals – Emma and Sara.;)

If you haven’t already, please ‘like’ my facebook page to see additional photos.  You can also follow me on Instagram and Pinterest.

Friday field trip garden tour front door

Have a wonderful weekend and remember to take pleasure in simple things, Jackie

Sharing at Mona’s Picturesque, Little Red House, and Craftberry Bush.

6 comments

lovely apron upgrade

July 16, 2013

diy apron

diy apron

Today I wanted to share an easy way to upgrade a standard chef’s apron into something lovely. I was recently involved with organizing a charity garden event and I really wanted the hostesses to have coordinating aprons. The gardens were so amazing and we had some very tasty food prepared with a flower and herb theme…I needed aprons that were as lovely as the rest of the event.

Not wanting to spend much money, I decided to use a few embellishments to make a white chef’s apron contribute to our theme. If you know someone in the restaurant business, you may be able to score an apron or two at no cost. If not, you can purchase one at a restaurant supply store for $5 or $6.

The first thing I did was to add a flower photo onto the top of the apron front. This was easy to do with T-Shirt transfer paper. You can pick this up at any store that sells office supplies. I found my package at Target near the copy paper. I bought Avery brand Ink Jet T-Shirt Transfers. Six 8 1/2″ x 11″ sheets come in the container. Since I was printing a 5″ x 7″ photo, I was able to print two photos on one sheet. I chose a photo I had taken last spring of my lilly of the valley.

pretty napkin basket

I printed the page using a color printer and ironed the photos onto the aprons, carefully following the directions on the transfer package. I decided to add a little sparkle around the edges of the photo by applying some silver sparkle paint with a cotton swab.

pocket on diy apron

Then, I added a couple pockets by sewing on a rectangular shaped piece of fabric I found on the clearance table at the fabric store. First I sewed a hem on one of the long sides of the fabric – this would be the top of the pocket. Then, I attached the piece of fabric by sewing the two sides and the bottom

onto the apron. Sewing vertically down the middle of the pocket created the two pockets.

Rosemary sea salt shortbreads – one of the treats I made to serve at the Garden Tour.

And that was it! Using a photo transfer sheet and some scrap fabric that coordinated with my photo, I was able to upgrade my standard white apron into something garden party worthy!

diy apron

You can do the same for your next event!

Hope you enjoyed today’s post on upgrading an apron. I look forward to sharing more about the garden event in future posts.

Thanks for visiting! Remember to take pleasure in simple things, Jackie

Sharing at A Pinch of Joy and Timewashed.

3 comments

you scream, i scream

July 12, 2013

ice cream

We have been making a lot of homemade ice cream at my house this year with our old hand crank ice cream maker…the last batch was my favorite…Turkish cherries and dark chocolate in a country vanilla base.  Yum!  So, I haven’t really been motivated to visit my favorite ice cream shop.  But, this week I did end up going for ice cream, just not to my usual spot.

Ice cream in Newtown

One of my friends had never visited The Creamery at Ferris Acres Farm in Newtown, so I took it upon myself to introduce her to The Creamery and I am sharing the visit with you on today’s Friday field trip .

cow

Ferris Acres is the last working diary farm in Fairfield County and it certainly is a beautiful location to enjoy some good quality ice cream.   Something about a farm and cows just seems to make the ice cream taste all that much better.  And, flavors?  Yeah, they got ’em…the flavors in these photos are not even the complete list of offerings…

Ice cream flavors at Ferris Farm in Newtown

I really enjoy a creative name for an ice cream flavor…it’s almost as good as a great nail polish color name or paint color name.  They have a few good ones, don’t you think?  I had a scoop of coconut chocolate chunk…not one of the more creative names on the list, but a delicious ice cream!

ferris farm ice cream flavors

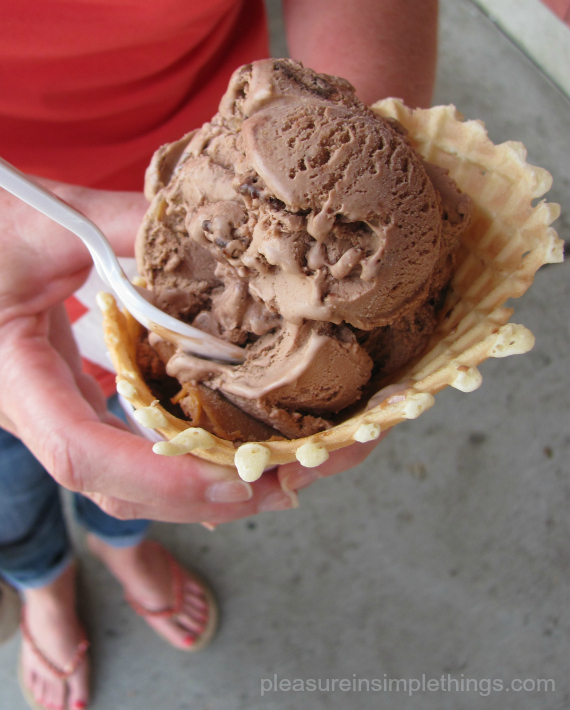
I also had a scoop of Salty Cow…delicious!

ferris farm ice cream

As you can see, my friend certainly made her first visit count…waffle cone and all!  I have a strong feeling she will be back for a visit!

Ferris Farm in Newtown, CT


eating ice cream in Newtown

How could I resist snapping a photo of this happy customer..yes, life is good with an ice cream cone in hand on a hot day!

ice cream at Ferris Farm

Can’t imagine why this customer didn’t convince his parents to take the “The Creamery Challenge!”

Ferris Farm Ice cream challenge

Hope you enjoyed our visit to Ferris Acres Creamery in Newtown, Connecticut…if you find yourself in the neighborhood, be sure to stop by Sugar Street!  Yes, that is the name of the street!

Ferris Farm sign

Have a really great weekend and remember to take pleasure in simple things, Jackie

Sharing at The Tablescaper.

7 comments

beachy shower gift

July 9, 2013

Mr. & Mrs. beach towels

Need a gift idea for a bridal shower?

On previous posts we shared creating a beach themed gift wrap, beach theme decorations, and a beach themed shell tote bag tie-on.Since I have gotten some emails asking what was actually inside the tote bag gift, today I am sharing a beach themed gift idea for a bridal shower.

This year, my go-to bridal shower gift was his and her beach towels.A nice beach towel is a necessity for all beach lovers and a natural gift choice for a summer shower!I chose some really large, bright striped, heavyweight matching beach towels and had them monogrammed ‘MR.’ and ‘MRS.’ So cute!A great item to pack for a honeymoon. :)

beachy gift idea

(I love monogrammed towels – I always had my kids’ towels monogrammed with their names to hang in the ‘kids’ bathroom; avoiding any question of towel ownership!Even a college student can appreciate a way to help safeguard a towel that may be left in a laundry or shower room.Note:Monogramming a small child’s name on a beach towel for use on a public beach is not recommended! )

beachy bridal shower gift

You can package the towels in a beach tote or basket.Try to include items special or unique to the couple…maybe something symbolic to where they met or a special interest.The couple receiving this gift tote were wine lovers… so a bottle of wine, acrylic wine glasses, and cocktail napkins were included in the tote.Of course, the bottle of wine tucked inside needed to fit the theme!Also, a holiday ornament inscribed with the town where the couple met was tucked into one of the glasses.

beachy bridal shower gift

A gift tag attached to the pull of the tote was made using an old beach photo of the groom’s mom that was photocopied onto a piece of cardstock.

DIY gift tag

Personalizing your gift for the couple is the fun part!If you don’t know the couple very well, you can usually get a good sense of their interests and color preferences by reviewing their gift registries.

I hope this bridal shower gift idea will inspire you to create a gift tote to give to a special couple in your life.

Thanks for visiting, Jackie

Sharing at The Shabby Nest and Craftberry Bush.

no comments

making candles in the sand

July 5, 2013

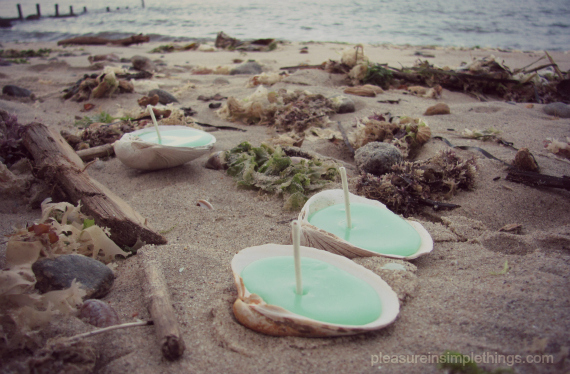
candles in scallop shells

For a long time I have wanted to make a sand candle like the ones I made as a kid.  Recently I came across a rock I painted back in junior high school and it got me thinking once again about making a sand candle.   So, today’s Friday field trip is a nostalgic trip back to my childhood to make some sand candles.

rock painted with owl

Back in junior high, our candle making was very basic – we melted candle wax in a tin can over a hot plate.  Rather than spoil the nostalgia, I decided to make my sand candle from memory and forgo any formal candle making research.

Candle makers probably use thermometers, scents, colors and other ‘fancy’ equipment for accuracy and safety.  My equipment is some wax and an old pan.  I did purchase a package of votive candle wicks from the craft store that I happen to notice when I stopped in to pick up a 1 lb. block of wax.  I think in junior high we just used twine dipped in wax.  So, I am going a little bit ‘high tech’ with this project. ;)

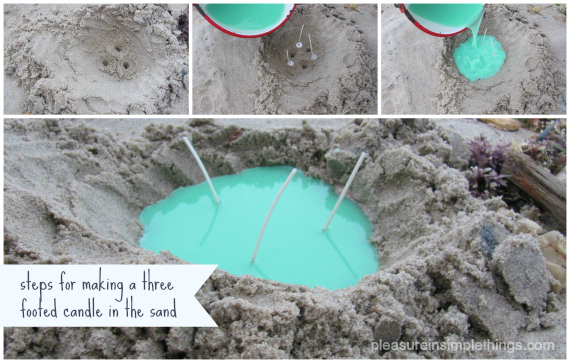
steps to making a footed candle in the sand

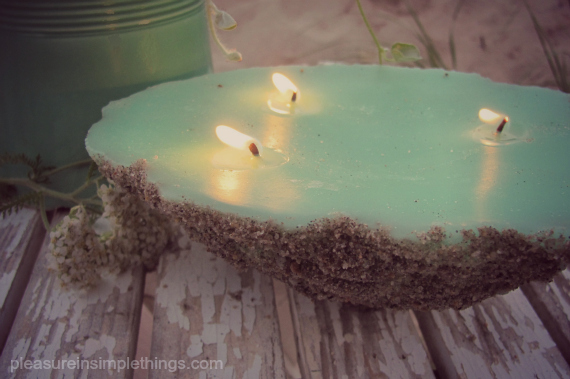
To make a sand candle, sand is used as the mold for the candle.  At low tide, the candle ‘mold’ is made in the sand.  I made an oval shape in the sand and then poked a stick into the bottom in three places to make three ‘legs’ for the candle to stand on.  It’s a very simple premise.  And then, before the tide comes up again and the wax has hardened, I dig the candle out of the sand.  Sand adheres to the hot wax, creating a sandy outside to the candle.

I really didn’t want to keep the wax its natural white color.  Thinking a light lavender color may be pretty against the sand, I checked to see if I had a lavender crayon to add a little tint…nope.  I chose a ‘sea green’ crayon from the colors I had and threw it into the pot with the wax.

making scallop shells in the sand

I used an old pot that I keep specifically for various craft projects –like tie dyeing, or other projects where I don’t want to ruin my good pans.  I melted the wax using a double boiler method, melting it slowly since I wasn’t sure about the safety of melting wax and wanted to be as cautious as possible.

candle made in the sand

Once the wax melted, I used a pot holder to carry the pot out to the mold in the sand.  After I poured in the wax I needed, I poured the remaining wax into shells I found on the beach after adding wicks from the bag I had purchased.

sea green shell candles and flowers

candle in a scallop shell

And, that is it!  The hardest part is timing the tide!  If you don’t have a beach, you can certainly use this method with a bucket of sand…and then you don’t have to worry about the high tide coming in and taking your candle out to sea! ;)  I was so excited about my nostalgic creations, the next day I couldn’t wait for it to get dark so I could light them!

candles in scallop shells

dusk at the beach with shell candles

Now that I got that out of my system, I wonder what other crafts from my past I can recreate…

flowers at nightfall at the beach

Until next time…

Thanks for visiting.  Remember to take pleasure in simple things, Jackie

Sharing at The Shabby Nest.

4 comments

seafood swag

July 2, 2013

diy seafood forks

You may already know that I am a big Plasti Dip fan from my wooden spoon tutorial.  Today, I am going to show you how I used Plasti Dip to give an old set of seafood forks new life by putting a colorful plastic coating on the handles. 

'before' seafood forks for Plasti DipI was lucky enough to be the recipient of an old set of seafood forks from my friend Terry…thanks again T ;)  If you don’t have a friend like mine to give you good stuff to recycle, you can head to a thrift store.  The forks don’t need to match since the color you choose for the Plasti Dip will tie the set together.

I wanted my seafood fork set for eating shellfish on the beach and decided on royal blue for my Plasti Dip color.  Following the directions on the ‘Make Your Own Color Kit’, I used blue and a little bit of black to mix the color I wanted. 

eating shellfish at the beach

DIY seafood forks

Plasti Dip is very easy to use.  You can follow my spoon tutorial if you need some instruction.  In the same way that I dipped the wooden spoons, I dipped each seafood fork into the Plasti Dip.  Easy! 

revamped seafood forks

After allowing for drying time, my forks are ready to use!

seafood fork DIY

Now I have a colorful supply of seafood forks that I love!  Mussels anyone?

shellfish on the sand

Thanks so much for visiting!

Remember to take pleasure in simple things, Jackie  Be sure to ‘like’ my facebook page and follow on Instagram to share more summer photos!

Sharing at Coastal Charm.

6 comments

monthly book giveaway for july!

July 1, 2013

Wonder by R. J. Palacio

Congratulations to Emma from Connecticut, winner of the June giveaway book Little Princes by Conor Grennan!  Emma, I know you will enjoy this wonderful read signed by the author.  Now, for our July giveaway selection…

Wonder tattoos

Temporary tattoos distributed by the Fairfield Library during the Fairfield University appearance of author R.J. Palacio, who’s book Wonder was chosen for Fairfield’s 2013 town read.

I don’t like vampires…or zombies…so; I am not a big reader of Young Adult fiction.  Yet, every once in a while a really special book shows up in the YA category that deserves attention.  Books like The Fault in Our Stars or The Book Thief come to mind.   Recently, a book categorized for even younger readers –  9 to 12 year olds -was added to my list of recommended titles.  This book is Wonder by R. J. Palacio, and it is a must read for all ages.

I was lucky enough to catch an appearance by the author when she was in Fairfield, Connecticut, and I am thrilled to be able to give away a copy of Wonder signed by R. J. Palacio to one of my blog readers.  Just leave me a comment during the month of July to be entered into the drawing…each comment qualifies as an entry.

The book’s message?  Choose kindness.  Sounds simple, right?  It certainly should be…and this is the sentiment illustrated beautifully in the story of a young boy with a facial deformity, named August, who mainstreams into school for the first time in fifth grade.  The book starts from Auggie’s point of view, continuing on with the perspectives of others to help tell this story of friendship and acceptance. 

R. J. Palacio, author of the New York Times best seller Wonder.

R. J. Palacio, author of the New York Times best seller Wonder.

Inspired by her own personal experience, Ms. Palacio touches the hearts of all who read the story of young August.  Put this book on your summer reading list.  You will be so glad you did.  And when you finish, you can let your children read it. :)

Be sure to enter to win this marvelous book!

Have a wonderful start to July!  Remember to take pleasure in simple things, Jackie   Instagram users, please read on… Please share your simple pleasures on Instagram!  Use these word prompts for July to inspire photos to share.  Be sure to tag your  #pleasuregram …share today or every day!  Enjoy!

Instagram #pleasuregram word prompts for July

no comments